How I Make Light-Weight Hexagon or Honeycomb Telescope Mirror Blanks
By casting them myself in a kiln
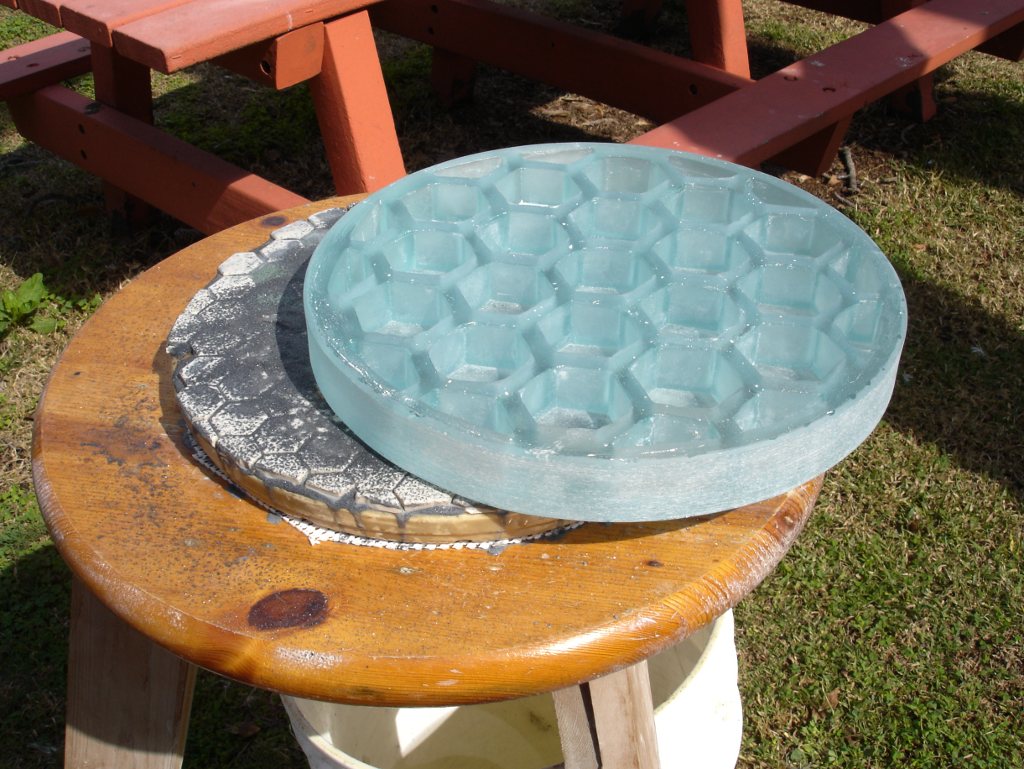
This is a photo of a 12.5 inch diameter, 1.5 inch thick, telescope mirror blank that has been lightened by casting the mirror in a mold that made
lots of hexagon-shaped pockets in the back of the mirror. This is the story of how I did it.
Why light-weight mirror blanks? Well, telescope mirrors are made from thick glass. Thick glass is heavy, no, really heavy.
Most people don't realize how heavy glass really is because they usually only deal with small pieces of thin plate glass. Handing a large telescope mirror
to someone who has never seen one before, is a revelation to them about just how heavy glass really is. I like to tell them that it is as heavy as granite.
In a large telescope, the primary mirror can constitute 1/3 or more of the weight of the entire instrument. Supporting the massive weight of the mirror requires that
the rest of the telescope be sturdily built. The result is that large telescopes can be shockingly heavy. I know this first hand because I have thrown out my back
several times moving my relatively "easily portable" 17.5 inch Dobsonian Telescope. So I decided to try making
some-light-weight mirror blanks, just to see if I could do it.
Let's start this story at the beginning. About two years ago I bought a kiln and began experimenting with making my own
telescope mirror blanks
by fusing together disks of thin glass in my kiln to make the thick glass needed for telescope mirrors. The process works great, and I have produced wonderful
solid blanks up to 14.5 inches in diameter and 1 1/2 inches thick in my new, bigger kiln. Once I had the process of making solid blanks pretty much perfected,
I wanted to try making light-weight mirror blanks.
So, how to make a light weight mirror? There are two schools of thought on that. One way is to make the mirror thinner. Telescope mirrors are generally
made of thick glass because thick glass is very stiff and won't distort, even under its
considerable weight. Thin glass is not very stiff and distorts easily even under its own weight. So mirrors are made thick to keep them stiff. Making a
mirror thinner leads to problems keeping it properly supported so it doesn't sag out of shape. The mirror cells get really complicated, and
sometimes the mirrors sag anyway.
The other way to make a light-weight telescope mirror is to keep the mirror thick so it will be stiff, but remove pockets of glass from the back in
such a way as to lighten the mirror without compromising its stiffness. Since the mirror is now lighter, but still thick, it has even less tendency to
sag and distort under its own weight than a solid mirror. The mirror cell can be very simple and low-tech. The problem is, to go this route, you need to
cast the mirror yourself. A daunting task for most people. I am not afraid of complex and time-consuming projects with steep learning curves,
(basically I was too dumb to realize I couldn't do this, so I went ahead and did it anyway) so I dove in and started experimenting.
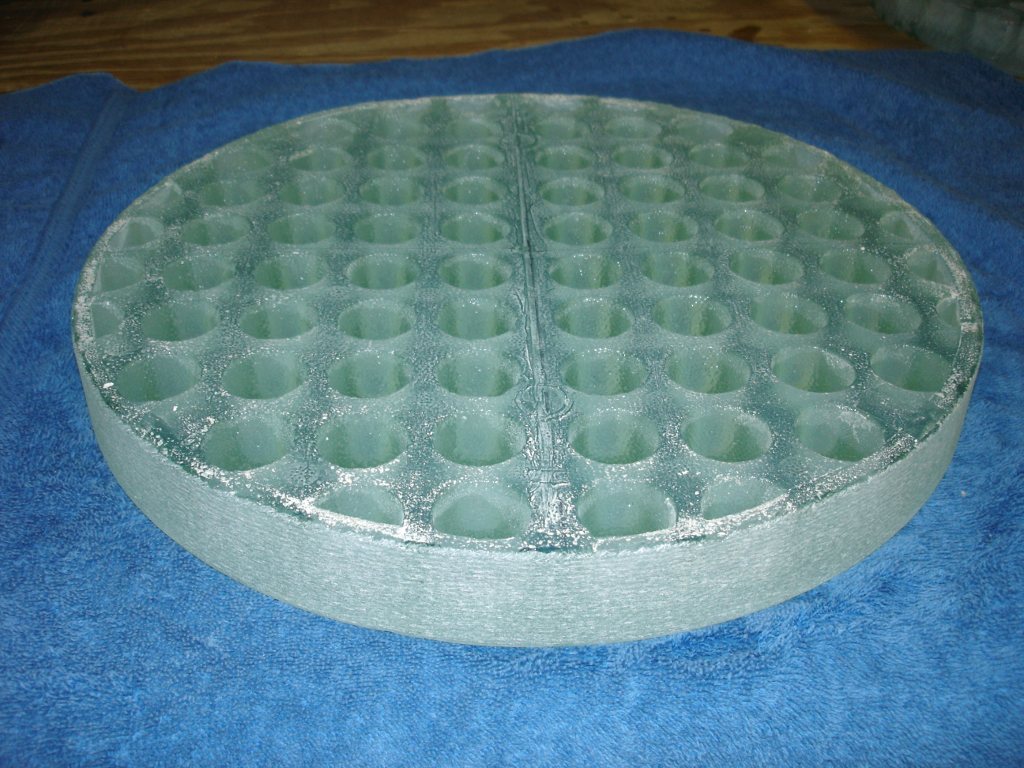
One of my first attempts at making a light-weight mirror blank resulted in my Waffle-Back design.
This mirror has a lot of small circular pockets in the back of the mirror to lighten it. This design works, and it sure is pretty, if I do
say so myself, but it doesn't lighten the mirror blank as much as it could. The amount of glass left between the circular pockets is excessive.
I played around with different sizes of pockets and different ways of arranging them, looking for improvements. I could improve the design, but
not as much as I wanted to. I stuck with circular pockets for a long time, because circles are easy to make. Eventually though, I realized that
hexagons would work much better, and abandoned the circles.
Why hexagons? Hexagons can be used to tile a plane with no gaps between them. Circles though, no matter how you arrange them, will always have
gaps between them. Those gaps represent excess glass. Naturally I do need gaps between the hexagons to make the supporting ridges
that keep the mirror thick and stiff. But those ridges are uniform in width, and I can control the width of those ridges easily by adjusting
the spacing between the hexagons. I could make the
gaps just big enough to do the job with no waste. The big problem I had was how to make the hexagons I needed? I tried tots of things, and none of them
really worked. I tried using hexagon cookie cutters. I tried making wood hexagon molds. I tried hexagonal chocolate molds. It was all an utter failure.
Then I had the eureka moment. I was wracking my brain trying to figure out where I could find hexagons in lots of different sizes for my experiments.
Suddenly I noticed a hex nut on a piece of equipment. The lightbulb went off. I slapped my forehead and said Duh! Hex nuts are hexagons. They come in
an amazing variety of sizes. They are easy to find and relatively cheap. I went online and found a table showing the dimensions of standard hex nuts.
I decided that 1 1/4 inch ID nuts were the perfect size for the pockets I wanted to make in the back of the mirrors. They are just a little
under 2 inches across the flats. So I popped down to Pinellas Bolt and Screw and bought a box of big nuts.
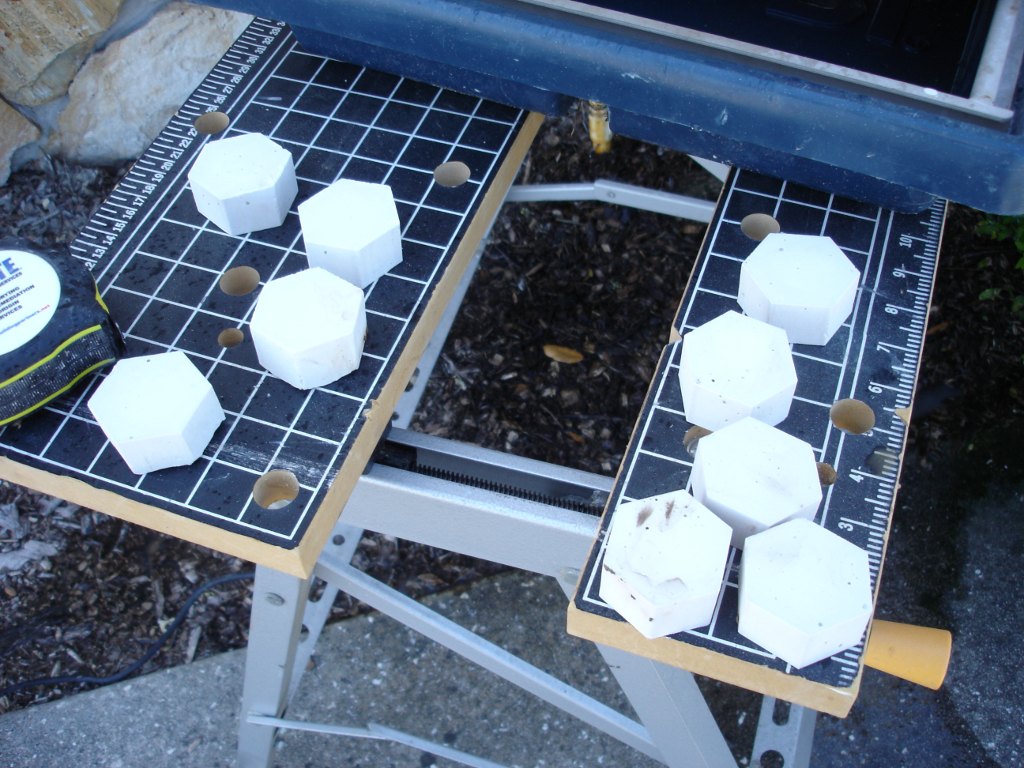
I can't use the nuts themselves to mold the pockets, but I can use the nuts as molds to make plaster hexagons the same size as the nuts. These plaster
hexagons then become the molds for the pockets in the back of the mirror blank. I arrange the nuts in a pattern that leaves 8 nut-shaped voids I can pour
plaster into.
The recipe for this plaster is 50% Hydrocal plaster and 50% 200 mesh silica flour (by volume) with enough water to make it soupy so it can
be poured. In just a few minutes the plaster hexagons are hard enough to break out of the nut molds. I clean up any rough edges or flashing with a rasp.
It may seem like a convoluted way to do things, but making the plaster hexagons this way actually goes fairly quickly and easily. In a short time I had a big
pile of hexagons made. The hexagons are 1 inch tall and 1 7/8 inches across the flats. I was now ready to make the mold for the mirror blank.
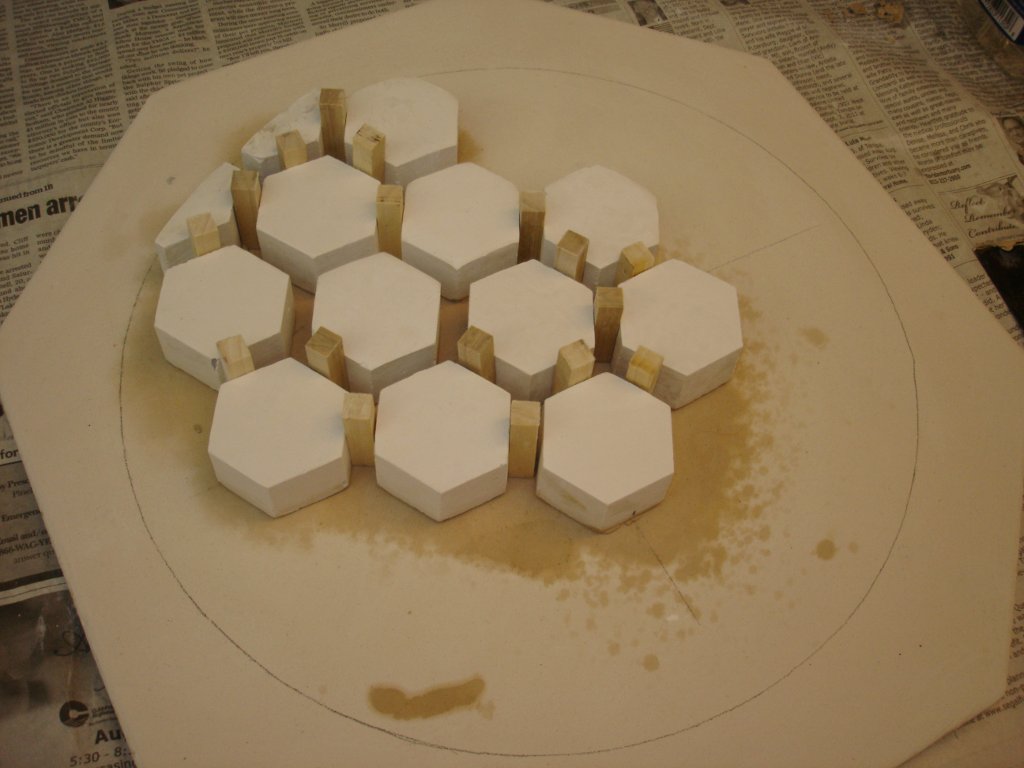
I had drawn up the pattern I wanted to make. I wanted to actually see the pattern and make sure there were no problems before continuing.
So I mocked up the pattern of the hexagons on a paper circle 12.5 inches in diameter. I cut some of the hexagons with a diamond tile
saw and shaped them with a belt sander to make the partial hexagons for around the edge. I used square wooden dowels 3/8 inch in size as
spacers to get the spacing between the hexagons the way I wanted it and keep it uniform.
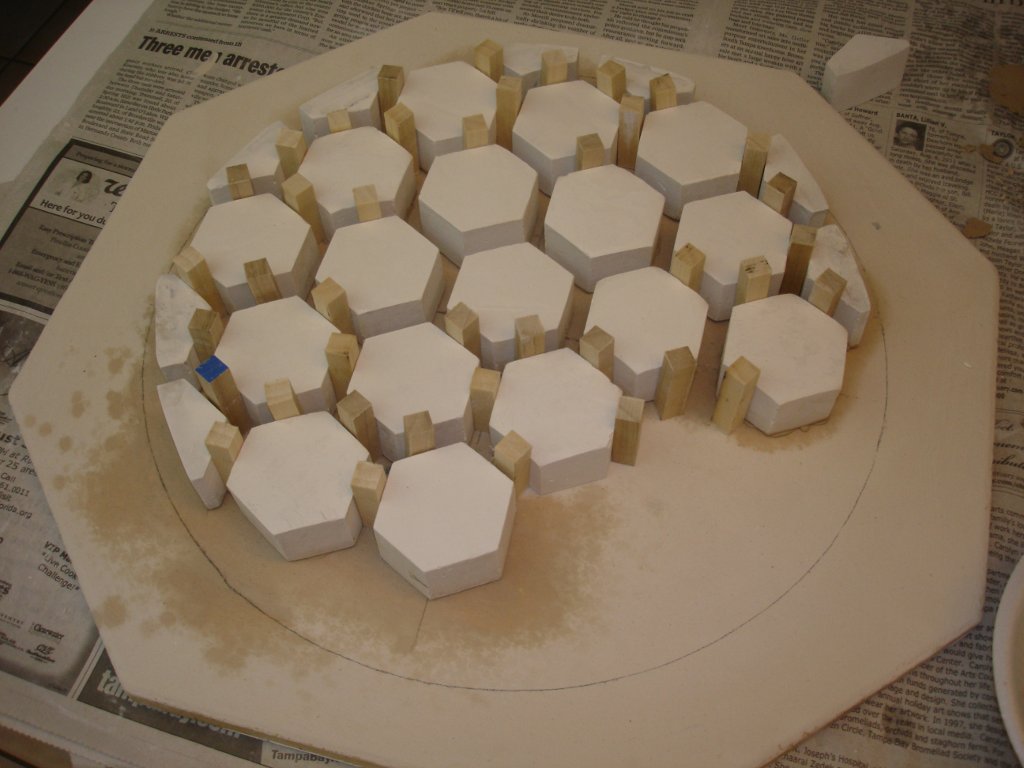
I start building the mold with a kiln shelf that has been well coated in kiln wash. I drew a 12.5 inch diameter circle on the
kiln shelf. This is the footprint of the finished mirror blank. The hexagons and partial hexagons will need to be arranged within this circle.
Again I am using the wood dowels to get the spacing right. To keep the hexagons from shifting around, I glue them down with a slurry of kiln wash.
To glue down the hexagons I mix up some soupy kiln wash and use a spray bottle
to wet down both the hexagon, and the position on the shelf where it will go. I then dip the bottom of the hexagon in the soupy kiln wash
and quickly put it in place. The plaster hexagon and the porous kiln shelf wick the water out of the kiln wash slurry in a matter of seconds,
and the hexagon locks in place. If I don't wet the pieces first, the kiln wash slurry hardens instantly. I have only a very short period
of time to maneuver the hexagon into place after it touches town on the kiln shelf before the kiln wash seizes up. If it isn't in the right
place, I have to break it loose, scrape off the hardened kiln wash, and try again.
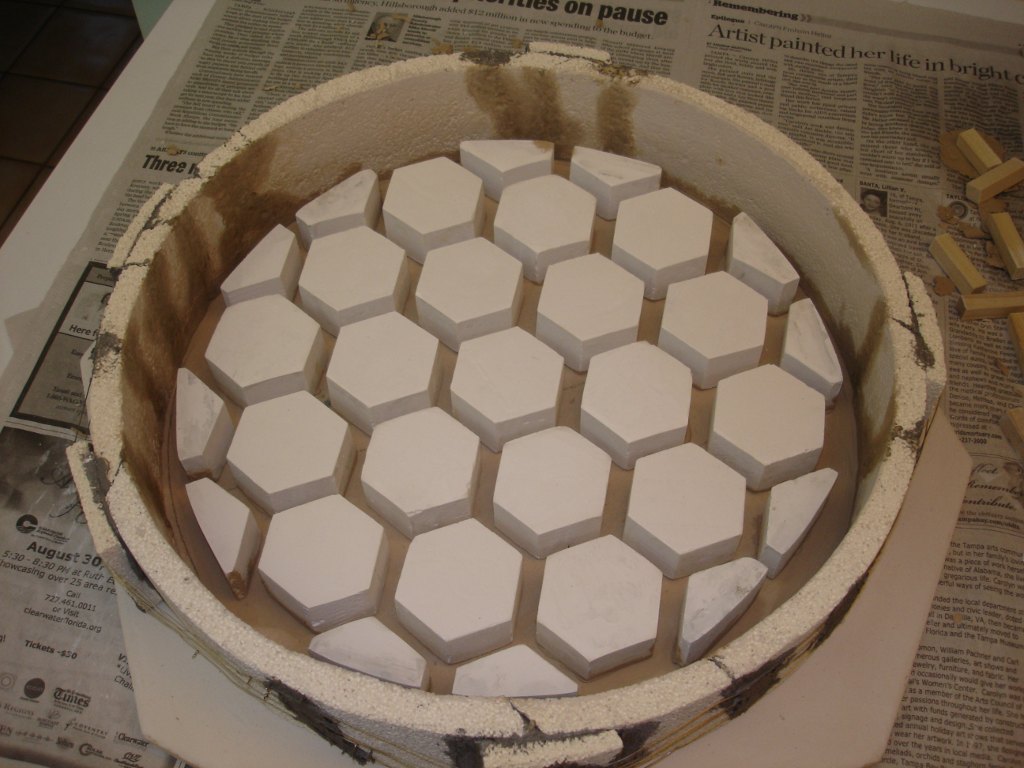
Once all the hexagons and partial hexagons are in place, I put the outer ring of the mold in place. The ring is cut from soft fire brick
with a band saw. The pieces are glued together with furnace cement. This particular mold has been used several times before. It is beat up
and has multiple repairs. Once the mold is finished, I place the shelf, with the mold on it, into the kiln.
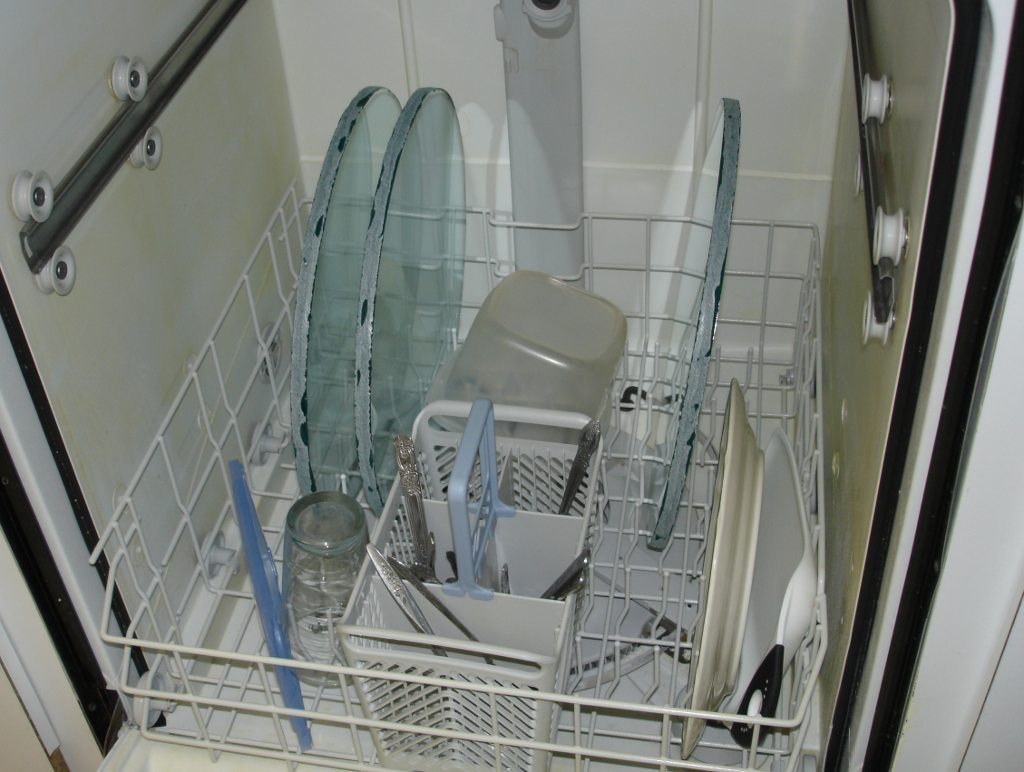
Here I am cleaning 3 disks of 1/2 inch thick glass in my dishwasher. These particular disks are 14.5 inches in diameter. I didn't have any
photos of the 12.5 inch diameter disks I used in this blank. After thoroughly cleaning 2 disks of glass 12.5 inches in diameter and 1/2
inch thick, I place them in the mold. and fire up the kiln.
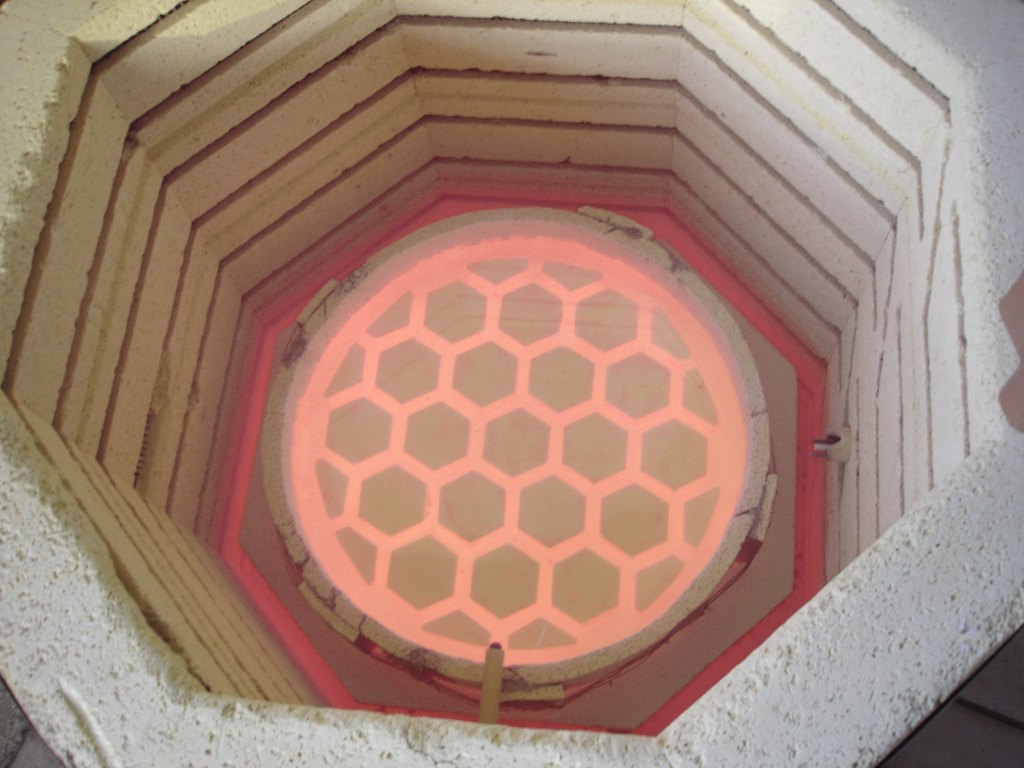
Here is a shot of the blank cooking in the kiln. At this point, the two disks have fused together, and slumped down to fill the spaces
between the hexagons, and the gap between the hexagons and the outer ring. Now comes three days of annealing and slow cool-down to room temp.
I have had several people write to me and ask what firing schedule I use for making these blanks. Here it is below.
I have a ramp-soak controller for my kiln. It took a lot of
experimenting to find the proper times and temperatures for annealing. I started with the Bullseye Glass annealing tables, but got
terrible results with the float glass. After ruining a lot of glass I discovered that I needed to go about 150 degrees F higher than
the Bullseye recommended temperatures, and about four times as long on the ramp time of the initial cooling rate. This schedule generally
yields a well annealed blank.
Firing Schedule
Ramp Time
300
60
115
AFAP
2000
1000
1400
Temperature
950
1250
1750
1050
950
850
90
Soak Time
0
60
60
400
0
0
0
Times are in minutes. Temperatures are in degrees F. AFAP = As Fast As Possible (I open the kiln lid to get the temperature down quickly
so as not to linger in the devitrification zone). The above photo was taken during the rapid cool-down to the annealing temperature.
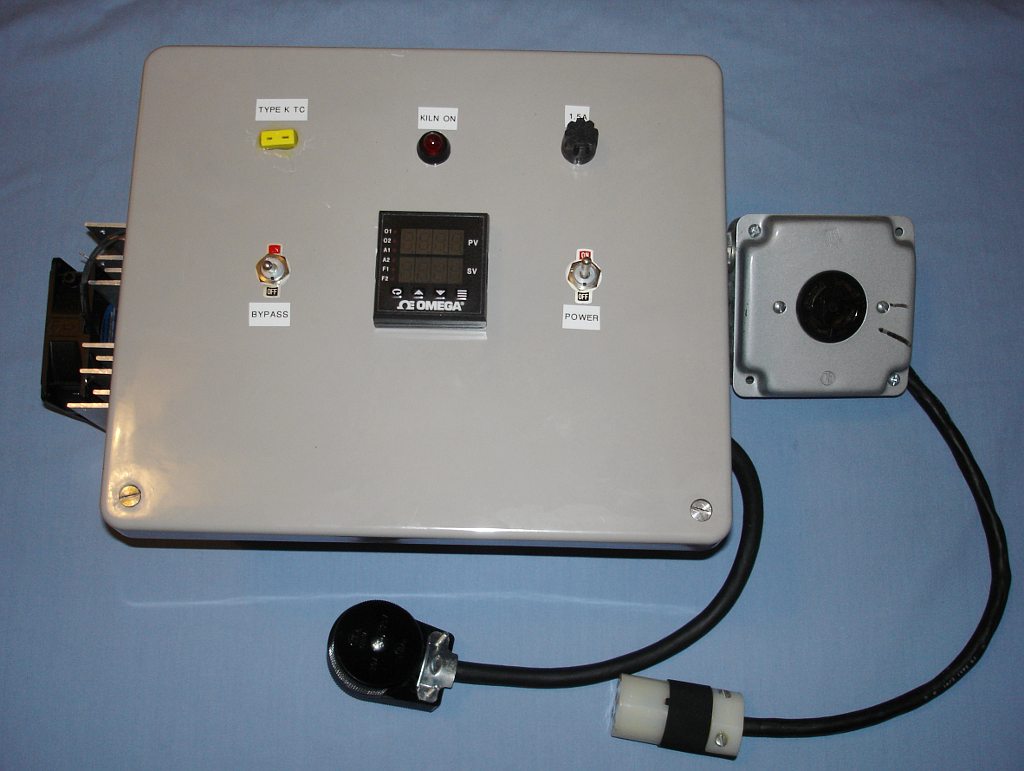
I use a home-made 8-segment ramp/soak controller to control my kilns for firing the telescope mirror blanks. Click the photo to see how I built the controller.
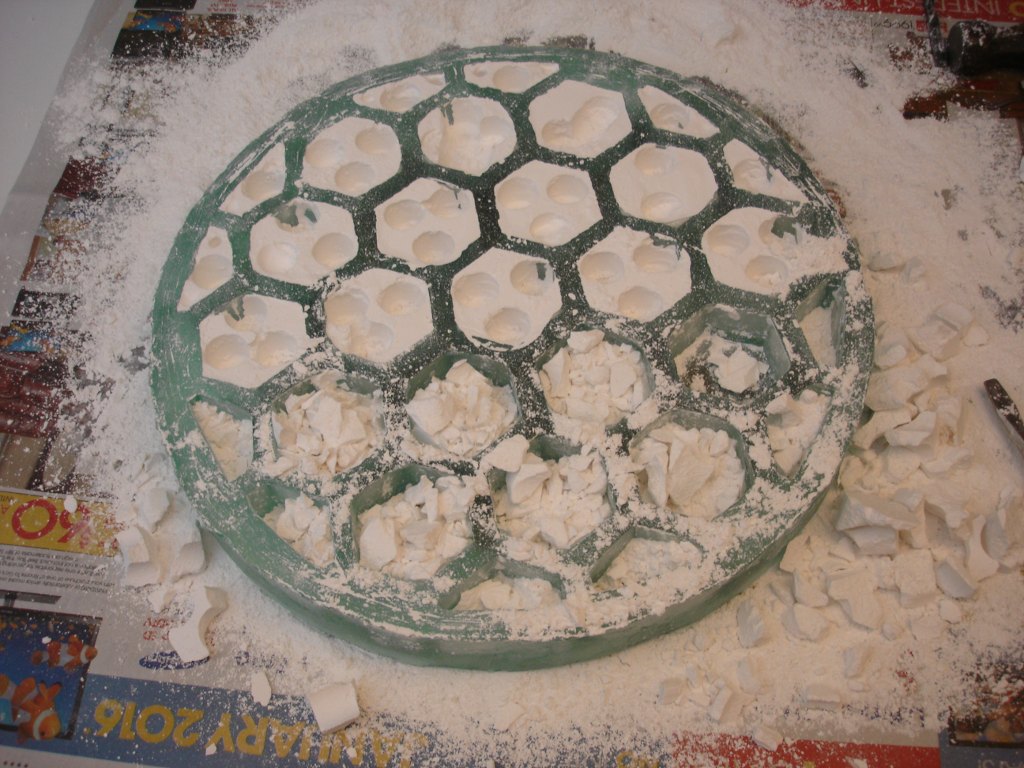
After the blank had finally cooled down to ambient, I took it out of the kiln, and removed the outer mold. Then it was time to start
cleaning the plaster out of the hexagons and partial hexagons. A very messy and delicate job. Fortunately the plaster is rendered quite soft
and powdery by the temperatures involved in casting glass. So it comes out fairly easily.
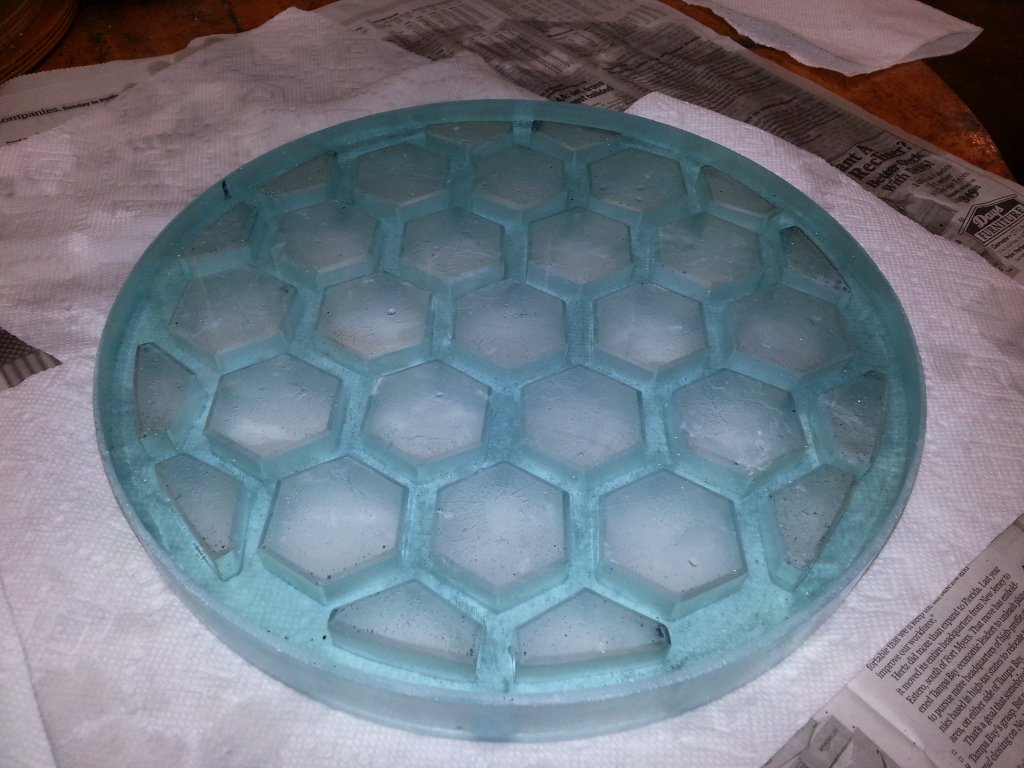
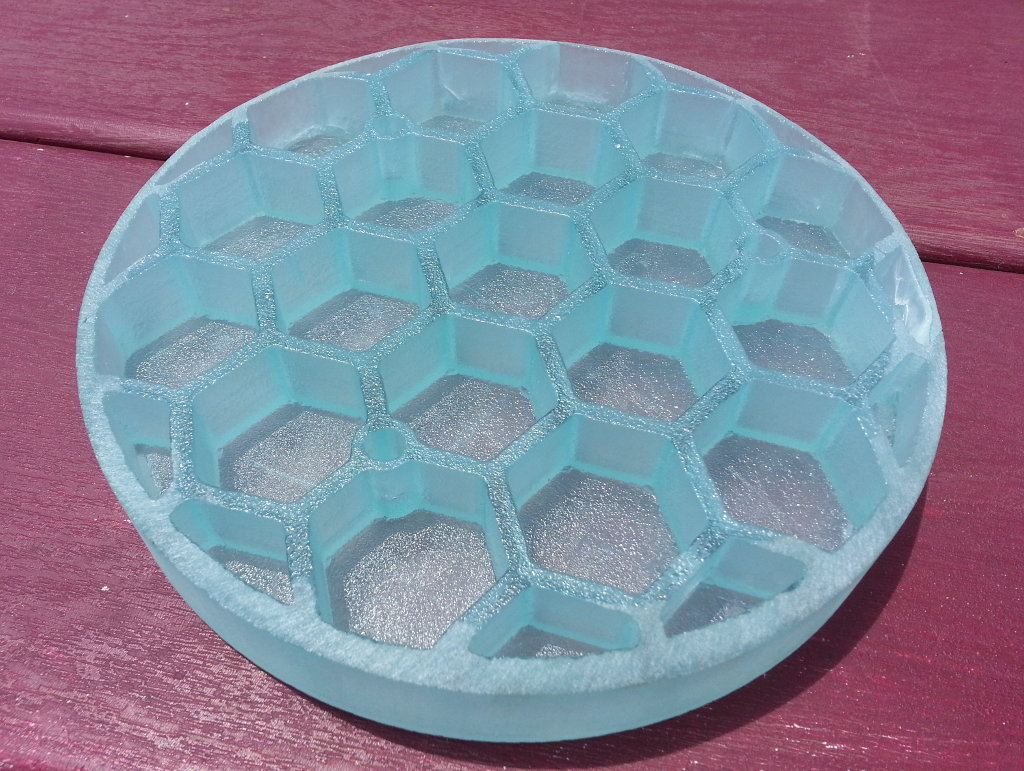
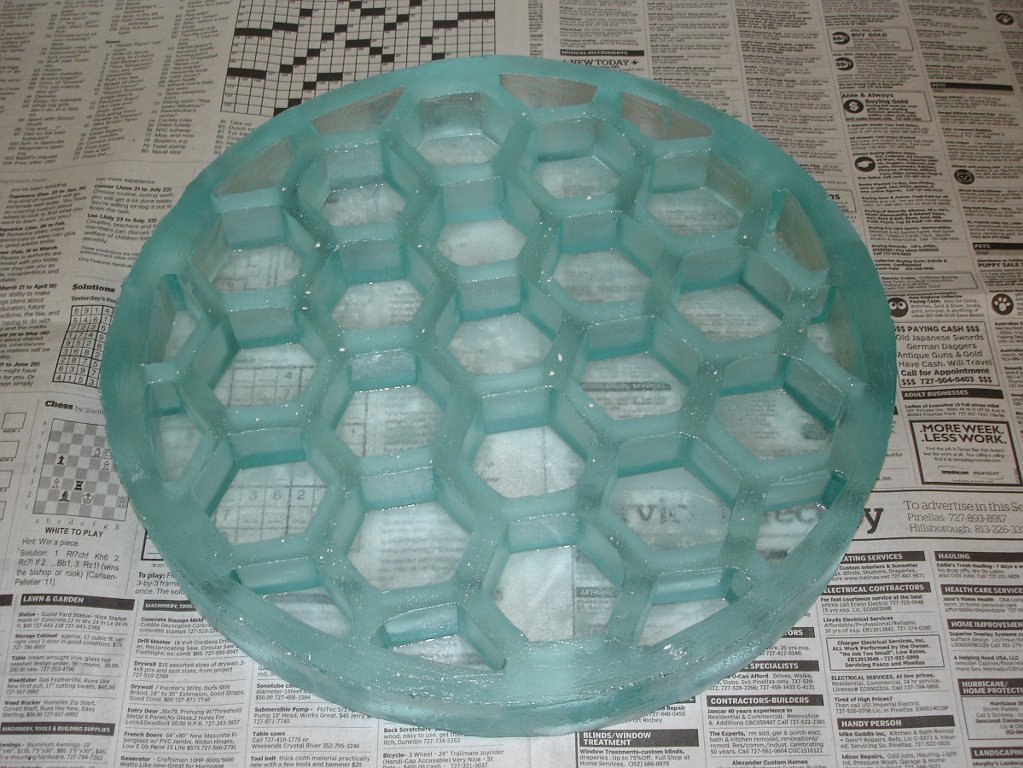
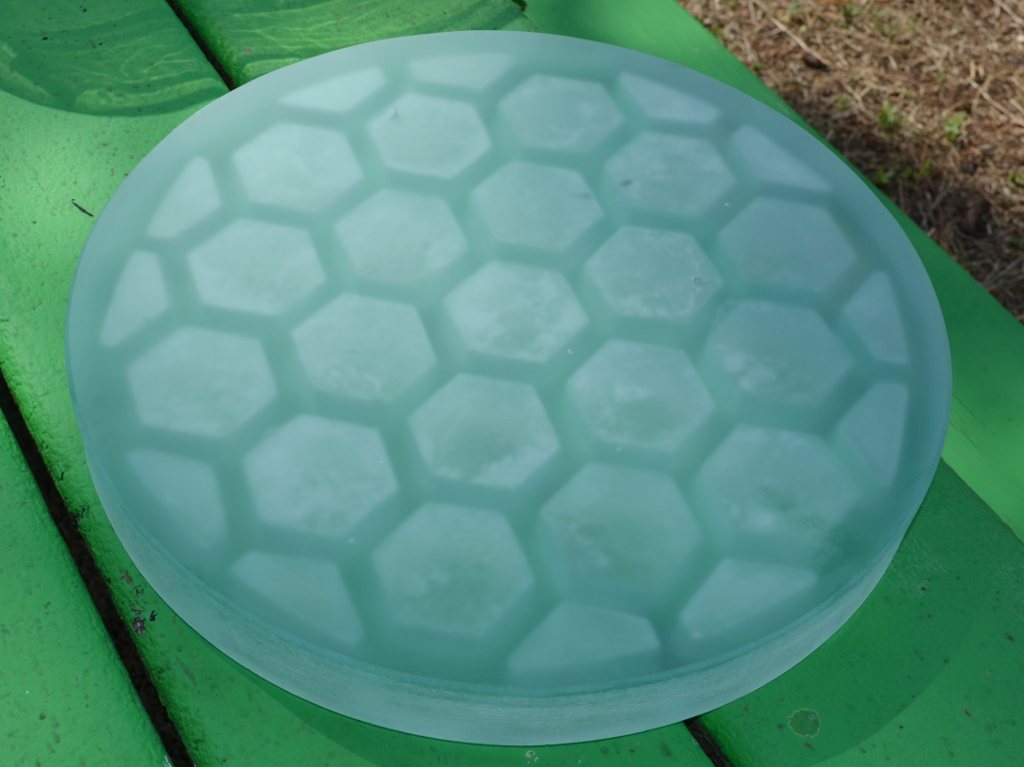
Here is the honeycomb back of the cleaned out mirror blank. The blank is a little over 12.5 inches in diameter and slightly irregular.
I need to turn it round and get the diameter down to size on my grinder. The blank is 1.5 inches thick. The pockets are 1 inch deep.
There is .5 inch of glass left on the front face for grinding a curve. It weighs only 10lbs, 9.5oz at this point. It will loose a
little more weight on the grinder. It's not perfect. There are a few tiny air bubbles that may be close enough to the front surface
to be encountered while grinding. Otherwise, I am very pleased with it.
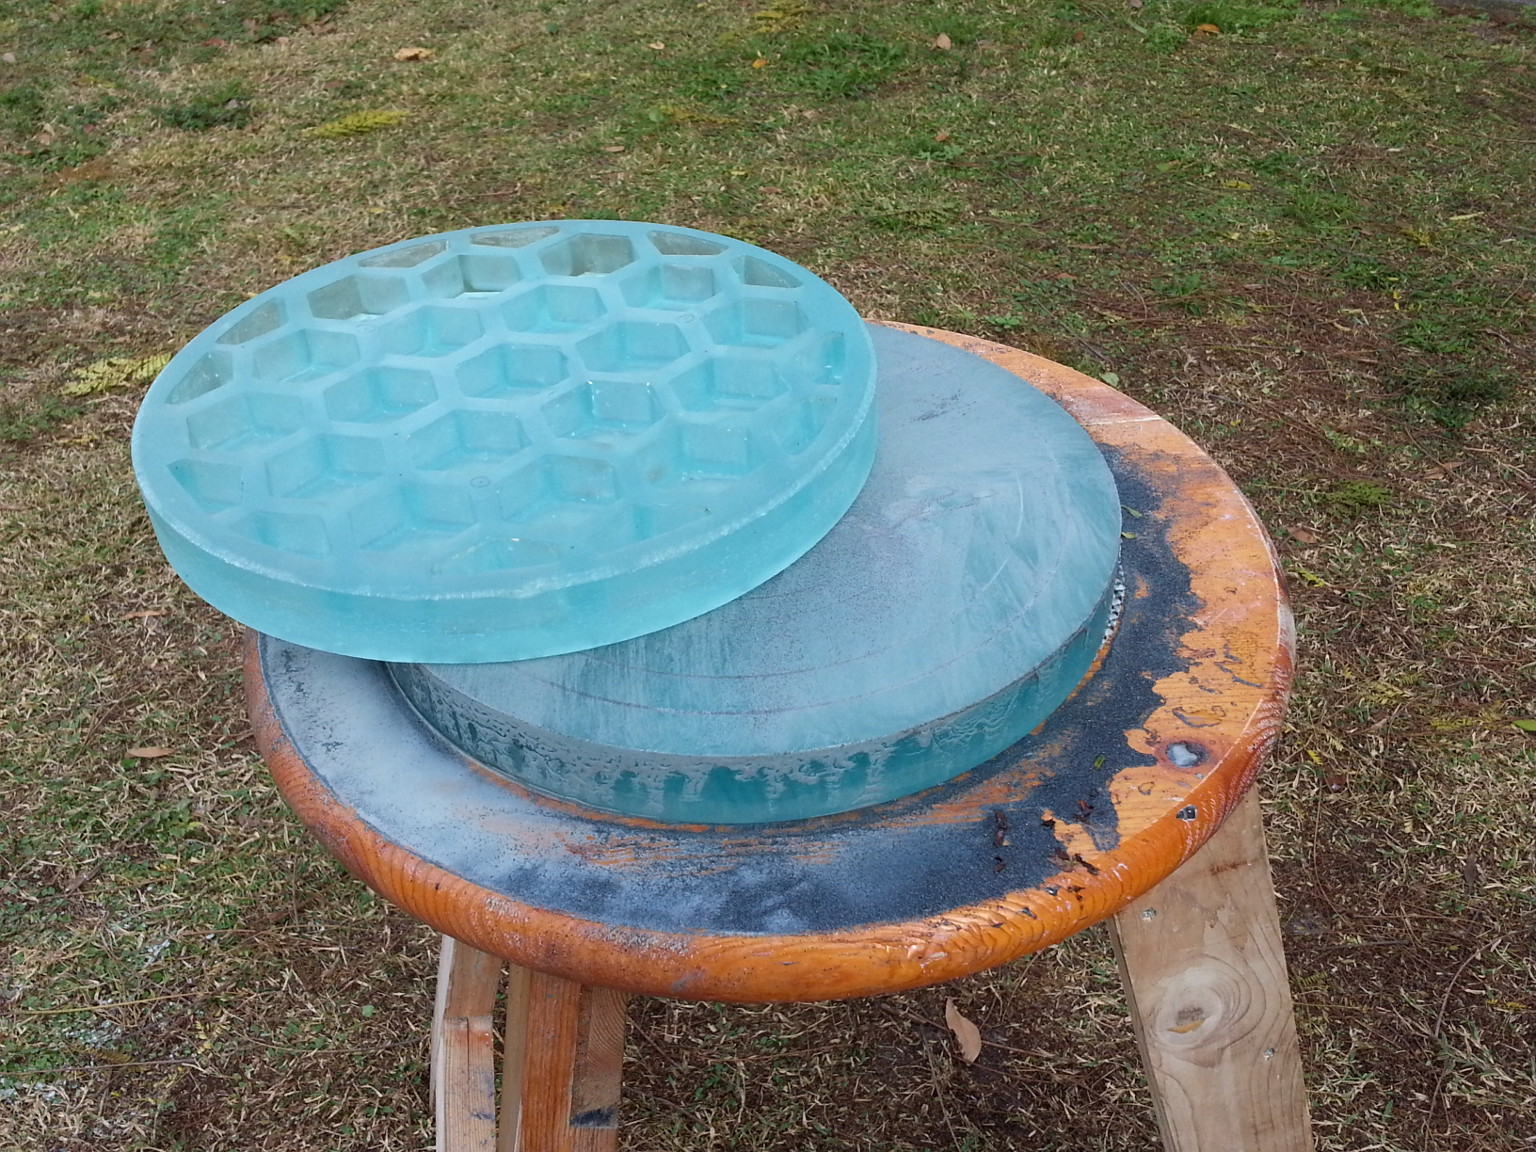
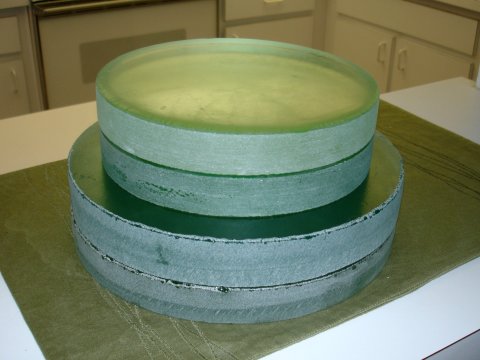
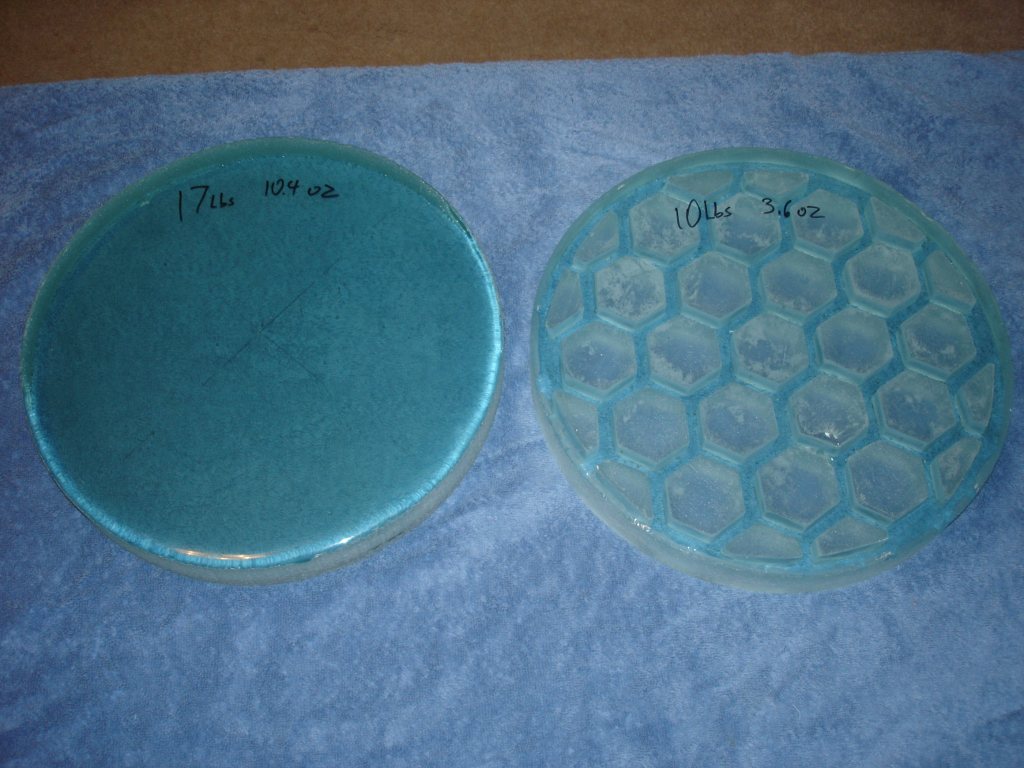
Here is a photo of the finished 12.5 inch diameter honeycomb-back mirror blank after final edge trimming. It is side-by-side with a solid 12.5
inch blank of the same 1.5 inch thickness that I also cast in my kiln. The honeycomb blank weighs 10 lbs 3.6 oz. The solid blank weighs
17 lbs 10.4 oz. The honeycomb mirror is 42% lighter. I think I might be able to get close to a 50% reduction in weight with just some
slight tweaking of the design.
So, What's next? I plan on grinding and polishing this 12.5 inch mirror to see how well it takes a figure, and if the pattern of the back
prints through. I am also planning on making larger diameter versions of this design. I will post updates in the future.
Update 02/15/12
I have started the process of rough grinding the 12.5 inch honeycomb-back mirror blank. I am aiming for an
f/4.5 mirror when it is finished. It will be interesting to see how well
it takes a figure and if or how much the back pattern prints through. It will probably be several months at least
before I am finished with the grinding, polishing and figuring, depending on how much time I have to work on it.
I will post updates as the mirror progresses.
Click the photo for a larger view.
Update 03/03/12
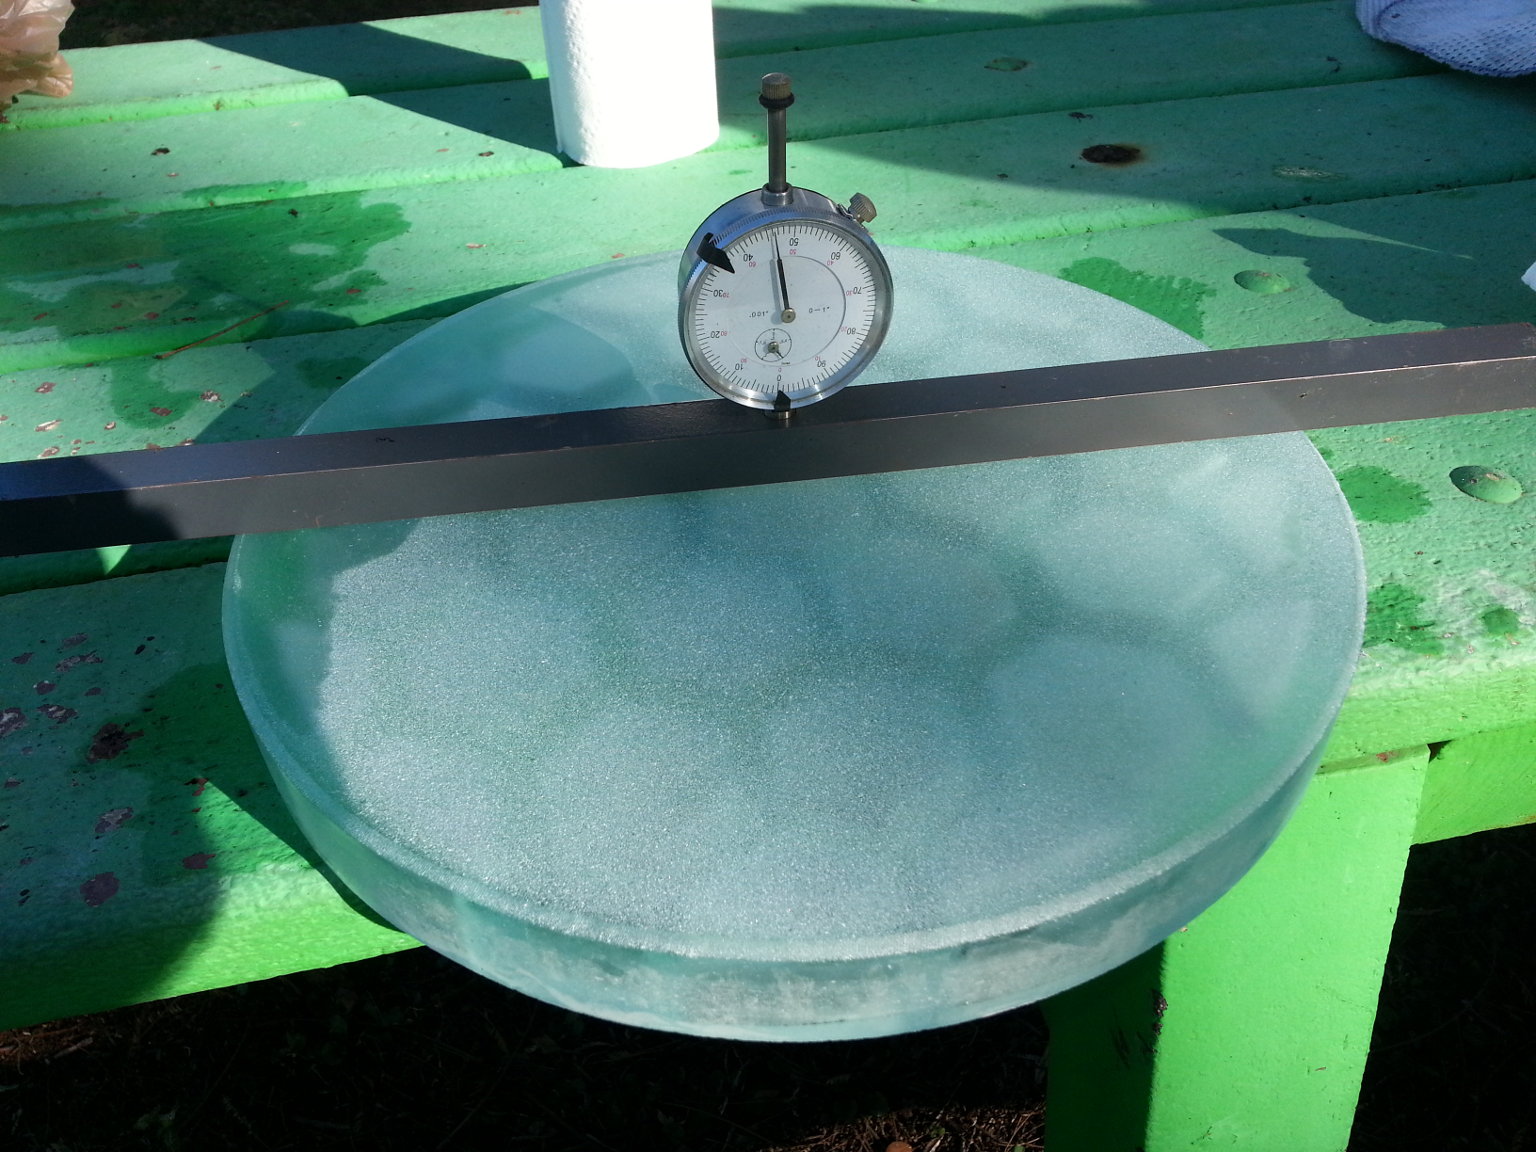
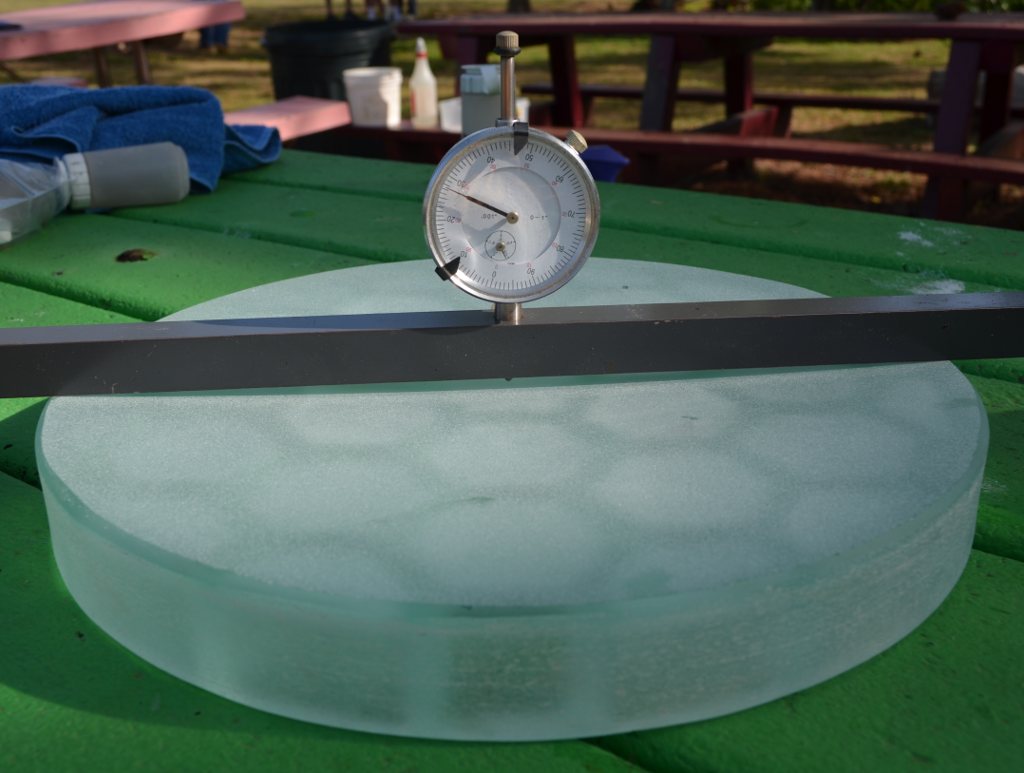
Rough grinding is complete for the 12.5 inch honeycomb-back telescope mirror blank.
The rough grinding went pretty quickly
and painlessly this time. I only have maybe 12 hours of actual work in the mirror so far. It's hard to believe, but the rough grinding
has removed over a pound of glass. The mirror now weighs in at only only 8 pounds 15 ounces. Incredible! The curve is still
3 thousandths of an inch too shallow, but I can make that up with the finer grits as I clean up the surface finish. I did hit a couple of
bubbles in the blank, as I feared would happen. So the mirror will have a few minor pock-marks on the surface. Grinding deeper to get
past the bubbles isn't really an option since there are others further down. Time to move on to finer grits. I'll post more updates as
the fine grinding progresses.
Click the photo for a larger view.
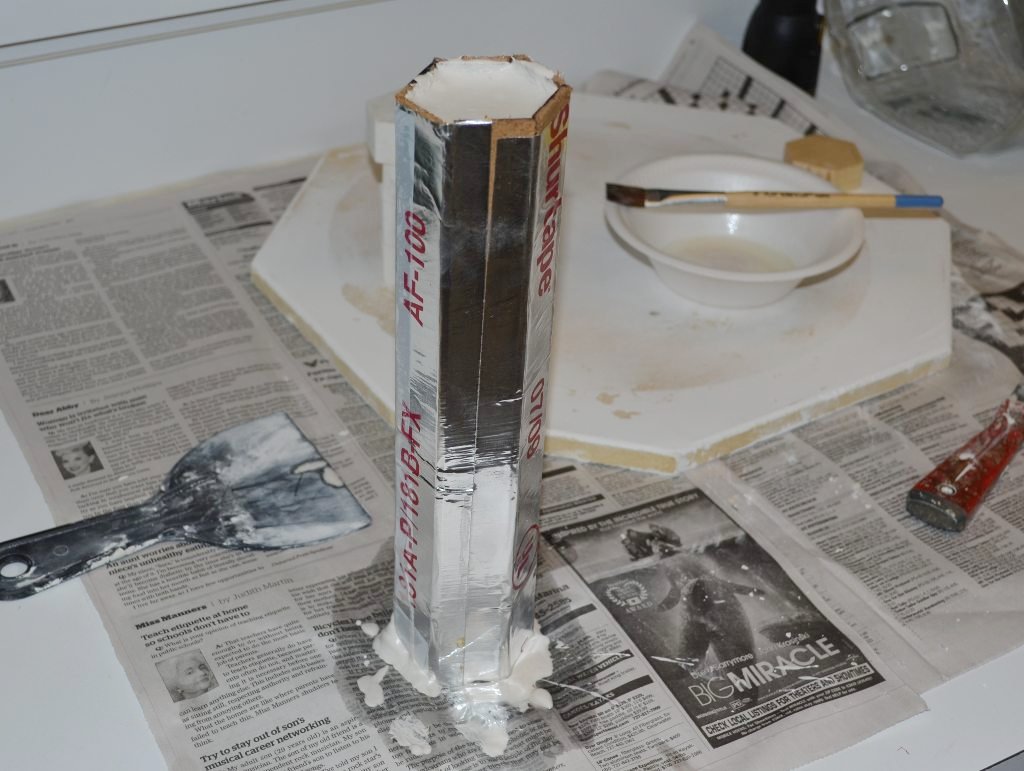
Update 03/25/12 I have come up with a new way of making the hexagons for the mirror molds. I have built a tall,
hexagonal mold to cast long, hexagonal logs from the usual 50/50 mix of Hydrocal Plaster and silica flour. The mold is made of a wood
hexagon at the base and long strips of hardboard, and held together with aluminum tape. All parts were coated with vegetable oil to
prevent the plaster mix from sticking to the mold. Here the mold has been filled with the wet plaster mix. I filled it to the top,
but as the plaster hardened, it shrank and formed a concave surface.
Click the photo for a larger view.
Here is the hardened log out of the mold. It is hexagonal in cross-section, and about 10 inches long. It turned out very nice. There are
a few more small air bubbles than I am used to with my hex-nut method, but no real problems. The plaster did not stick to the mold thanks to
the coating of vegetable oil. The wooden hexagonal base is visible to the right and below the log. I should be able to re-use this mold over,
and over again. I used a rasp to neaten up the log and remove the flashing.
Click the photo for a larger view.
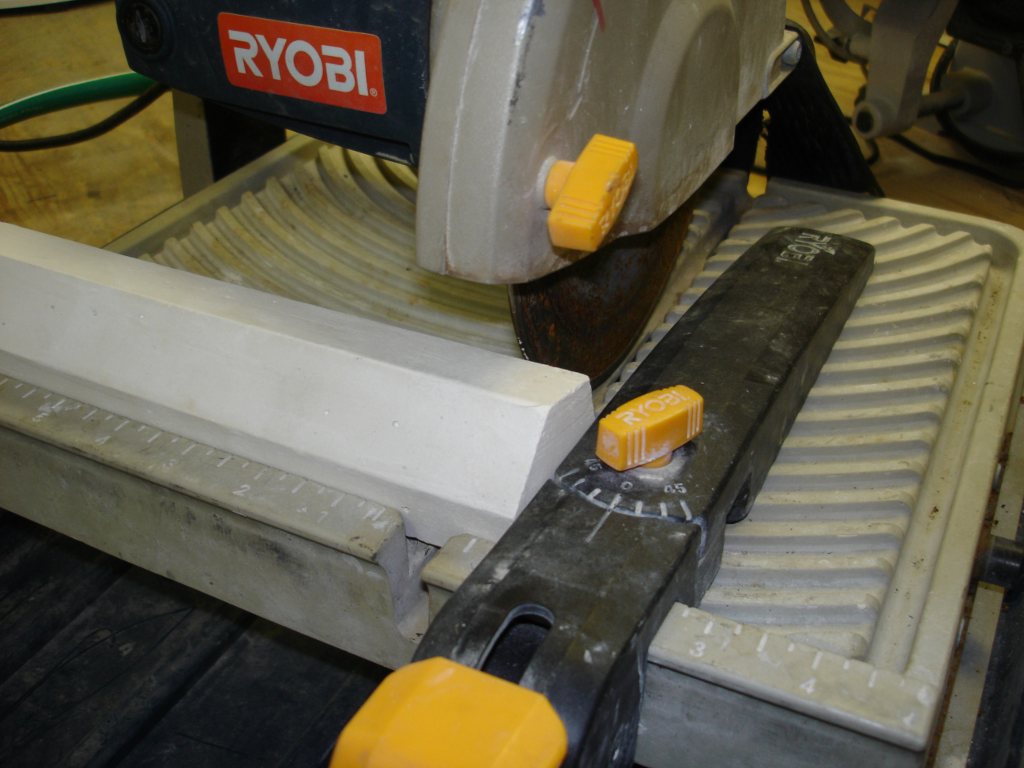
Here I have my first hexagonal log in my diamond wet saw, ready to start slicing off 1 inch thick hexagons.
Click the photo for a larger view.
I was pleasantly surprised to discover that the saw cuts through the log like a hot knife through butter. The cutting went very
quick and easy, and produced perfect hexagons.
Click the photo for a larger view.
In the end, I got 8 perfect hexagons out of the log. The 9th one, cut from the top of the log, was sunken in the center from shrinkage.
I discarded it. This was much quicker, easier and much less messy than making the hexagons the old way. This new technique will come in
handy in the future as I scale up my honeycomb-back design, since I probably won't be able to easily find hex nuts large enough to do it
the old way.
Click the photo for a larger view.
Update 04/08/12
The fine grinding is finally done on my 12.5 inch diameter prototype honeycomb mirror. Now I get to start polishing. Soon I will know what sort
of figure this mirror design will take. Stay tuned for future updates.
Click the photo for a larger view.
Update 7/12/12
A video of my home-cast 12.5 inch diameter, light-weight, honeycomb-back telescope mirror on the Robotic Foucault testing stand at the
SPAC Mirror Lab. The door to the Foucault testing
tunnel is opened allowing ambient light to back-light the mirror, causing the honeycomb structure of the mirror to appear and show through. When the door
is closed, the honeycomb structure completely disappears. No print-through problems! The mirror is quite oblate at this stage of polishing. Air currents
stirred up by opening and closing the door are quite visible. A very neat little video. It was taken by my friend Allen with a hand-held video camera
aimed at the Foucault tester monitor.
Update 03/23/13
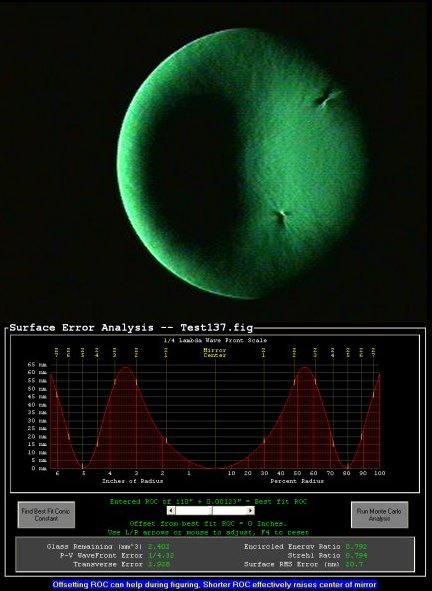
I have finally finished the figuring of my first home-made honeycomb back mirror. It took me quite a while. The fast focal ratio of
f/4.5 and dealing with plate glass, and trying to prevent print-through of the honeycomb pattern on the back necessitated re-learning
everything I thought I knew about figuring mirrors. I got nowhere with a full-size lap and had to use a variety of sub-diameter, light-weight laps
to finally get the figure better than 1/4 wave of green light without any print-through.
It is not the smoothest mirror I have ever made, but this blank had some issues. I am making much better blanks these days. This is really
just a a proof of concept mirror, to make sure these honeycomb-back, light-weight mirror blanks I am making can actually be figured without
print-through problems. As you can see from the focogram, there is no trace of print-through. The two strange artifacts in the focogram are
air bubbles just under the surface of the glass that broke through during grinding and polishing. This blank has a lot of air bubbles in it.
I ground into a lot of them while grinding and polishing the mirror, probably making the finished mirror unusable. I am making blanks with far fewer bubbles
these days. I wanted to try to finish this mirror since it was a worst-case scenario.
Even though it isn't the prettiest mirror to come out of the SPAC Mirror Lab, I am very happy with it.
It gives me confidence that the better quality mirror blanks I am making now, and the even better ones I will be making in the future, can be
ground, polished and figured into excellent telescope mirrors. I also now know how to do it.
I get emails almost every day from people asking me if I will sell them one of my honeycomb mirror blanks. Unfortunately, I am not mass-producing
these blanks at present. I still consider myself to be in the R&D phase of casting these mirror blanks. Once I feel that the process is perfected,
and the quality of the blanks improves to my satisfaction, I may offer some for sale.
Update 01/11/14
I have finally started serious grinding on my second cellular, honeycomb-back mirror blank at the
SPAC Mirror Lab. I have high hopes for this mirror. It was built with the new hexagon molding technique and new edge grinding machine. I am calling it my second
generation hexagone back blank. This one has far fewer air bubbles in it than the first prototype did.
I had forgotten how much hard work rough grinding is. Gotta build a curve generating machine next.
Click the photo for a larger view.
Update 01/25/14
I have reached final depth rough grinding on my second generation cellular, honeycomb-back mirror blank at the
SPAC Mirror Lab. It is actually 2 thousandths of an inch shallow, which I expect to make up in fine grinding.
Fine grinding will begin next weekend.
Click the photo for a larger view.
Update
I am going to be taking a new approach to my cellular mirror blanks in the future. My brother and I have built a CNC mill. I plan on using it to mill out the complex
mold shapes for the mirror blanks, rather than trying to piece them together by hand. I plan on CNC cutting a positive (same shape as the back of the finished mirror)
in foam or machinable wax. Then casting a negative of it with refractory plaster. Then casting the mirror on the plaster mold. I will then fuse a thin sheet of glass
on top to ensure there are no bubbles or other defects in the top surface which gets ground and polished. This new technique should allow me to create more complex
designs and execute them more easily and accurately. It is an ambitious project, but I have been planning and working toward it for a long time already. The first
proof of concept mirror blanks should be coming along soon.
Update 05/05/14
Finally accomplished something I've been working toward for years. This video shows the CNC milling of a mold for casting my light-weight,
honeycomb telescope mirror blanks. You wouldn't think it would take years to do it, but first my brother and I had to design and scratch-build
the CNC mill, then I had to teach myself G-Code. All that took a while, especially since I could only work on it in my spare time.
This test mold is a scaled-down version of my 12.5 inch diameter mirror design. I scaled it down to 10 inches so it would
fit in the largest piece of florist foam I could find. The foam is cheap and easy to cut, but very fragile. My ultimate plan is to build a
dam around the edge of the foam and fill it with refractory plaster, creating a negative. Then I would cast a positive off the negative in glass.
This process should be a lot easier than building up a mold out of individual hexagons, and allow me to get more creative with the mold design.
Time will tell how well that all goes, but at least this part of the process is working. I gotta find bigger pieces of foam.
Update 05/19/14
My 2nd generation honeycomb 12.5 inch mirror is is now fully polished and a pretty darn good sphere, if I do say so myself. It has been slow going with this mirror, but it is finally in
a state to start figuring. That should start next Saturday. I am excited about this mirror. It is turning out really nice. It has far fewer issues than my first honeycomb
mirror. 3rd generation mirror blanks will be coming out of my kiln soon too, now that I can CNC mill molds.
Update 07/05/14
I had an exceptionally good 4th of July. I finished my first proof of concept 3rd generation honeycomb-back mirror blank, and it turned out great. This video shows nearly
every step in the process of making the blank. When the blank first came out of
the mold, I wasn't sure it was going to be salvageable. There were issues. But I managed to fix most of them. After the final cold-working, the blank was beautiful. It is a
10 inch blank, 1 and 5/8 inches thick, and it weighs 6lbs and not quite 10 ounces. Since this was just a test, I used a thicker glass plate on top top than I wanted to. I
used glass I had on hand for the test, instead of buying glass of the proper thickness. So the face is 1/8 thicker than I originally planned for. The blank would have been
even lighter with thinner glass. I won't normally be making 10 inch cellular blanks. This is a scaled down proof of concept blank made just to make sure everything was going
to work. In the future I will be making this design in 12.5, and 14 inch blanks, and eventually even larger ones.
Check out the video.
Here is a photo of the back of the above new mirror blank. I really took a different path on this blank. The mold was CNC milled instead of pieced together as in my previous hex
blanks. This allowed me to create a very complex design incorporating bearing points and sockets that would have been difficult to piece together. I know because I have
tried for the last couple of years to assemble such a mold by casting individual pieces. I finally gave up and decided the whole thing needed to be machined in one piece.
I also departed with the past by not trying to cast the blank as a single monolithic piece. I cast the honeycomb back separately, and then fused a sheet of glass on top to
be the surface to be ground and polished. This totally eliminates the problem of grinding into air bubbles that has plagued my previous cellular castings. This will probably
be the way I make cellular blanks in the future.
This blank was just a proof of concept test piece, and there was no expectation as I was making it that it would actually be usable, but it came out so nice that I think It could
actually be ground and polished into a mirror. Maybe it will be someday. For now it is a trophy that represents the successful completion of a project I have worked long and
hard on for many months.
Click the photo for a larger view.
Update 08/20/14
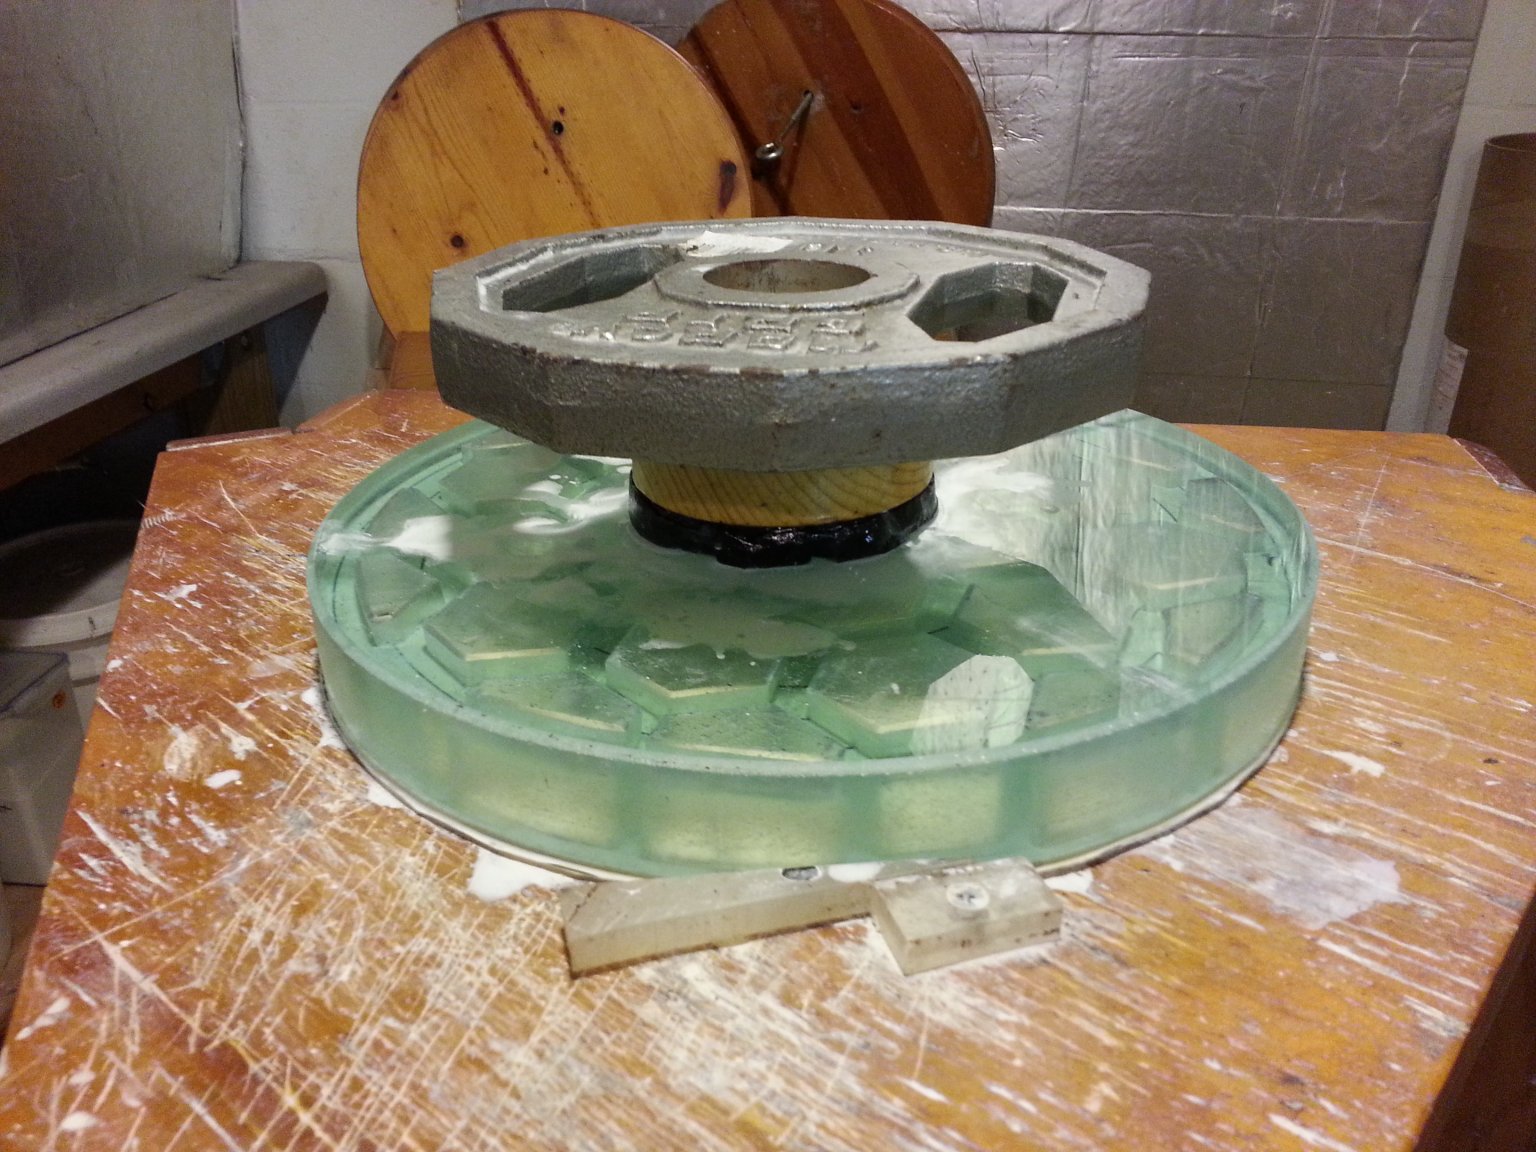
My second generation 12.5 inch honeycomb mirror project is coming along very slowly. Health problems sidelined me for several months earlier this year and prevented me from pushing
glass. Then there have been numerous problems encountered while figuring. I have fought a persistent
turned down edge, holes in the center, peaks in the center, uncooperative zones, and a general refusal of the mirror to respond properly to normal figuring strokes on a full-size lap the same
way a solid mirror does. So once again I have broken out my collection of sub-diameter laps and am tackling the mirror a zone or two at a time trying to tame it. Here I am pressing a
small lap on the mirror to get it into good contact. Looking at this photo I now realize how foolish and dangerous this move was. It would have been far safer to press the mirror
on top of the lap. If the weight had been bumped and slid off the lap it could have gouged or even shattered the nearly finished mirror, and ruined hundreds of hours of hard work.
Don't try this at home, I'm a trained professional, with more guts than brains sometimes.
 Let's start this story at the beginning. About two years ago I bought a kiln and began experimenting with making my own


 Update 03/23/13