How I built an electricity producing Solar Panel
It was easy. You can do it too
Several years ago I bought some remote property in Arizona. I am an astronomer
and wanted a place to practice my hobby
far away from the sky-wrecking light pollution found near cities of any real size. In my attempt to
escape city light pollution, I found a great piece of remote property.
The problem is, it's so remote that there is no electric service available. That's not really a problem. No electricity
equals no light pollution. However, it would be nice to have at least a little electricity,
since so much of life in the 21st century is dependent on it.
I built a wind turbine to provide some power on the remote property. It works
great, when the wind blows. However, I wanted
more power, and more dependable power. The wind seems to blow all the time on my property, except when I really need it too.
I've also been experimenting with a biomass gasifier.
With well over 300 sunny days a year on the property though, solar power seems like an obvious choice to supplement the
wind turbine and
gasifier. Solar panels are very expensive though. So I decided to try my
hand at building my own. I used common tools and
inexpensive and easy to acquire materials to produce a solar panel that rivals commercial panels in power production, but
completely blows them away in price. Read on for step by step instructions on how I did it.
Here is a video of the solar panel set up and in use on my remote, off-grid property.
Let me state up front that I probably won't be able to help you out much if you decide to build your own solar panel(s).
This web site has become insanely popular, often taxing the bandwidth limits of the server. I get dozens of requests for
help each day. I simply don't have time to answer the majority of them. Most of the questions and requests I get are the
same ones over and over again. I have crated a FAQ to handle these repetitive questions.
Please read it before emailing me.
Simple questions, not covered by the FAQ,which only require a quick and simple answer
may get replies if time permits. However, there is no way I can help you out with complex issues, teach you electronics
theory, help you locate parts, build a charge controller for you, or custom design a system for you. There just aren't enough
hours in the day. Sorry.
So what is a solar panel anyway? It is basically a box that holds an array of solar cells. Solar cells are the things that do the actual
work of turning sunlight into electricity. However, it takes a lot of cells to make a meaningful amount of power, and they are
very fragile, so the individual cells are assembled into panels. The panels hold enough cells to make a useful amount of power
and protect the cells from the elements. It doesn't sound too complicated. I was convinced I could do it myself.
I started out the way I start every project, by Googling for information on home-built solar panels. I was shocked at how few
I found. The fact that very few people were building their own panels led me to think it must be harder to do than I thought.
The project got shelved for a while, but I never stopped thinking about it.
After a while, I came to some conclusions:
The main stumbling block to building solar panels is acquiring solar cells at a reasonable price.
New solar cells are very expensive, and can even sometimes be hard to find in quantity at any price.
Blemished and damaged solar cells are available on
and other places at a fraction of the cost of new perfect cells.
These second rate solar cells could probably be used to make a solar panel that would work just fine.
Once I came to the realization that I could use blemished and factory-second solar cells to build my panels, I finally got to
work. I started by buying some solar cells off of
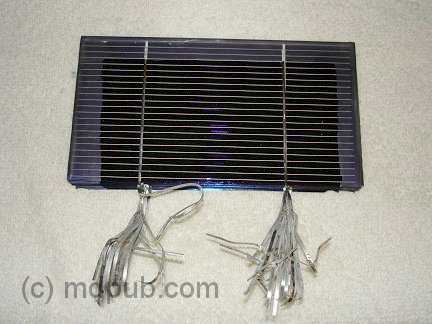
I bought a couple of bricks of 3 X 6 mono-crystalline solar cells. It takes a total of 36 of these type solar cells wired in
series to make a panel. Each cell produces about 1/2 Volt. 36 in series would give about 18 volts which would be good for
charging 12 volt batteries. (Yes, you really need that high a Voltage to effectively charge 12 Volt batteries)
This type of solar cell is as thin as paper and as brittle and fragile as glass. They are very
easily damaged. The seller of these solar cells dips stacks of 18 in wax to stabilize them and make it easier to ship them without
damaging them. The wax is quite a pain to remove though. If you can, find cells for sale that aren't dipped in wax. Keep in mind
though that they may suffer some more damage in shipping. Notice that these cells have metal tabs on them. You want cells with
tabs on them. You are already going to have to do a lot of soldering to build a panel from tabbed solar cells. If you buy cells without
tabs, it will at least double the amount of soldering you have to do. So pay extra for tabbed cells.
I also bought a couple of lots of cells that weren't dipped in wax from another
seller. These cells came packed in a plastic box. They rattled around in the box and got a little chipped up on the edges and
corners. Minor chips don't really matter too much. They won't reduce the cell's output enough to worry about. These are all
blemished and factory seconds anyway. The main reason solar cells get rejected is for chips. So what's another chip or two?
All together I bought enough cells to make 2 panels. I knew I'd probably break or otherwise ruin at least a few during
construction, so I bought extras.
There are lots of other sizes of solar cells besides 3 X 6 inches available. You could use larger or smaller cells for your panel.
Just keep a few things in mind.
Cells of the same type all produce the same voltage no matter what size they are. So the same number of cells is always needed.
Larger cells produce more current (Amps) and smaller cells produce less current.
The total power your panel can produce is determined by Amps X Volts.
So using bigger cells produces more power, but the panel will be large and heavy. Using smaller cells keeps the panel small and
light, but won't produce as much power. Also, mixing cell sizes is not a good idea. This is because the current your panel can produce will
be limited by the smallest cell in the group and the larger cells won't work to their full potential.
The cells I settled on are 3 X 6 inches in size and are rated at roughly 3 amps. I will wire 36 of them in series to get a little over
18 volts. The result should be a panel capable of delivering almost 60 Watts of power in bright sunlight. It doesn't sound
like a lot, but it sure beats no power at all, which is what I had on my property before. And that is 60 Watts all day when the sun
is shining. That power will go into charging batteries which will primarily be used for powering lights and small appliances
for only a few hours after dark. Once I go to bed, my power requirements drop to almost nothing. So 60 Watts is actually quite a
lot of useful power, especially when I also have my wind turbine
adding to the power production when the wind is blowing.
After you buy your solar cells, put them away in a safe place where they won't get dropped, played with by the kids, or eaten by
the dog until you are ready to install them in the panel. These cells are very fragile. Rough treatment and excessive handling
will turn your expensive solar cells into little, blue, shiny shards that aren't useful for anything.
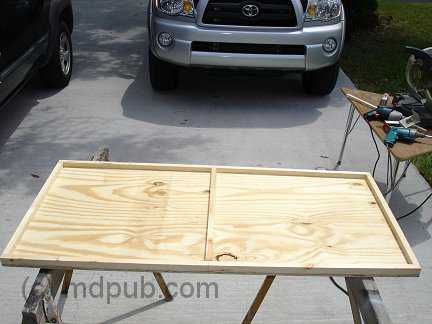
A solar panel is really just a shallow box. So I started out by building myself a shallow box. I made the box shallow so the sides
wouldn't shade the solar cells when the sun comes at an angle from the sides. It is made of 3/8 inch thick
plywood with 3/4 X 3/4 pieces of wood around the edges. The pieces are glued and screwed in place. This panel will hold 36 3 X 6 inch
solar cells. I decided to make 2 sub-panels of 18 cells each just so make it easier to assemble later. So there is a center divider
across the middle of the box. Each sub-panel will fit into one well in the main panel.
Here is my sort of back of the envelope sketch showing the overall dimensions of the solar panel. All dimensions are in inches
(sorry you fans of the metric system). The side pieces are 3/4 by 3/4 and go all the way around the edges of the plywood substrate.
also a piece goes across the center to divide the panel into two sub-panels. This is just the way I chose to do it. There is nothing
critical about these dimensions, or even the overall design. Feel free to deviate in your own design. These dimensions are included
here for those people who always clamor for me to include dimensions on my projects. I always encourage people to experiment and
innovate on their own, rather than blindly follow the way I (or anyone else) does things. You may well come up with a
better design.
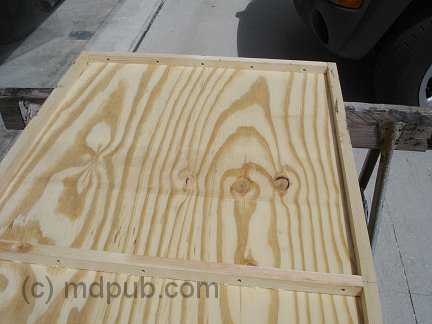
Here is a close-up showing one half of the main panel. This well will hold one 18 cell sub-panel. Notice the little holes drilled
in the edges of the well. This will be the bottom of the panel (it is upside down in the photo, sorry). These are vent holes to
keep the air pressure inside the panel equalized with the outside, and to let moisture escape. These holes must be on the bottom
of the panel or rain and dew will run inside. There must also be vent holes in the center divider between the two sub panels.
Update: After using the panel for a while, I now recommend that the vent holes be increased to at least 1/4 inch
in diameter. Also, to keep dust and critters out of the panel, stuff a little fiberglass insulation in the holes in the bottom rail
of the panel. The insulation is not needed in the holes in the center divider.
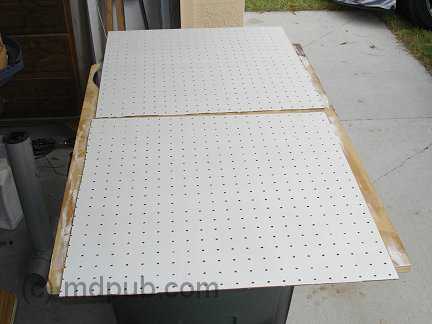
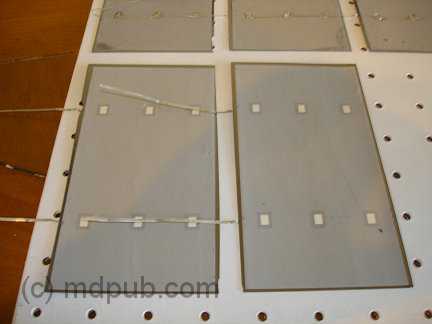
Next I cut two pieces of masonite peg-board to fit inside the wells. These pieces of peg-board will be the substrates that each
sub-panel will be built on. They were cut to be a loose fit in the wells. You don't have to use peg-board for this. I just
happened to have some on hand. Just about any thin, rigid and non-conducting material should work.
To protect the solar cells from the weather, the panel will have a plexiglass front. Here two pieces of scrap plexiglass have been
cut to fit the front of the panel. I didn't have one piece big enough to do the whole thing. Glass could also be used for this,
but glass is fragile. Hail stones and flying debris that would shatter glass will just bounce off the plexi. Now you can start
to see what the finished panel will look like.
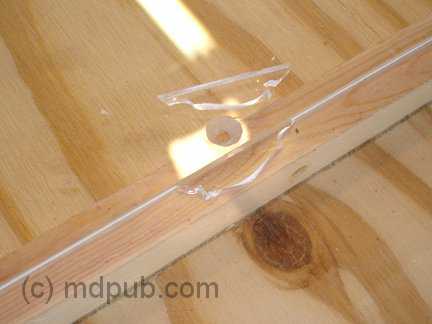
Oops! This photo shows a close-up of where the two halves of the plexiglass cover meet over the center divider.
I drilled and countersunk holes all around the edges of both pieces of plexiglass so I could screw them onto the face of the
panel with 1 inch drywall screws. Be careful working close to the edge of the plexi. If you get to aggressive it will break,
as happened here. I just glued the broken piece back in and drilled another hole a short distance away.
Next I gave all the wooden parts of the panel several coats of paint to protect them from moisture and the weather. The box was
painted inside and out. The type of paint and color was scientifically chosen by shaking all the paint cans I had laying around
in my garage and choosing the one that felt like it had enough left in it to do the whole job.
The peg-board pieces were also painted. They got several coats on both sides. Be sure to paint them on both sides or they will
curl when exposed to moisture. Curling could damage the solar cells that will be glued to them.
Now that I had the structure of the panel finished, it was time to get the solar cells ready
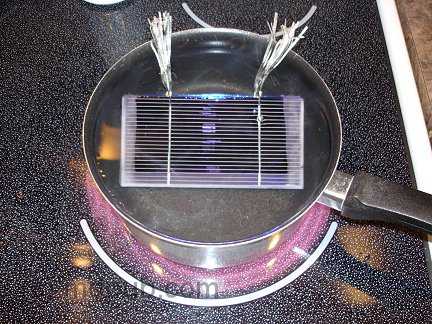
As I said above, getting the wax off the cells is a real pain. After some trial and error, I came up with a way that works fairly
well. Still, I would recommend buying from someone who doesn't dip their cells in wax. The first step is a bath in hot water to
melt the wax and separate the cells from each other. Don't let the water boil or the bubbles will jostle the cells against each
other violently. Also, boiling water may be hot enough to loosen the electrical connections on the cells. I also recommend
putting the brick of cells in the water cold, and then slowly heating it up to just below boiling temperature to avoid harsh
thermal shocks to the cells. Plastic tongs and spatulas come in handy for teasing the cells apart once the wax melts. Try not
to pull too hard on the metal tabs or they may rip off. I found that out the hard way while trying to separate the cells. Good
thing I bought extras.
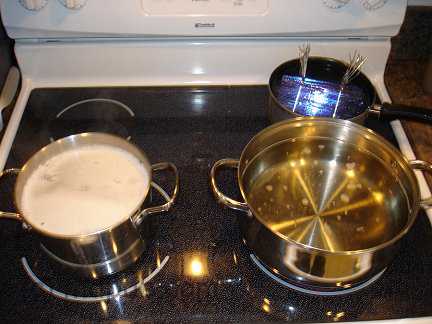
This photo shows the complete setup I used. My girlfriend asked what I was cooking. Imagine her surprise when I said solar cells.
The initial hot water bath for melting the wax is in the right-rear. On the left-front is a bath of hot soapy water. On the
right-front is a bath of hot clean water. All the pots are at just below boiling temperature. The sequence I used was to melt the
bricks apart in the hot water bath on the right-rear.
I'd tease the cells apart and transfer them one at a time to the soapy water bath on the left-front to remove any wax on the cell.
Then the
cell would be given a rinse in the hot clean water on the right-front. The cells would then be set out to dry on a towel. You
should change the water frequently in the soapy and rinse water baths. Don't pour the water down the sink though, because the
wax will solidify in your drains and clog them up. Dump the water outside. This process removed almost all the wax from
the cells. There is still a very light film on some of the cells, but it doesn't seem to interfere with soldering or the working
of the cells. A solvent bath would probably remove the rest of the wax, but that would be dangerous and stinky since the only
solvents I could think of that would cut wax are either flamable, toxic or smelly, or all three.
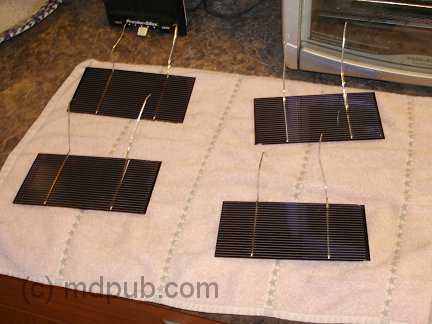
Here are some separated and cleaned solar cells drying on a towel. Once separated from their wax stabilized brick form, they are
amazingly fragile and difficult to handle and store. I would recommend leaving them as bricks until you are ready to install them
in your panel. That way you won't wreck them before you get to use them. So build the panel first. Now it's time to start installing
them in the panel
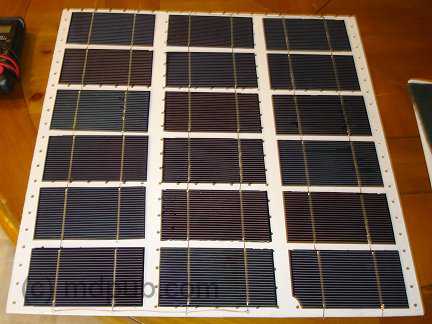
I started out by drawing a grid pattern on each of the two pieces of pegboard, lightly in pencil, so I would know where each of the
18 cells on them would be located. Then I laid out the cells on that grid pattern upside-down so I could solder them together.
All 18 cells on each half panel need to be soldered together in series, then both half panels need to be connected in series to
get the desired voltage.
Soldering the cells together was tricky at first, but I got the hang of it fairly quickly. Start out with just two cells upside-down.
Lay the solder tabs of one cell across the solder points on the back of the other cell. I made sure the spacing between the cells matched
the grid pattern.
I used a low-Wattage soldering iron and fine rosen-core solder. I also used a rosen pen on the solder points on the back of the
cells before soldering. Use a real light touch with the soldering iron. The cells are thin and delicate. If you push too hard,
you will break the cells. I got careless a couple of times and scrapped a couple of cells.
UPDATE 04/01/10
A lot of people write me confused about how to solder the solar cells together. When a hundred people all ask the same question, it's
obvious I am not being clear in this area. A lot of people look at the photos and assume I
am soldering the cells in parallel instead of in series. I have created this crude sketch to hopefully
clear things up. This is a side view of the solar cells soldered together. The negative tabs from the top of one cell are soldered
to the positive pads on the bottom of the next. This
connects the cells in series, and adds their voltages. I do this until I have a string of 6 cells. 3 strings of 6 make a half panel.
I hope that helps.
I repeated the above steps and soldered solar cells together until I had a string of six cells. I soldered tabs from scrapped
cells to the solder points on the back of the last cell in the string of six. Then I repeated the whole process two more times to
get three strings of six cells for a total of 18 for this half of the panel.
The three strings of cells need to be wired in series. So the middle string needs to be rotated 180 degrees with respect to the
other two. I got the strings oriented the way I wanted them (still upside-down) on top of the pegboard panel before the next step
of gluing the cells in place.
Gluing the cells in place proved to be a little tricky. I placed a small blob of clear silicone caulk in the center of each cell
in a six cell string. Then I flipped the string over and set in place on the pencil line grid I had laid out earlier. I pressed
lightly in the center of each cell to get it to stick to the pegboard panel. Flipping the floppy string of cells is tricky. Another
set of hands may be useful in during this step.
Don't use too much glue, and don't glue the cells
anywhere but at their centers. The cells and the panel they are mounted on will expand, contract, flex and warp with changes in
temperature and humidity. If you glue the cells too tightly to the substrate, they will crack in time. gluing them at only one
point in the center allows the cells to float freely on top of the substrate. Both can expand and flex more or less independently,
and the delicate solar cells won't crack.
Next time I will do it differently. I will solder tabs onto the backs of all the solar cells. Then I will glue all the cells down in their
proper places. Then I will solder the tabs together. It seems like the obvious way to go to me now, but I had to do it the hard way
once to figure it out.
Here is one half panel, finally finished.
Here I used copper braid to interconnect first and second strings of cells. You could use solar cell tabbing material or even
regular wire. I just happened to have the braid on hand. There is another similar interconnection between the second and third
strings at the opposite end of the board. I used blobs of silicone caulk to anchor the braid and prevent it from flopping around.
Here I am testing first half panel outside in the sun. In weak sun through clouds the half panel is producing 9.31 Volts.
YAHOO! It works! Now all I had to do is build another one just like it.
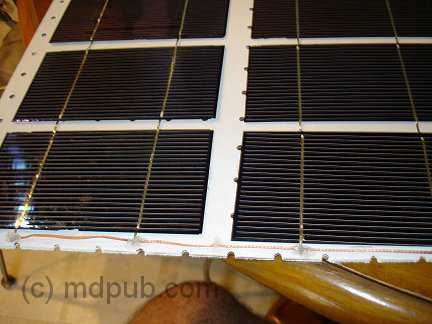
Once I had two half panels complete, I could install them in their places in the main panel frame and wire them together.
Each of the half panels dropped right into their places in the main panel frame. I used four small screws (like the silver one
in the photo) to anchor each of the half panels in place.
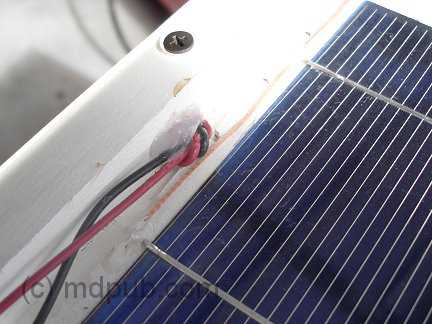
Wires to connect the two half panels together were run through the vent holes in the central divider. Again, blobs of silicone
caulk were used to anchor the wire in place and prevent it from flopping around.
Each solar panel in a solar power system needs a blocking diode in series with it to prevent the panel from discharging your
batteries at night or during cloudy weather. I used a Schottky diode with a 3.3 Amp current rating. Schottky diodes have a
much lower forward voltage drop than ordinary rectifier diodes, so less power is wasted. Every Watt counts. I got a package of
25 31DQ03 Schottky diodes on
for only a few bucks.
So I have enough left-overs for lots more solar panels
My original plan was to mount the diode inline with the positive wire outside the panel. After looking at the spec-sheet for
the diode though, I decided to mount it inside since the forward voltage drop gets lower as the temperature rises. It will be
warmer inside the panel and the diode will work more efficiently. More silicone caulk was used to anchor the diode and wires.
I drilled a hole in the back of the panel near the top for the wires to exit. I put a knot in the wires for strain relief, and
anchored them in place with yet more of the silicone caulk.
It is important to let all the silicone caulk cure well before screwing the plexiglass covers in place. I have found through
past experience that the fumes from the caulk may leave a film on the inside of the plexiglass and the cells if it isn't
allowed to thoroughly cure in the open air before screwing on the cover.
And still more silicone caulk was used to seal the outside of the panel where the wires exit.
I added a polarized two-pin jones plug to the end of the panel wires. A mating female plug will be wired into the
charge controller I use with my home-built wind turbine so the
solar panel can supplement its power production and battery
charging capacity.
UPDATE: 10/12/09
I've been getting a lot of emails from people giving me grief for using a male plug on the solar panel. They say that power sources
should always have female pugs on them to prevent short circuits. I understand their point. However, the reason I used the male plug
on the solar panel is because there is a much greater danger of a short circuit on the cable going to the charge controller and battery
bank. The solar panel can only supply 3 Amps to a short circuit at most. The battery bank though could pump hundreds or possibly
thousands of Amps through a short circuit. That is enough energy to do serious damage. So I put the female end on the cable to the
charge controller. Still, I agree that it is dangerous to have a male plug on the solar panel. On a recent trip to Radio Shack I
found this sort of plug. It only cost a few bucks and will solve the potential short circuit problem. When unplugged, neither end
can short out.
Here is the completed panel with the plexiglass covers screwed into place. It isn't sealed shut yet at this point. I wanted to
wait until after testing it because was worried that I might have to get back inside it if there were problems. Sure enough,
a tab popped off one of the cells. Maybe it was due to thermal stresses or shock from handling. Who knows? I opened up the
panel and replaced that one cell. I haven't had any more trouble since. I will probably seal the panel with either a bead
of silicone caulk, or aluminum AC duct tape wrapped around the edges.
Here I am testing the Voltage output of the completed panel in bright winter sunlight. My meter says 18.88 Volts with no load.
That's exactly what I was aiming for.
Here I am testing the current capacity of the panel, again in bright winter sunlight. My meter says 3.05 Amps short circuit
current. That is right about what the cells are rated for. So the panel is working very well.
So how much did all this cost to build? Well, I saved all the receipts for everything I bought related to this project. Also, my
workshop is well stocked with all sorts of building supplies and hardware. I also have a lot of useful scrap
pieces of wood, wire and all sorts of miscellaneous stuff (some would say junk) lying around the shop. So I had a lot of stuff
on hand already. Your mileage may vary.
Part
Origin
Cost
Solar Cells
$74.00*
Misc. Lumber
Homecenter Store
$20.62
Plexiglass
Scrap Pile
$0.00
Screws & Misc. Hardware
Already on hand
$0.00
Silicone Caulk
Homecenter Store
$3.95
Wire
Already on hand
$0.00
Diode
$0.20±
Jones Plug
Newark Electronics
$6.08
Paint
Already on hand
$0.00
Total
$104.85
Not too bad. That's a fraction of what a commercially made solar panel with a comparable power output would cost, and it was easy.
I already have plans to build more panels to add to the capacity of my system. I'll post more here as the project evolves. Stay
tuned
* I actually bought 4 lots of 18 solar cells. This price represents only the two lots that went into building
this panel. Also, the price of factory second solar cells on
has gone up quite a lot recently as oil prices have skyrocketed.
± This price represents 1 out of a lot of 25 diodes I bought on
for $5.00.
UPDATE 07/18/08
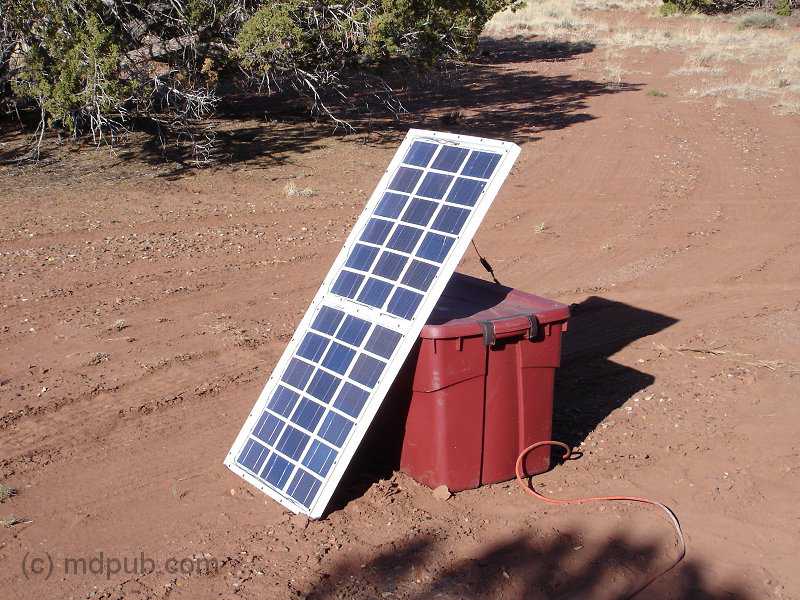
Once again I stayed on my remote property during my recent vacation in Arizona. This time I had both my
home-built wind turbine
and my home-built solar panel with me. Working together, they provided plenty of power for my
(admittedly minimal) electricity needs.
Here is a close-up of the solar panel in action.
I have to move it several times each day to keep it pointed at the sun, but that isn't really a big hardship. Maybe
someday I will build a tracking system to automatically keep it aimed at the sun.
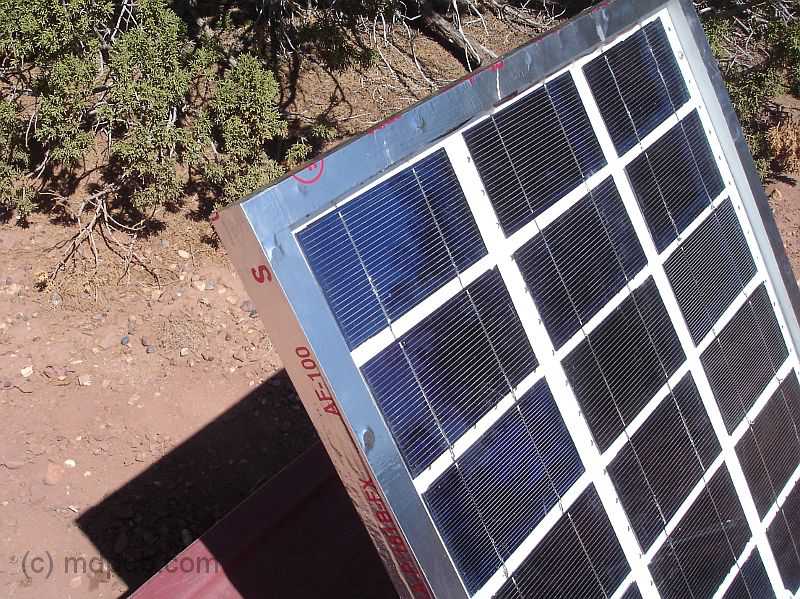
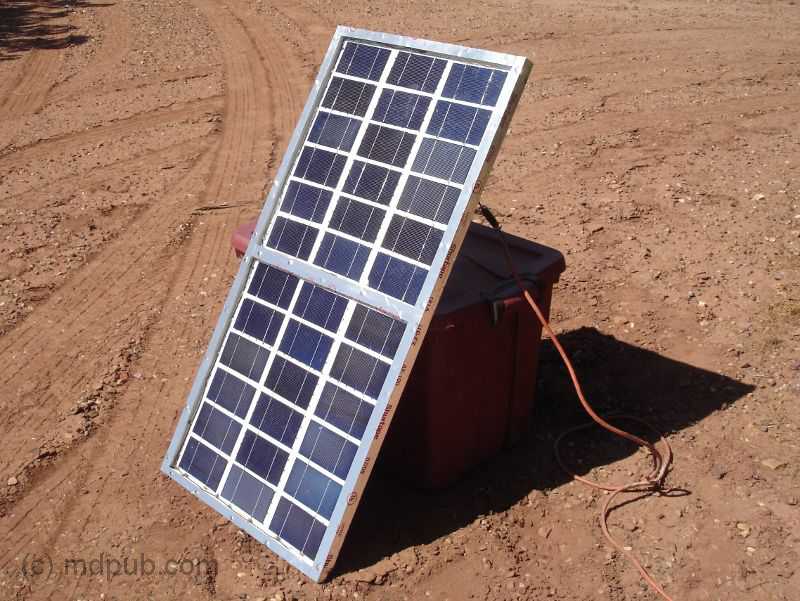
UPDATE 10/12/09
Here is a close-up of the solar panel after having the edges sealed with aluminum tape. This is not the cheap duct tape. This is the thin metal
tape with an adhesive backing. I applied it all the way around the edges of the panel and across the center seam. I burnished it down well
to make a good seal. I was careful to punch out the vent holes so they wouldn't be blocked. The tape seems to be quite weather-proof, and the
panel seems to be thoroughly sealed and protected. Only time will tell how well it works. However, since my panels are only outdoors when I
am staying on my remote property, and are not exposed to the weather all the time, I suspect it will hold up well for a long time.
The Aluminum tape gives the panel a whole new look. It looks like the frame is made of metal, rather than wood. To my eye, it looks a lot more
professional.
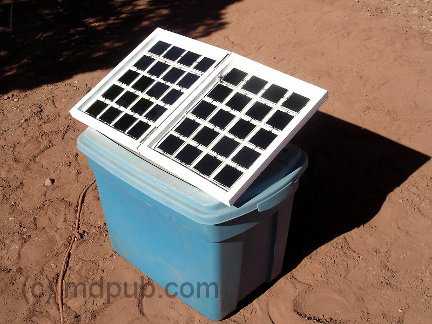
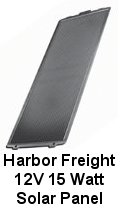
I have also completed a second solar panel. This is a smaller 15 Watt panel. It folds up for easier storage and transportation. Click the
photo to learn more about it.
UPDATE 03/20/11
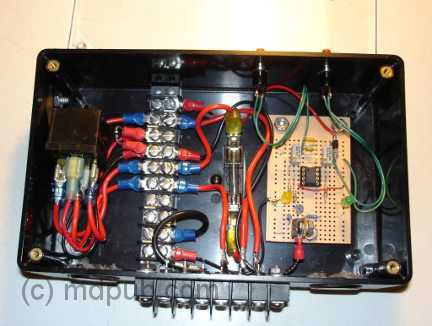
I have designed a simple battery charge controller circuit for use with solar panels and wind turbines. It is a simple circuit, and it uses only easy
to find parts, so it is very easy to build. Click the photo for more information.
UPDATE 11/02/11
This is a photo of my new home-built solar tracking platform for one of my home-made 60 Watt solar panels.
Actually, I could get two panels on this tracker, but I only have one mounted now for testing. This is really just a teaser photo
because the tracker isn't finished yet. I am still working on the electronics to drive it. The structure was mostly completed a couple of days
ago, and I got this nice photo of it set up in my workshop. It probably won't be completely done for another
month or two. Then I will put up a full write-up on how I built it. I will tell you this much about it now. It is driven by a 1960s
vintage antenna rotator. The structure is designed to come apart for eventual transport to my remote Arizona Property. It was also cheap
and easy to build. Stay tuned for future updates on this project.
Click the photo for a larger image.
UPDATE 06/07/13
Here is a time-lapse video of my home-built solar panel sun tracker in operation. In the video it is set up on my remote Arizona property, and is
doing a good job of keeping my solar panels pointed at the sun. It took me a while to get this project up and running.
Work and other priorities got in the way. Plus I decided to scrap my original plan for the electronics and start over with something completely different.
So it took a while. Now that it is up and running though, a thorough write-up on how I built it and how it works
will be coming soon. So stay tuned for more...
 I bought a couple of bricks of 3 X 6 mono-crystalline solar cells. It takes a total of 36 of these type solar cells wired in
series to make a panel. Each cell produces about 1/2 Volt. 36 in series would give about 18 volts which would be good for
charging 12 volt batteries. (Yes, you really need that high a Voltage to effectively charge 12 Volt batteries)
This type of solar cell is as thin as paper and as brittle and fragile as glass. They are very
easily damaged. The seller of these solar cells dips stacks of 18 in wax to stabilize them and make it easier to ship them without
damaging them. The wax is quite a pain to remove though. If you can, find cells for sale that aren't dipped in wax. Keep in mind
though that they may suffer some more damage in shipping. Notice that these cells have metal tabs on them. You want cells with
tabs on them. You are already going to have to do a lot of soldering to build a panel from tabbed solar cells. If you buy cells without
tabs, it will at least double the amount of soldering you have to do. So pay extra for tabbed cells.
I bought a couple of bricks of 3 X 6 mono-crystalline solar cells. It takes a total of 36 of these type solar cells wired in
series to make a panel. Each cell produces about 1/2 Volt. 36 in series would give about 18 volts which would be good for
charging 12 volt batteries. (Yes, you really need that high a Voltage to effectively charge 12 Volt batteries)
This type of solar cell is as thin as paper and as brittle and fragile as glass. They are very
easily damaged. The seller of these solar cells dips stacks of 18 in wax to stabilize them and make it easier to ship them without
damaging them. The wax is quite a pain to remove though. If you can, find cells for sale that aren't dipped in wax. Keep in mind
though that they may suffer some more damage in shipping. Notice that these cells have metal tabs on them. You want cells with
tabs on them. You are already going to have to do a lot of soldering to build a panel from tabbed solar cells. If you buy cells without
tabs, it will at least double the amount of soldering you have to do. So pay extra for tabbed cells.
 Next time I will do it differently. I will solder tabs onto the backs of all the solar cells. Then I will glue all the cells down in their
proper places. Then I will solder the tabs together. It seems like the obvious way to go to me now, but I had to do it the hard way
once to figure it out.
Next time I will do it differently. I will solder tabs onto the backs of all the solar cells. Then I will glue all the cells down in their
proper places. Then I will solder the tabs together. It seems like the obvious way to go to me now, but I had to do it the hard way
once to figure it out.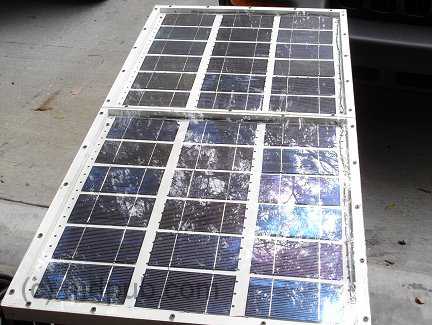 Several years ago I bought some remote property in Arizona. I am an
 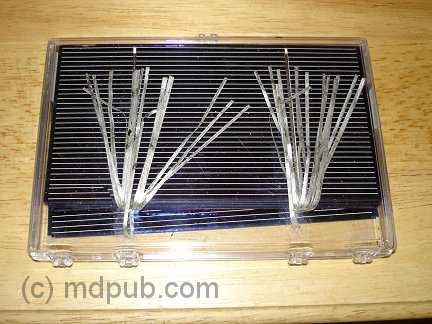 I also bought a couple of lots of cells that weren't dipped in wax from another
 A solar panel is really just a shallow box. So I started out by building myself a shallow box. I made the box shallow so the sides
wouldn't shade the solar cells when the sun comes at an angle from the sides. It is made of 3/8 inch thick
plywood with 3/4 X 3/4 pieces of wood around the edges. The pieces are glued and screwed in place. This panel will hold 36 3 X 6 inch
solar cells. I decided to make 2 sub-panels of 18 cells each just so make it easier to assemble later. So there is a center divider
across the middle of the box. Each sub-panel will fit into one well in the main panel.
A solar panel is really just a shallow box. So I started out by building myself a shallow box. I made the box shallow so the sides
wouldn't shade the solar cells when the sun comes at an angle from the sides. It is made of 3/8 inch thick
plywood with 3/4 X 3/4 pieces of wood around the edges. The pieces are glued and screwed in place. This panel will hold 36 3 X 6 inch
solar cells. I decided to make 2 sub-panels of 18 cells each just so make it easier to assemble later. So there is a center divider
across the middle of the box. Each sub-panel will fit into one well in the main panel.
 Here is my sort of back of the envelope sketch showing the overall dimensions of the solar panel. All dimensions are in inches
(sorry you fans of the metric system). The side pieces are 3/4 by 3/4 and go all the way around the edges of the plywood substrate.
also a piece goes across the center to divide the panel into two sub-panels. This is just the way I chose to do it. There is nothing
critical about these dimensions, or even the overall design. Feel free to deviate in your own design. These dimensions are included
here for those people who always clamor for me to include dimensions on my projects. I always encourage people to experiment and
innovate on their own, rather than blindly follow the way I (or anyone else) does things. You may well come up with a
better design.
Here is my sort of back of the envelope sketch showing the overall dimensions of the solar panel. All dimensions are in inches
(sorry you fans of the metric system). The side pieces are 3/4 by 3/4 and go all the way around the edges of the plywood substrate.
also a piece goes across the center to divide the panel into two sub-panels. This is just the way I chose to do it. There is nothing
critical about these dimensions, or even the overall design. Feel free to deviate in your own design. These dimensions are included
here for those people who always clamor for me to include dimensions on my projects. I always encourage people to experiment and
innovate on their own, rather than blindly follow the way I (or anyone else) does things. You may well come up with a
better design.
 Here is a close-up showing one half of the main panel. This well will hold one 18 cell sub-panel. Notice the little holes drilled
in the edges of the well. This will be the bottom of the panel (it is upside down in the photo, sorry). These are vent holes to
keep the air pressure inside the panel equalized with the outside, and to let moisture escape. These holes must be on the bottom
of the panel or rain and dew will run inside. There must also be vent holes in the center divider between the two sub panels.
Here is a close-up showing one half of the main panel. This well will hold one 18 cell sub-panel. Notice the little holes drilled
in the edges of the well. This will be the bottom of the panel (it is upside down in the photo, sorry). These are vent holes to
keep the air pressure inside the panel equalized with the outside, and to let moisture escape. These holes must be on the bottom
of the panel or rain and dew will run inside. There must also be vent holes in the center divider between the two sub panels.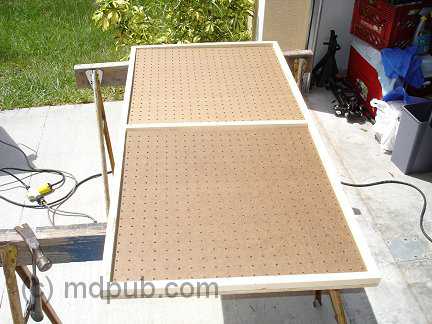 Next I cut two pieces of masonite peg-board to fit inside the wells. These pieces of peg-board will be the substrates that each
sub-panel will be built on. They were cut to be a loose fit in the wells. You don't have to use peg-board for this. I just
happened to have some on hand. Just about any thin, rigid and non-conducting material should work.
Next I cut two pieces of masonite peg-board to fit inside the wells. These pieces of peg-board will be the substrates that each
sub-panel will be built on. They were cut to be a loose fit in the wells. You don't have to use peg-board for this. I just
happened to have some on hand. Just about any thin, rigid and non-conducting material should work.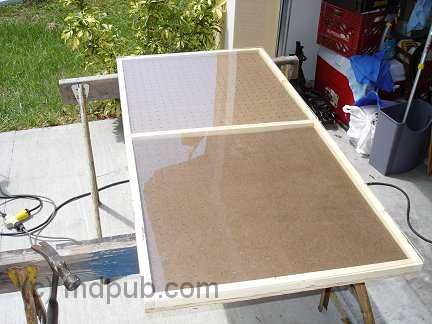 To protect the solar cells from the weather, the panel will have a plexiglass front. Here two pieces of scrap plexiglass have been
cut to fit the front of the panel. I didn't have one piece big enough to do the whole thing. Glass could also be used for this,
but glass is fragile. Hail stones and flying debris that would shatter glass will just bounce off the plexi. Now you can start
to see what the finished panel will look like.
To protect the solar cells from the weather, the panel will have a plexiglass front. Here two pieces of scrap plexiglass have been
cut to fit the front of the panel. I didn't have one piece big enough to do the whole thing. Glass could also be used for this,
but glass is fragile. Hail stones and flying debris that would shatter glass will just bounce off the plexi. Now you can start
to see what the finished panel will look like.
 Oops! This photo shows a close-up of where the two halves of the plexiglass cover meet over the center divider.
I drilled and countersunk holes all around the edges of both pieces of plexiglass so I could screw them onto the face of the
panel with 1 inch drywall screws. Be careful working close to the edge of the plexi. If you get to aggressive it will break,
as happened here. I just glued the broken piece back in and drilled another hole a short distance away.
Oops! This photo shows a close-up of where the two halves of the plexiglass cover meet over the center divider.
I drilled and countersunk holes all around the edges of both pieces of plexiglass so I could screw them onto the face of the
panel with 1 inch drywall screws. Be careful working close to the edge of the plexi. If you get to aggressive it will break,
as happened here. I just glued the broken piece back in and drilled another hole a short distance away.
 Next I gave all the wooden parts of the panel several coats of paint to protect them from moisture and the weather. The box was
painted inside and out. The type of paint and color was scientifically chosen by shaking all the paint cans I had laying around
in my garage and choosing the one that felt like it had enough left in it to do the whole job.
Next I gave all the wooden parts of the panel several coats of paint to protect them from moisture and the weather. The box was
painted inside and out. The type of paint and color was scientifically chosen by shaking all the paint cans I had laying around
in my garage and choosing the one that felt like it had enough left in it to do the whole job.
 The peg-board pieces were also painted. They got several coats on both sides. Be sure to paint them on both sides or they will
curl when exposed to moisture. Curling could damage the solar cells that will be glued to them.
The peg-board pieces were also painted. They got several coats on both sides. Be sure to paint them on both sides or they will
curl when exposed to moisture. Curling could damage the solar cells that will be glued to them.
 As I said above, getting the wax off the cells is a real pain. After some trial and error, I came up with a way that works fairly
well. Still, I would recommend buying from someone who doesn't dip their cells in wax. The first step is a bath in hot water to
melt the wax and separate the cells from each other. Don't let the water boil or the bubbles will jostle the cells against each
other violently. Also, boiling water may be hot enough to loosen the electrical connections on the cells. I also recommend
putting the brick of cells in the water cold, and then slowly heating it up to just below boiling temperature to avoid harsh
thermal shocks to the cells. Plastic tongs and spatulas come in handy for teasing the cells apart once the wax melts. Try not
to pull too hard on the metal tabs or they may rip off. I found that out the hard way while trying to separate the cells. Good
thing I bought extras.
As I said above, getting the wax off the cells is a real pain. After some trial and error, I came up with a way that works fairly
well. Still, I would recommend buying from someone who doesn't dip their cells in wax. The first step is a bath in hot water to
melt the wax and separate the cells from each other. Don't let the water boil or the bubbles will jostle the cells against each
other violently. Also, boiling water may be hot enough to loosen the electrical connections on the cells. I also recommend
putting the brick of cells in the water cold, and then slowly heating it up to just below boiling temperature to avoid harsh
thermal shocks to the cells. Plastic tongs and spatulas come in handy for teasing the cells apart once the wax melts. Try not
to pull too hard on the metal tabs or they may rip off. I found that out the hard way while trying to separate the cells. Good
thing I bought extras.
 This photo shows the complete setup I used. My girlfriend asked what I was cooking. Imagine her surprise when I said solar cells.
The initial hot water bath for melting the wax is in the right-rear. On the left-front is a bath of hot soapy water. On the
right-front is a bath of hot clean water. All the pots are at just below boiling temperature. The sequence I used was to melt the
bricks apart in the hot water bath on the right-rear.
I'd tease the cells apart and transfer them one at a time to the soapy water bath on the left-front to remove any wax on the cell.
Then the
cell would be given a rinse in the hot clean water on the right-front. The cells would then be set out to dry on a towel. You
should change the water frequently in the soapy and rinse water baths. Don't pour the water down the sink though, because the
wax will solidify in your drains and clog them up. Dump the water outside. This process removed almost all the wax from
the cells. There is still a very light film on some of the cells, but it doesn't seem to interfere with soldering or the working
of the cells. A solvent bath would probably remove the rest of the wax, but that would be dangerous and stinky since the only
solvents I could think of that would cut wax are either flamable, toxic or smelly, or all three.
This photo shows the complete setup I used. My girlfriend asked what I was cooking. Imagine her surprise when I said solar cells.
The initial hot water bath for melting the wax is in the right-rear. On the left-front is a bath of hot soapy water. On the
right-front is a bath of hot clean water. All the pots are at just below boiling temperature. The sequence I used was to melt the
bricks apart in the hot water bath on the right-rear.
I'd tease the cells apart and transfer them one at a time to the soapy water bath on the left-front to remove any wax on the cell.
Then the
cell would be given a rinse in the hot clean water on the right-front. The cells would then be set out to dry on a towel. You
should change the water frequently in the soapy and rinse water baths. Don't pour the water down the sink though, because the
wax will solidify in your drains and clog them up. Dump the water outside. This process removed almost all the wax from
the cells. There is still a very light film on some of the cells, but it doesn't seem to interfere with soldering or the working
of the cells. A solvent bath would probably remove the rest of the wax, but that would be dangerous and stinky since the only
solvents I could think of that would cut wax are either flamable, toxic or smelly, or all three.
 Here are some separated and cleaned solar cells drying on a towel. Once separated from their wax stabilized brick form, they are
amazingly fragile and difficult to handle and store. I would recommend leaving them as bricks until you are ready to install them
in your panel. That way you won't wreck them before you get to use them. So build the panel first. Now it's time to start installing
them in the panel
Here are some separated and cleaned solar cells drying on a towel. Once separated from their wax stabilized brick form, they are
amazingly fragile and difficult to handle and store. I would recommend leaving them as bricks until you are ready to install them
in your panel. That way you won't wreck them before you get to use them. So build the panel first. Now it's time to start installing
them in the panel
 I started out by drawing a grid pattern on each of the two pieces of pegboard, lightly in pencil, so I would know where each of the
18 cells on them would be located. Then I laid out the cells on that grid pattern upside-down so I could solder them together.
All 18 cells on each half panel need to be soldered together in series, then both half panels need to be connected in series to
get the desired voltage.
I started out by drawing a grid pattern on each of the two pieces of pegboard, lightly in pencil, so I would know where each of the
18 cells on them would be located. Then I laid out the cells on that grid pattern upside-down so I could solder them together.
All 18 cells on each half panel need to be soldered together in series, then both half panels need to be connected in series to
get the desired voltage.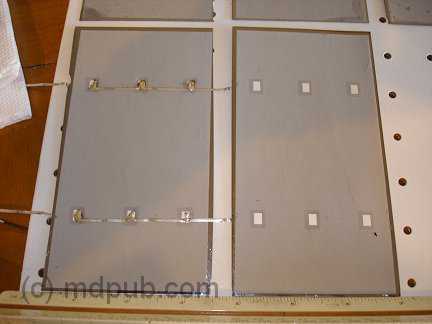 I used a low-Wattage soldering iron and fine rosen-core solder. I also used a rosen pen on the solder points on the back of the
cells before soldering. Use a real light touch with the soldering iron. The cells are thin and delicate. If you push too hard,
you will break the cells. I got careless a couple of times and scrapped a couple of cells.
I used a low-Wattage soldering iron and fine rosen-core solder. I also used a rosen pen on the solder points on the back of the
cells before soldering. Use a real light touch with the soldering iron. The cells are thin and delicate. If you push too hard,
you will break the cells. I got careless a couple of times and scrapped a couple of cells.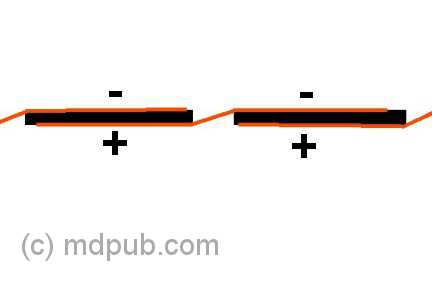 UPDATE 04/01/10
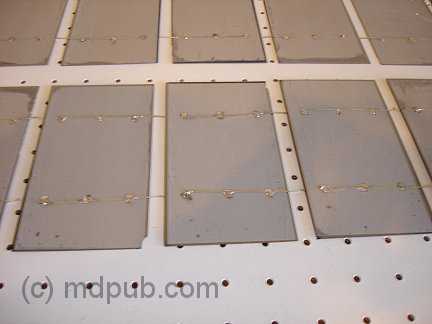 I repeated the above steps and soldered solar cells together until I had a string of six cells. I soldered tabs from scrapped
cells to the solder points on the back of the last cell in the string of six. Then I repeated the whole process two more times to
get three strings of six cells for a total of 18 for this half of the panel.
I repeated the above steps and soldered solar cells together until I had a string of six cells. I soldered tabs from scrapped
cells to the solder points on the back of the last cell in the string of six. Then I repeated the whole process two more times to
get three strings of six cells for a total of 18 for this half of the panel.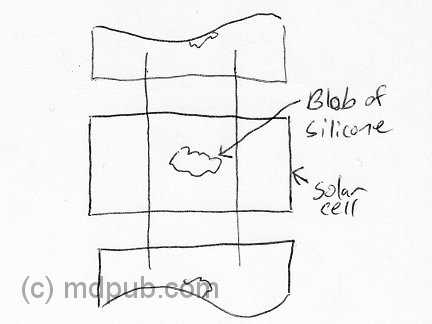 Gluing the cells in place proved to be a little tricky. I placed a small blob of clear silicone caulk in the center of each cell
in a six cell string. Then I flipped the string over and set in place on the pencil line grid I had laid out earlier. I pressed
lightly in the center of each cell to get it to stick to the pegboard panel. Flipping the floppy string of cells is tricky. Another
set of hands may be useful in during this step.
Gluing the cells in place proved to be a little tricky. I placed a small blob of clear silicone caulk in the center of each cell
in a six cell string. Then I flipped the string over and set in place on the pencil line grid I had laid out earlier. I pressed
lightly in the center of each cell to get it to stick to the pegboard panel. Flipping the floppy string of cells is tricky. Another
set of hands may be useful in during this step.
 Here I used copper braid to interconnect first and second strings of cells. You could use solar cell tabbing material or even
regular wire. I just happened to have the braid on hand. There is another similar interconnection between the second and third
strings at the opposite end of the board. I used blobs of silicone caulk to anchor the braid and prevent it from flopping around.
Here I used copper braid to interconnect first and second strings of cells. You could use solar cell tabbing material or even
regular wire. I just happened to have the braid on hand. There is another similar interconnection between the second and third
strings at the opposite end of the board. I used blobs of silicone caulk to anchor the braid and prevent it from flopping around. 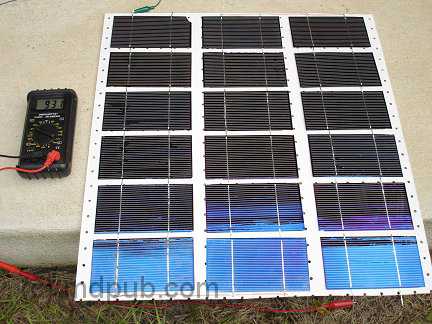 Here I am testing first half panel outside in the sun. In weak sun through clouds the half panel is producing 9.31 Volts.
YAHOO! It works! Now all I had to do is build another one just like it.
Here I am testing first half panel outside in the sun. In weak sun through clouds the half panel is producing 9.31 Volts.
YAHOO! It works! Now all I had to do is build another one just like it.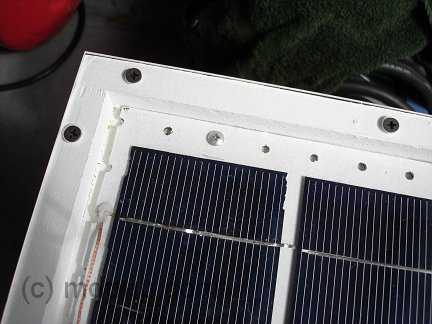 Each of the half panels dropped right into their places in the main panel frame. I used four small screws (like the silver one
in the photo) to anchor each of the half panels in place.
Each of the half panels dropped right into their places in the main panel frame. I used four small screws (like the silver one
in the photo) to anchor each of the half panels in place. Wires to connect the two half panels together were run through the vent holes in the central divider. Again, blobs of silicone
caulk were used to anchor the wire in place and prevent it from flopping around.
Wires to connect the two half panels together were run through the vent holes in the central divider. Again, blobs of silicone
caulk were used to anchor the wire in place and prevent it from flopping around.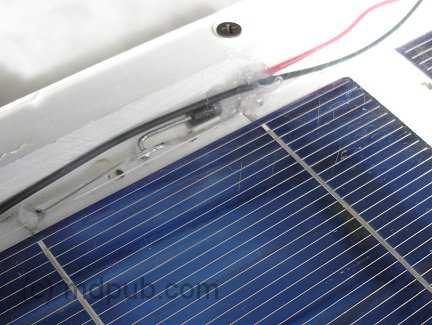 Each solar panel in a solar power system needs a blocking diode in series with it to prevent the panel from discharging your
batteries at night or during cloudy weather. I used a Schottky diode with a 3.3 Amp current rating. Schottky diodes have a
much lower forward voltage drop than ordinary rectifier diodes, so less power is wasted. Every Watt counts. I got a package of
25 31DQ03 Schottky diodes on
Each solar panel in a solar power system needs a blocking diode in series with it to prevent the panel from discharging your
batteries at night or during cloudy weather. I used a Schottky diode with a 3.3 Amp current rating. Schottky diodes have a
much lower forward voltage drop than ordinary rectifier diodes, so less power is wasted. Every Watt counts. I got a package of
25 31DQ03 Schottky diodes on
 I drilled a hole in the back of the panel near the top for the wires to exit. I put a knot in the wires for strain relief, and
anchored them in place with yet more of the silicone caulk.
I drilled a hole in the back of the panel near the top for the wires to exit. I put a knot in the wires for strain relief, and
anchored them in place with yet more of the silicone caulk.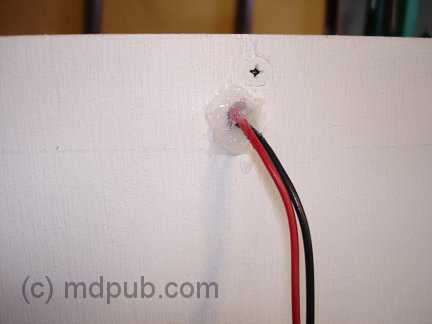 And still more silicone caulk was used to seal the outside of the panel where the wires exit.
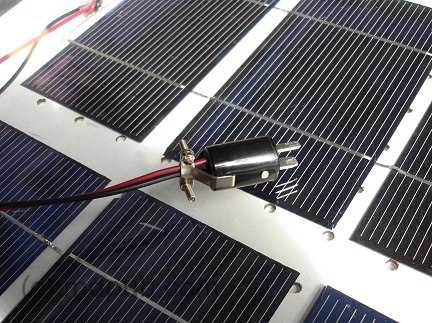 I added a polarized two-pin jones plug to the end of the panel wires. A mating female plug will be wired into the
charge controller I use with my
I added a polarized two-pin jones plug to the end of the panel wires. A mating female plug will be wired into the
charge controller I use with my  UPDATE: 10/12/09
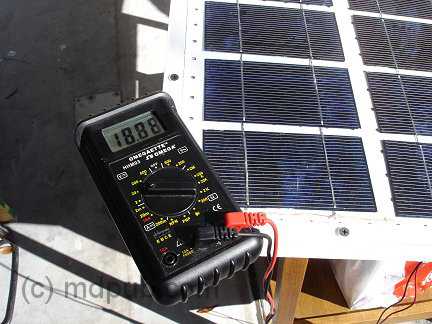 Here I am testing the Voltage output of the completed panel in bright winter sunlight. My meter says 18.88 Volts with no load.
That's exactly what I was aiming for.
Here I am testing the Voltage output of the completed panel in bright winter sunlight. My meter says 18.88 Volts with no load.
That's exactly what I was aiming for.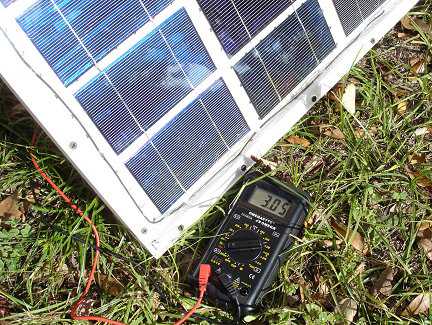 Here I am testing the current capacity of the panel, again in bright winter sunlight. My meter says 3.05 Amps short circuit
current. That is right about what the cells are rated for. So the panel is working very well.
Here I am testing the current capacity of the panel, again in bright winter sunlight. My meter says 3.05 Amps short circuit
current. That is right about what the cells are rated for. So the panel is working very well.