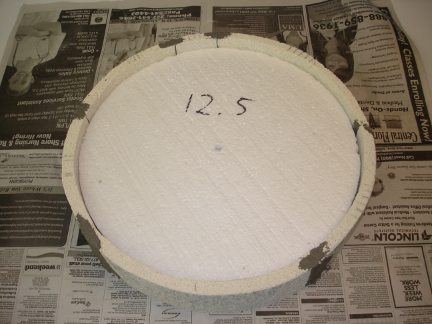
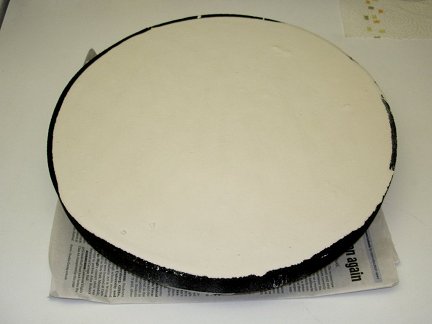
 This is a 12.5 inch diameter, 1.5 inch thick, light-weight telescope mirror blank that I made myself. The blank only weighs 11 lbs, 15 oz. This is a
process I call The Waffle-Back Design, because the finished mirror blank looks like a big waffle.
This is a 12.5 inch diameter, 1.5 inch thick, light-weight telescope mirror blank that I made myself. The blank only weighs 11 lbs, 15 oz. This is a
process I call The Waffle-Back Design, because the finished mirror blank looks like a big waffle.
This web page will show how I did it.
Click the photo for a larger view.
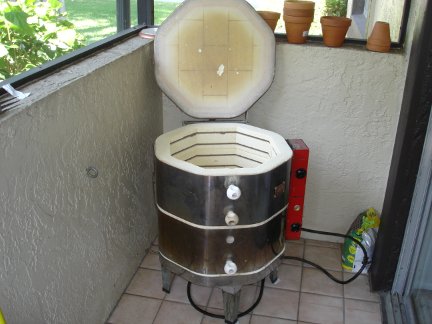 The most important tool needed to make telescope mirrors is a kiln. This is my Skutt Model 181 kiln. It is an older model that I bought used
cheap. It works great and came with a lot of accessories. It is nearly 18 inches in inside diameter, which should allow me to make up to
16 inch diameter mirror blanks. It is a high-fire ceramics kiln made to reach temperatures well in excess of 2000 degrees F. For glass fusing
it won't need to get that hot.
The most important tool needed to make telescope mirrors is a kiln. This is my Skutt Model 181 kiln. It is an older model that I bought used
cheap. It works great and came with a lot of accessories. It is nearly 18 inches in inside diameter, which should allow me to make up to
16 inch diameter mirror blanks. It is a high-fire ceramics kiln made to reach temperatures well in excess of 2000 degrees F. For glass fusing
it won't need to get that hot.
 The next most important thing needed i a supply of glass. I am using plate glass because it is inexpensive, and easy to obtain. I hope to someday
find a source of inexpensive borosilicate glass. Until then, I prowl thrift stores looking for cheap glass table tops to cut up for my blank
making experiments. I have recently bought several 1/2 inch thick glass tabletops and am busily cutting them up to make blanks. I have gotten very
good at cutting circles out of glass. See my page on making laminated fused glass blanks for information
on how I cut glass circles and fuse them together to make solid blanks. It has good background information on how I slowly worked my way up to this
point of making light-weight, cellular blanks.
The next most important thing needed i a supply of glass. I am using plate glass because it is inexpensive, and easy to obtain. I hope to someday
find a source of inexpensive borosilicate glass. Until then, I prowl thrift stores looking for cheap glass table tops to cut up for my blank
making experiments. I have recently bought several 1/2 inch thick glass tabletops and am busily cutting them up to make blanks. I have gotten very
good at cutting circles out of glass. See my page on making laminated fused glass blanks for information
on how I cut glass circles and fuse them together to make solid blanks. It has good background information on how I slowly worked my way up to this
point of making light-weight, cellular blanks.
 To make light-weight mirror blanks, two types of mold are needed. One to define the edge of the blank, and one to shape the back of the blank.
I started by making the edge mold first. Circular sections were cut out of soft K-23 firebricks on a bandsaw and fitted around a styrofoam form 12.5 inches
in diameter that was cut out on a hot-wire foam cutter. Once all the sections of the form were in place, they were glued together with furnace
cement.
To make light-weight mirror blanks, two types of mold are needed. One to define the edge of the blank, and one to shape the back of the blank.
I started by making the edge mold first. Circular sections were cut out of soft K-23 firebricks on a bandsaw and fitted around a styrofoam form 12.5 inches
in diameter that was cut out on a hot-wire foam cutter. Once all the sections of the form were in place, they were glued together with furnace
cement.
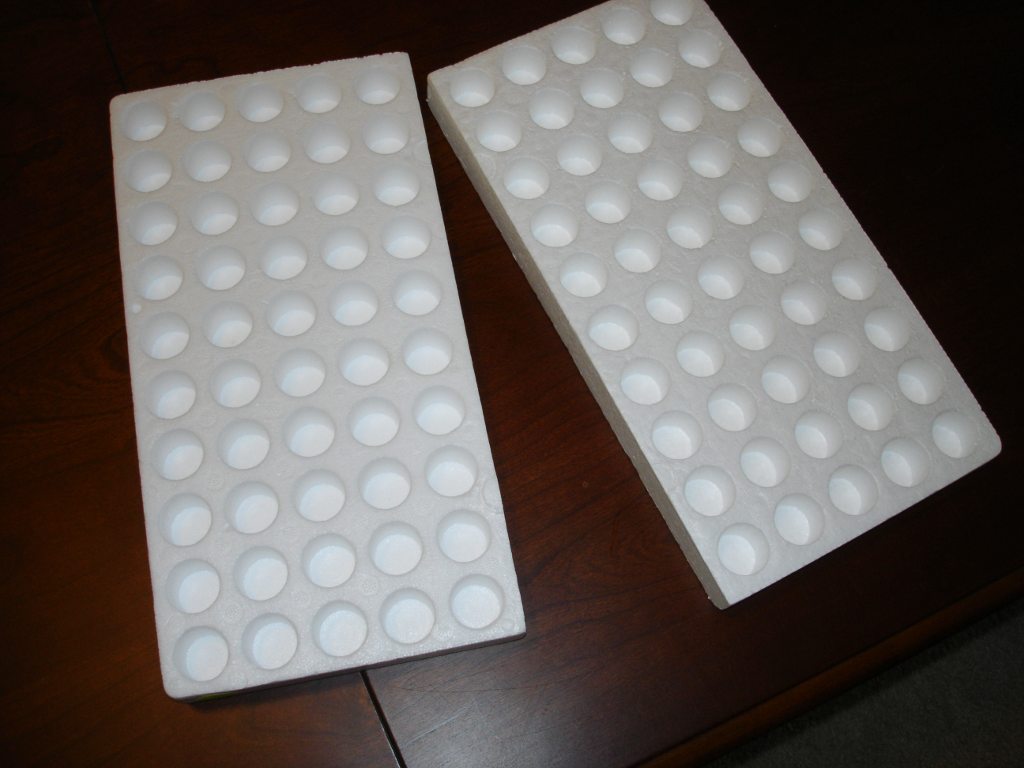
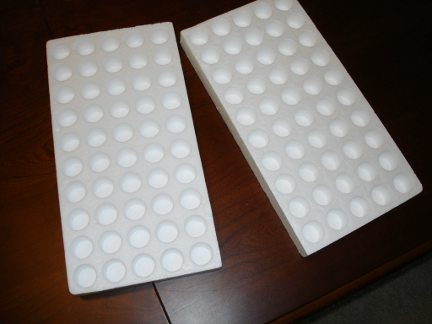 To make the mold for shaping the back of the blank, I started with some pieces of styrofoam that had deep pockets molded into them. This styrofoam
is used to cushion small glass bottles for shipping. The pockets are about 1 inch in diameter and about 7/8 inch deep. They have a slight taper to them.
To make the mold for shaping the back of the blank, I started with some pieces of styrofoam that had deep pockets molded into them. This styrofoam
is used to cushion small glass bottles for shipping. The pockets are about 1 inch in diameter and about 7/8 inch deep. They have a slight taper to them.
Click the photo for a larger view.
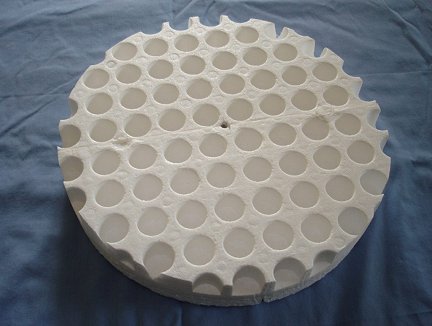 I glued two of the pieces together on a piece of flat styrofoam backing for strength. Then I
cut out a circle 12 inches in diameter using the hot-wire foam cutter. I wanted to leave 1/4 inch of solid glass all the way around the blank.
So that would make a total of 12.5 inches in final diameter. This is the pattern of holes or pockets I want to make in the back of the mirror
blank to lighten it.
I glued two of the pieces together on a piece of flat styrofoam backing for strength. Then I
cut out a circle 12 inches in diameter using the hot-wire foam cutter. I wanted to leave 1/4 inch of solid glass all the way around the blank.
So that would make a total of 12.5 inches in final diameter. This is the pattern of holes or pockets I want to make in the back of the mirror
blank to lighten it.
Click the photo for a larger view.
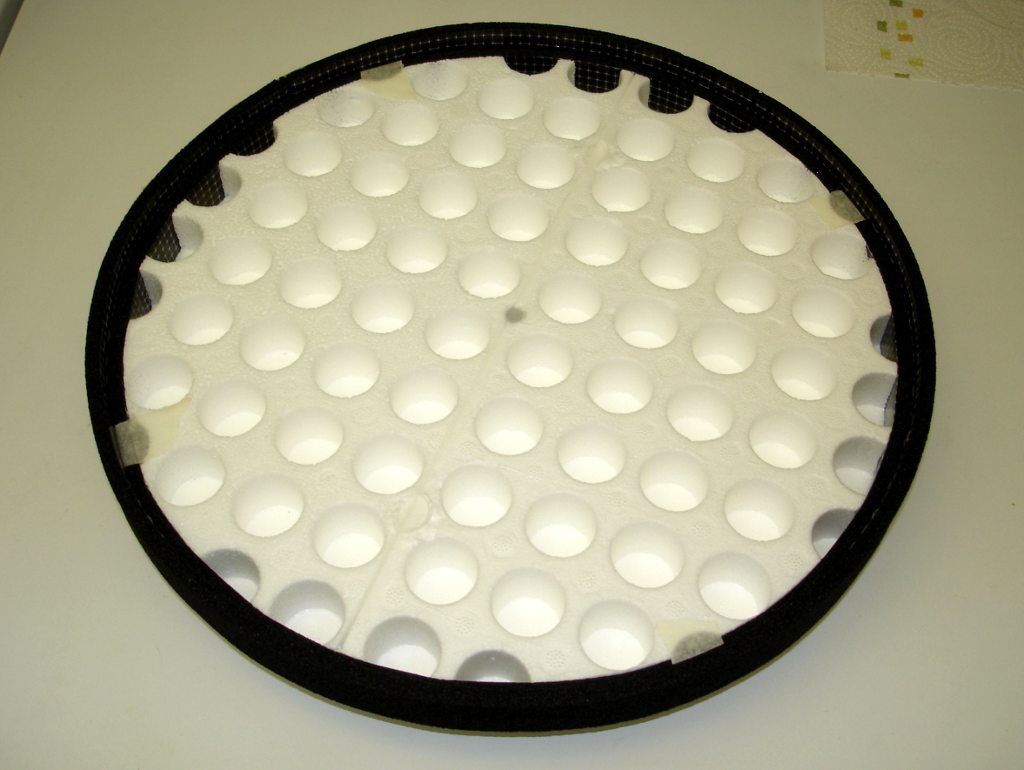
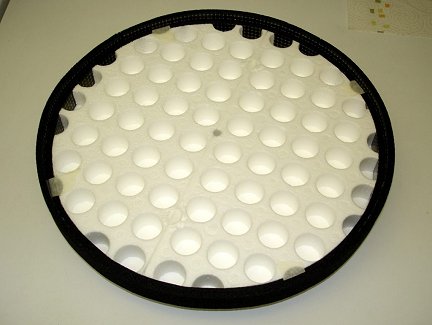 I wrapped 1/4 inch wide, adhesive-backed, foam weather stripping around the mold to seal all the partial holes and give me the needed 12.5 inch final
diameter. I added a second wrap of weather stripping around the first and offset upward by 1/4 inch to make a dam around the top of the mold. I also used
masking tape to close off four of the smaller pockets that I thought would make posts too skinny to survive handling.
I wrapped 1/4 inch wide, adhesive-backed, foam weather stripping around the mold to seal all the partial holes and give me the needed 12.5 inch final
diameter. I added a second wrap of weather stripping around the first and offset upward by 1/4 inch to make a dam around the top of the mold. I also used
masking tape to close off four of the smaller pockets that I thought would make posts too skinny to survive handling.
Click the photo for a larger view.
 Next, I mixed up a batch of 50% Hydrocal Plaster and 50% silica flour. The plaster alone will have no strength at the temperature glass melts.
Adding the silica flour, which is just fine ground silica sand, adds strength to the plaster at high temperature. I made the mixture soupy
enough to pour into the mold and fill all the pockets. I agitated it well to get as many of the air bubbles out of it as possible.
Next, I mixed up a batch of 50% Hydrocal Plaster and 50% silica flour. The plaster alone will have no strength at the temperature glass melts.
Adding the silica flour, which is just fine ground silica sand, adds strength to the plaster at high temperature. I made the mixture soupy
enough to pour into the mold and fill all the pockets. I agitated it well to get as many of the air bubbles out of it as possible.
I let it cure overnight, then put it in a 180 degree F oven for 24 hrs to bake out the excess water.
Click the photo for a larger view.
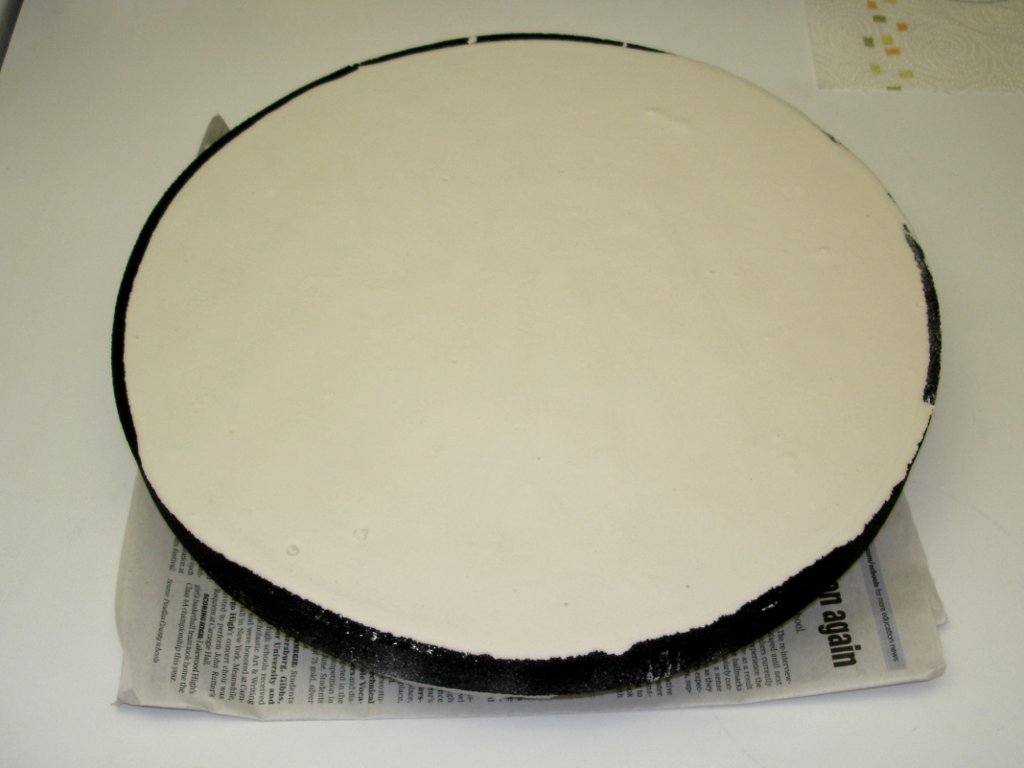
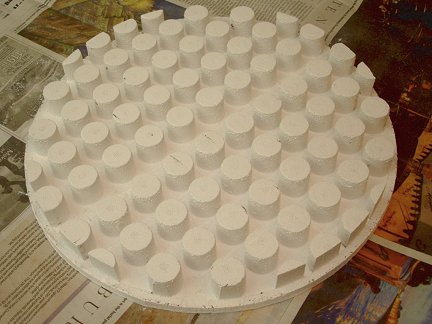 Here is the resulting plaster piece for molding the back of the mirror. It is a negative of what I want the back of the mirror blank to look like.
It is covered with posts where there were pockets in the styrofoam. I have tried many methods to separate the plaster
and the styrofoam. None are easy, and only one seems to work well. First off, nothing I have tried as a mold release agent has worked, and I have tried
many things. Commercial teflon mold release agent, furniture wax, cooking oil spray, and other things too. The problem is that styrofoam is porous, and the
plaster works its way into the pores, and locks itself into the styrofoam as it cures. I keep hoping to find something that will seal the pores in the
styrofoam and leave behind a smooth surface that the plaster won't stick to. I haven't found it yet.
Here is the resulting plaster piece for molding the back of the mirror. It is a negative of what I want the back of the mirror blank to look like.
It is covered with posts where there were pockets in the styrofoam. I have tried many methods to separate the plaster
and the styrofoam. None are easy, and only one seems to work well. First off, nothing I have tried as a mold release agent has worked, and I have tried
many things. Commercial teflon mold release agent, furniture wax, cooking oil spray, and other things too. The problem is that styrofoam is porous, and the
plaster works its way into the pores, and locks itself into the styrofoam as it cures. I keep hoping to find something that will seal the pores in the
styrofoam and leave behind a smooth surface that the plaster won't stick to. I haven't found it yet.
You might think that the styrofoam can be dissolved off with a solvent like acetone. I have tried that. The result is a slimy mess that still sticks
to the plaster, and as far as I can tell, is impossible to remove. Burning off the plastic residue in the kiln creates clouds of nasty smelling smoke, and mini
explosions inside the kiln. That is not good.
The way that seems to work best is to use a hot-wire foam cutter to make many cuts into the foam, between the posts, and then gently pry out the
cut pieces of styrofoam. It is tedious, time-consuming, and you must be careful not to damage the posts. However, it seems to be the best way.
Click the photo above for a larger view.
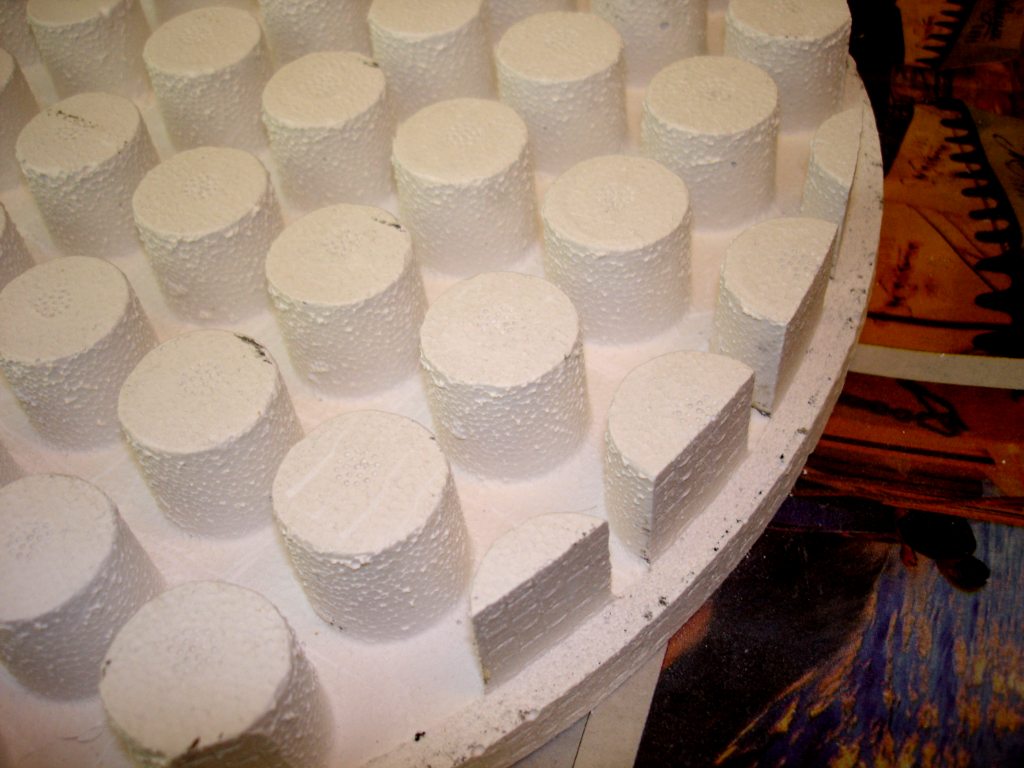
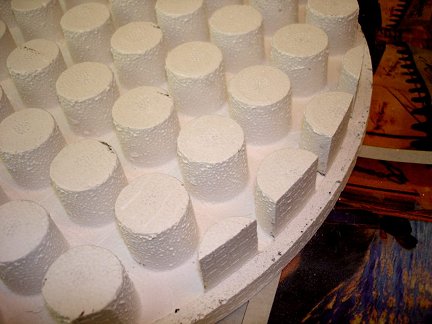 Here is a close-up of the plaster back mold. You can see the rough surface of the posts caused by the plaster working its way into the pores of the
styrofoam. No wonder it is all but impossible to separate the plaster and styrofoam.
Here is a close-up of the plaster back mold. You can see the rough surface of the posts caused by the plaster working its way into the pores of the
styrofoam. No wonder it is all but impossible to separate the plaster and styrofoam.
This photo also shows how the posts near the edge are truncated. I wanted to leave a solid 1/4 inch of glass all the way around the edge.
Click the photo for a larger view.
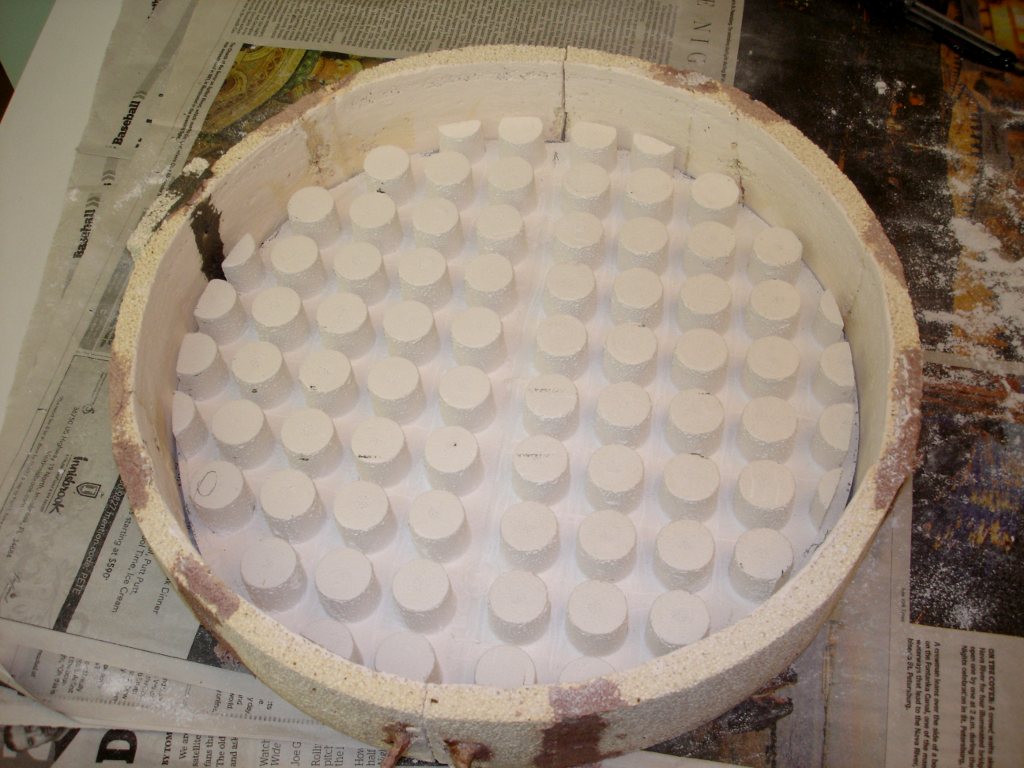
 Here the back mold has been placed inside the edge mold to check the fit. The plaster mold was a little small, leaving a small gap between the
edge of the plaster and the firebrick outer mold. That's ok though. I didn't want a tight fit out of fear that differential expansion in the
kiln would cause the molds to crack. I had a plan to fill the gap and keep molten glass out of it.
Here the back mold has been placed inside the edge mold to check the fit. The plaster mold was a little small, leaving a small gap between the
edge of the plaster and the firebrick outer mold. That's ok though. I didn't want a tight fit out of fear that differential expansion in the
kiln would cause the molds to crack. I had a plan to fill the gap and keep molten glass out of it.
Once the mold was assembled on a kiln shelf, I used a small spoon to pour sand into the gap between the plaster and the firebrick molds.
I used a small paint brush to herd any sand that missed the gap back into place. This did a good job of sealing up the mold.
Click the photo for a larger view.
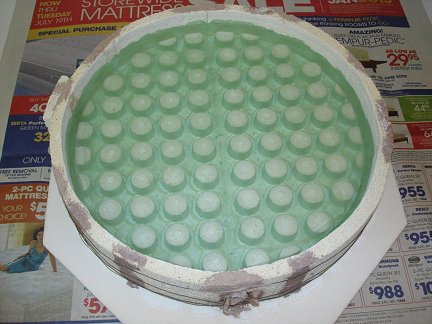
 Here is a picture of the completed mold in the kiln with glass in it, ready to be fired. I had a problem when it came to putting the glass in the mold.
My usual procedure when making solid blanks is to clamp the mold around glass circles that are to be fused
together. This time though, I had to have the mold
entirely assembled before the glass went in. I had no good way to get the glass disks into the mold. They are nearly the same diameter as the mold, so there
was no room to get them in with my fingers holding them. I didn't want to drop them in, so I had to go down to
Harbor Freight and buy a suction cup
to pick up the glass and place it gently in the mold.
Here is a picture of the completed mold in the kiln with glass in it, ready to be fired. I had a problem when it came to putting the glass in the mold.
My usual procedure when making solid blanks is to clamp the mold around glass circles that are to be fused
together. This time though, I had to have the mold
entirely assembled before the glass went in. I had no good way to get the glass disks into the mold. They are nearly the same diameter as the mold, so there
was no room to get them in with my fingers holding them. I didn't want to drop them in, so I had to go down to
Harbor Freight and buy a suction cup
to pick up the glass and place it gently in the mold.
I wanted a good 0.5 inch of solid glass on the front of the mirror for grinding a curve. My calculations showed that I needed two 0.5 inch thick disks
of glass 12.5 inches in diameter, and a third piece equal to about half a disk to make the
necessary amount of glass. I also added a little extra glass to the calculation to allow for the fact that the mold is slightly over-size, and to allow
for slight leakage, flashing that will have to be removed, and other issues. So that is what I loaded into the mold. As usual, the glass was thoroughly
cleaned in my dishwasher first to promote good fusion and expulsion of air between the layers. See my page on
making laminated fused glass blanks for information on how I cut circles out of glass and fuse them together.
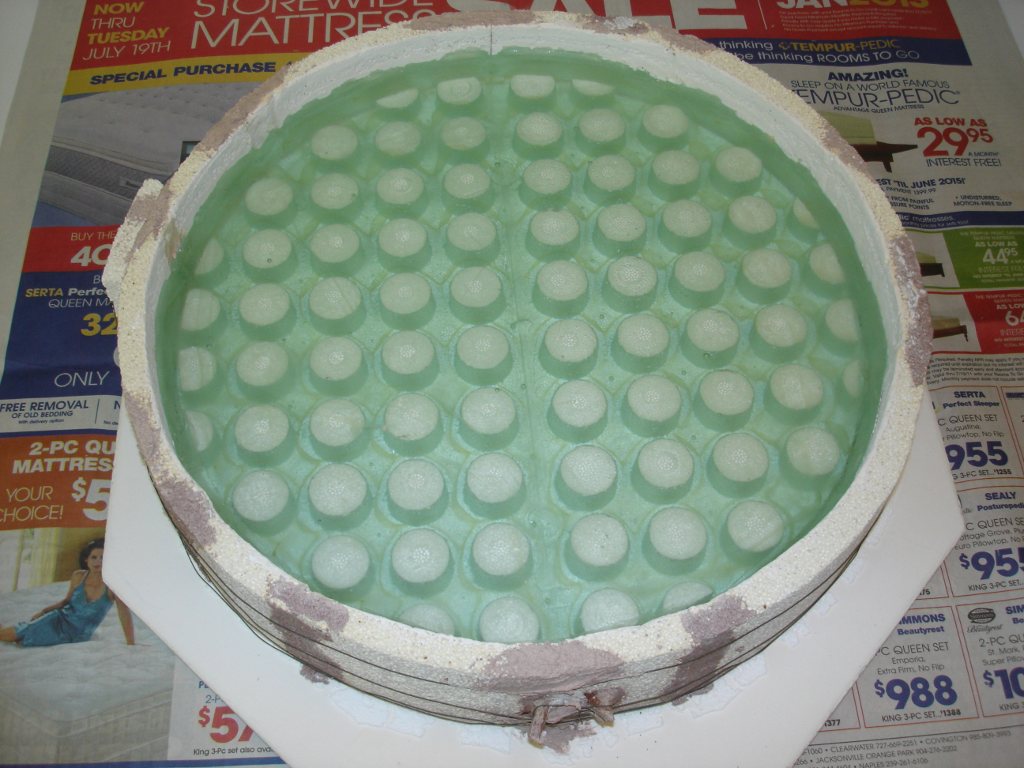
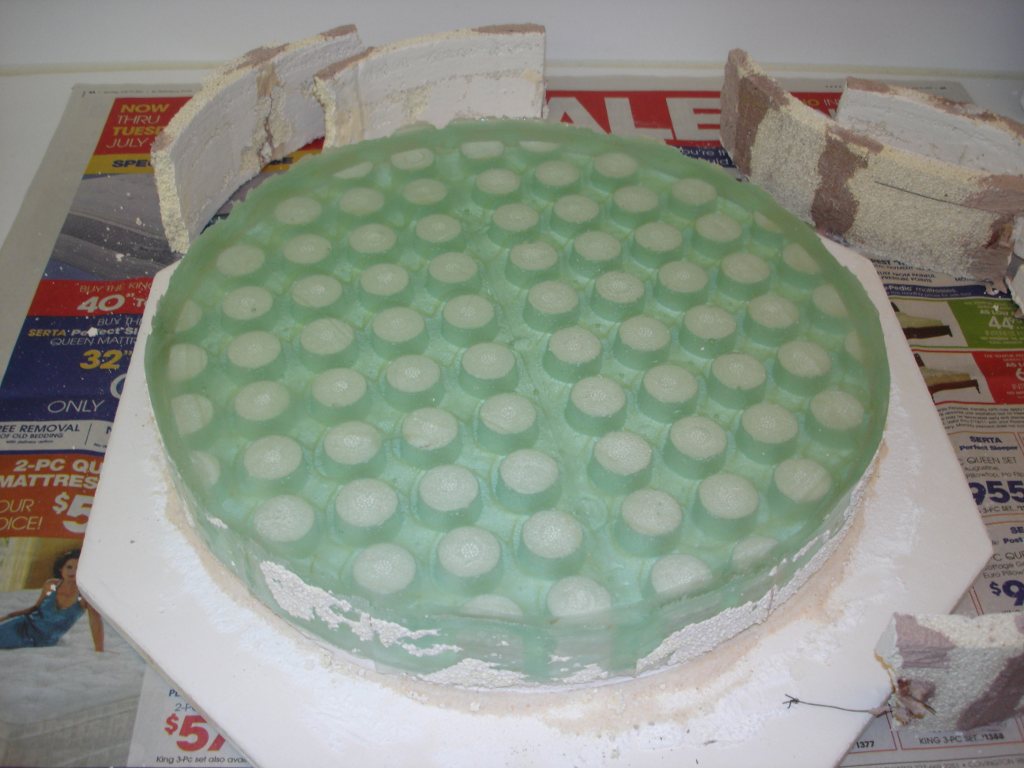
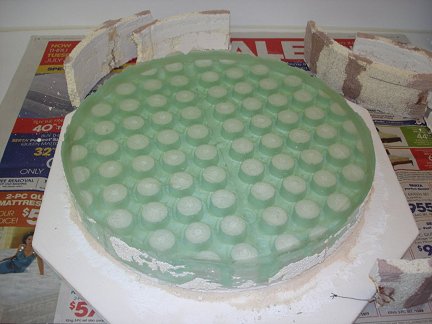
 Here is the blank after removing it from the kiln the next day. I was very happy. The blank looked nearly perfect. There were a few more air bubbles than
I would have liked, but otherwise, it was great. I couldn't wait to get it out of the mold and have a good look at it.
Click the photo for a larger view.
Here is the blank after removing it from the kiln the next day. I was very happy. The blank looked nearly perfect. There were a few more air bubbles than
I would have liked, but otherwise, it was great. I couldn't wait to get it out of the mold and have a good look at it.
Click the photo for a larger view.
 Here the firebrick edge mold has been stripped off. I generally try to use the edge molds several times. This mold had already been used before, and was in
pretty bad shape. So I just broke it off and didn't bother trying to be careful removing it. I'll make another for the next one.
Here the firebrick edge mold has been stripped off. I generally try to use the edge molds several times. This mold had already been used before, and was in
pretty bad shape. So I just broke it off and didn't bother trying to be careful removing it. I'll make another for the next one.
You can see the sand at the base of the blank that filled the gap between the plaster and the firebrick. Bits of firebrick are also stuck to the edge of
the blank. The edge of the blank is also somewhat ragged and out of round. That will all be cleaned up during a later edging operation. First I needed
to remove the plaster back mold.
Click the photo for a larger view.
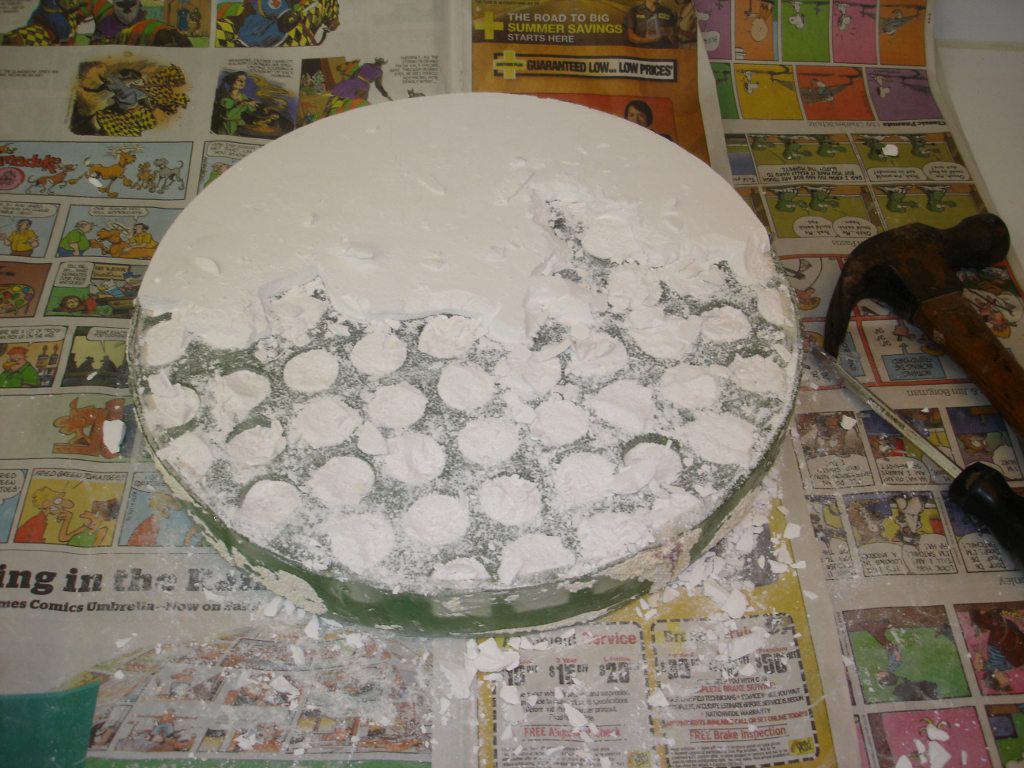
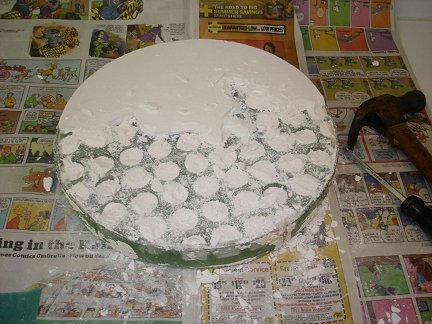 Here the blank has been turned over and I have begun chipping away the plaster back mold. At glass fusing temperatures, the plaster looses almost
all it's strength. Only the addition of the silica flour allows it to hold together at all. So chipping away the plaster is very easy. I was too lazy
to go out to the garage and get a proper chisel, so I abused a poor old screwdriver during the chipping process.
Click the photo for a larger view.
Here the blank has been turned over and I have begun chipping away the plaster back mold. At glass fusing temperatures, the plaster looses almost
all it's strength. Only the addition of the silica flour allows it to hold together at all. So chipping away the plaster is very easy. I was too lazy
to go out to the garage and get a proper chisel, so I abused a poor old screwdriver during the chipping process.
Click the photo for a larger view.
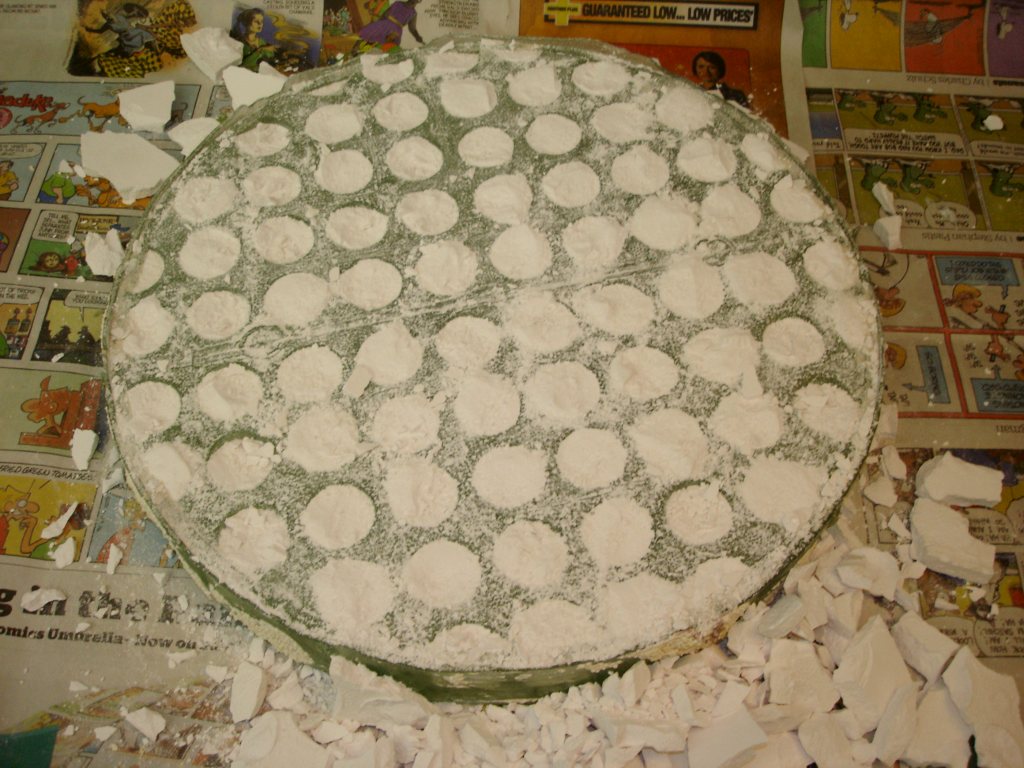
 Here all the plaster backing has been removed. Only the plaster filling the pockets remains.
Click the photo for a larger view.
 I have found that a spade bit, slightly smaller than the diameter of the pockets, works well for clearing out the soft plaster. The plaster
left behind by the drill but is easily scraped out with the long-suffering screwdriver.
I have found that a spade bit, slightly smaller than the diameter of the pockets, works well for clearing out the soft plaster. The plaster
left behind by the drill but is easily scraped out with the long-suffering screwdriver.
For the smaller partial pockets near the edge of the blank, I switched to a smaller twist drill bit. I drilled two or three holes in the plaster
in the smaller pockets, to get the screwdriver in, then broke and scraped out the rest of the plaster.
Click the photo for a larger view.
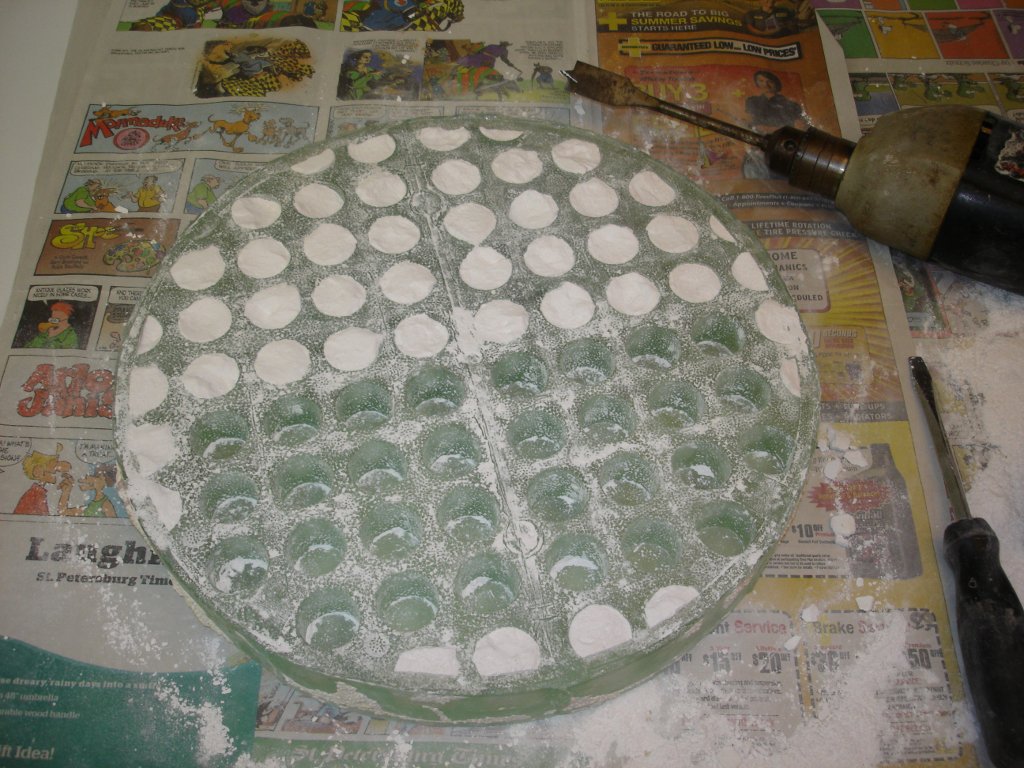
 It is a messy and tedious process that takes about an hour, but finally all the plaster was cleared out of the pockets. After a washing to
remove all the plaster dust, the blank was starting to look really nice. The next step is edging to remove the bits of stuck on mold,
and make the edge truly round and get the blank to the correct diameter.
It is a messy and tedious process that takes about an hour, but finally all the plaster was cleared out of the pockets. After a washing to
remove all the plaster dust, the blank was starting to look really nice. The next step is edging to remove the bits of stuck on mold,
and make the edge truly round and get the blank to the correct diameter.
Click the photo for a larger view.
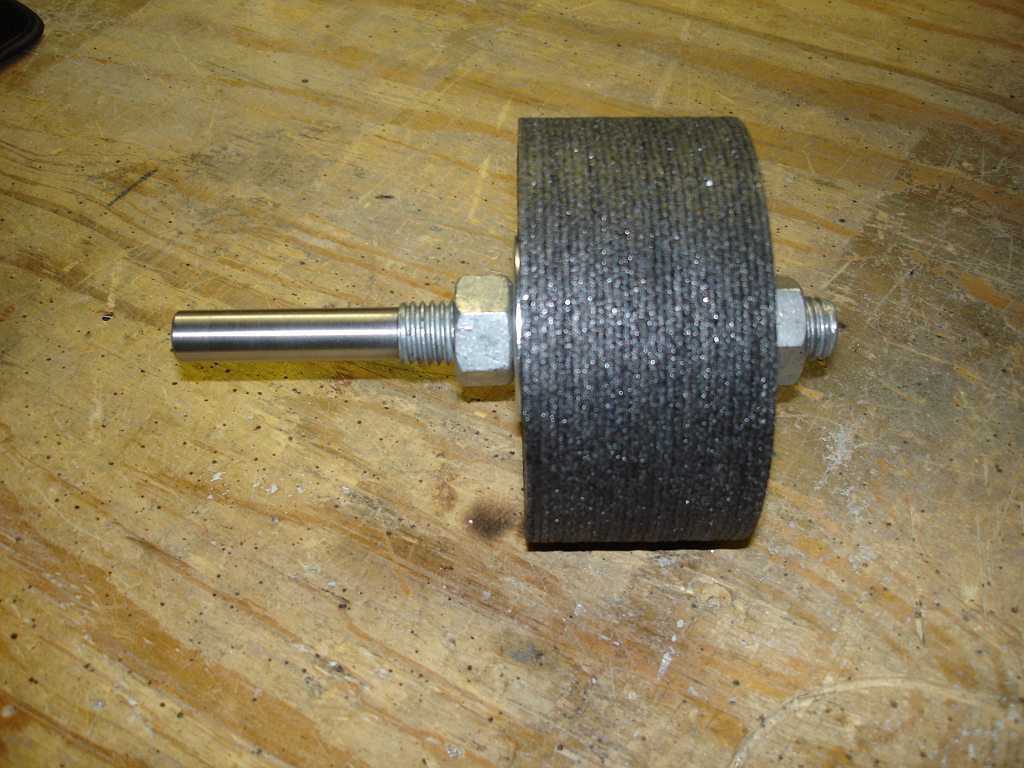
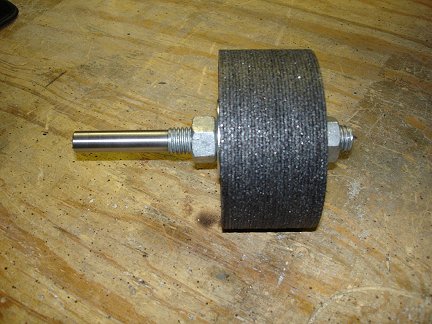 The proper tool for edging a mirror blank is a thick grinding wheel. Well, thick grinding wheels are very expensive, and somewhat hard to find. So
I decided to make my own grinding wheel. While in Harbor Freight I noticed
they sell thin masonry grinding disks in packs of 10 at a very inexpensive
price. Looking at them, I got the idea of stacking a bunch of these thin disks to make a thick wheel. I had a machinist friend of mine make a mandrel
for me that could hold a stack of thirty disks. Shazam! Just like that I had myself a thick grinding wheel on the cheap, and when I wear it down, the
disks are easily, and cheaply replaceable.
The proper tool for edging a mirror blank is a thick grinding wheel. Well, thick grinding wheels are very expensive, and somewhat hard to find. So
I decided to make my own grinding wheel. While in Harbor Freight I noticed
they sell thin masonry grinding disks in packs of 10 at a very inexpensive
price. Looking at them, I got the idea of stacking a bunch of these thin disks to make a thick wheel. I had a machinist friend of mine make a mandrel
for me that could hold a stack of thirty disks. Shazam! Just like that I had myself a thick grinding wheel on the cheap, and when I wear it down, the
disks are easily, and cheaply replaceable.
Click the photo for a larger view.
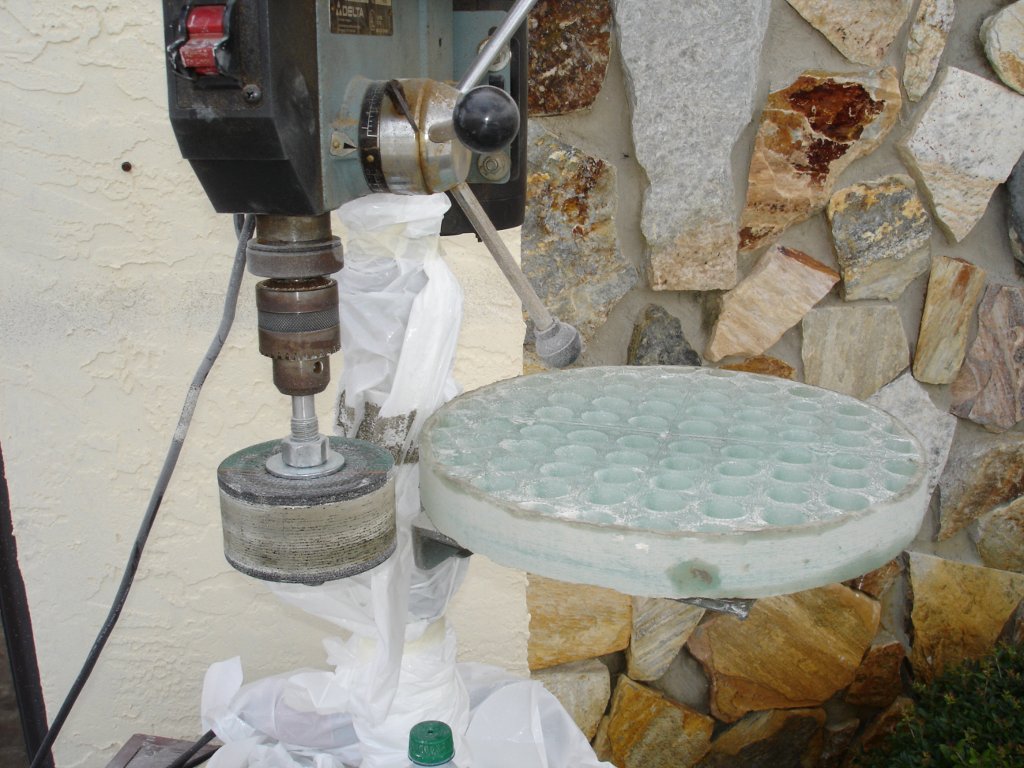
 Here is a photo of the setup for edging the mirror blank. The blank itself is on a lazy-suzan table mounted on the table of the drill press.
My home-made grinding wheel is chucked up in the drill press. The blank is pressed against the grinding wheel with one hand while applying
braking pressure with the other hand to prevent the blank from spinning out of control. The differential speed provides good grinding action.
In short order the blank was trued up, perfectly round, and cut down to the proper diameter.
Here is a photo of the setup for edging the mirror blank. The blank itself is on a lazy-suzan table mounted on the table of the drill press.
My home-made grinding wheel is chucked up in the drill press. The blank is pressed against the grinding wheel with one hand while applying
braking pressure with the other hand to prevent the blank from spinning out of control. The differential speed provides good grinding action.
In short order the blank was trued up, perfectly round, and cut down to the proper diameter.
Water must be continuously applied during the grinding operation to keep down the heat, or large chips will begin breaking out of the edge of
the mirror blank as the edge overheats. The entire blank may crack if allowed to overheat.
During the grinding operation I wear a face shield, a good quality dust mask, and leather gloves. Chips of glass tend to go flying in all directions,
especially at the start of the roughing operation when the edge is still ragged. The dust produced is very bad for your lungs. Of course there are
always sharp edges when dealing with glass. I also swaddle my drill press in plastic sheeting to prevent the water, mud, dust and glass chips from getting
all over and into it.
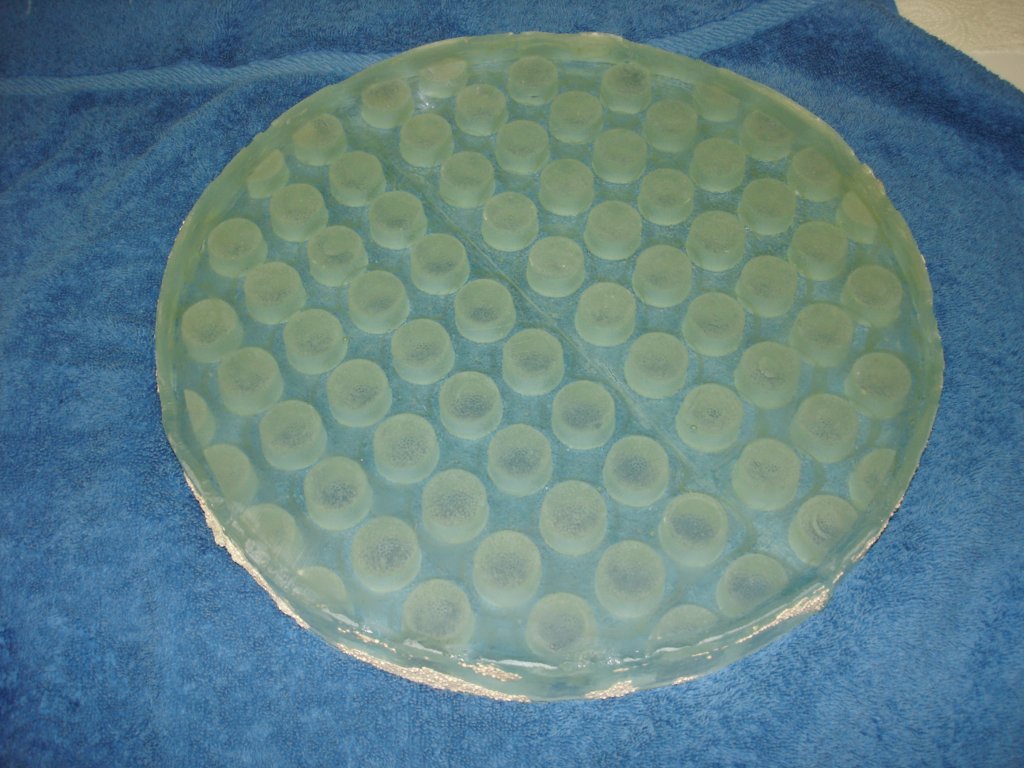
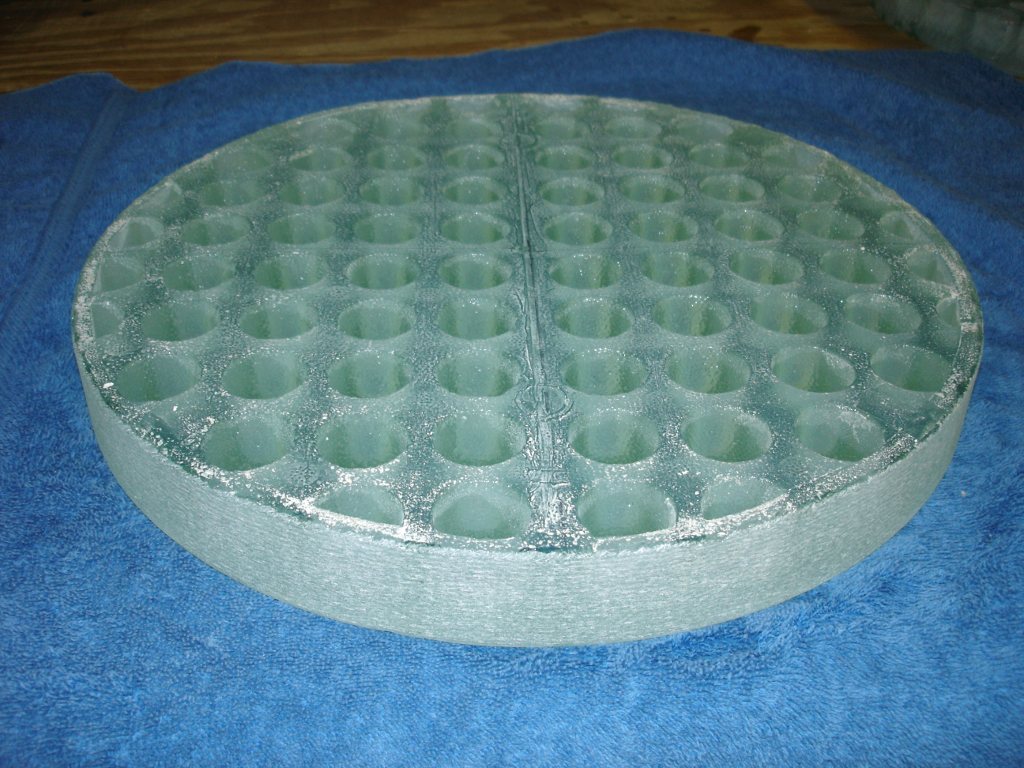
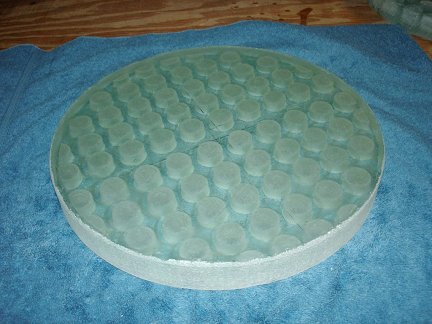
 Here is the back of the finished blank after edging. It is still a little dirty in this photo. It actually cleaned up quite nicely with a little scrubbing.
It turned out just the way I hoped it would. The pockets are nice and uniform and they lighten the blank by about 40%. The band of solid glass around the edge
is a nice uniform 0.25 inch thick. I think that even the slight grooving in the edge finish, due to my multi-disk grinding wheel, is kind of neat looking.
Dare I say groovy?
Here is the back of the finished blank after edging. It is still a little dirty in this photo. It actually cleaned up quite nicely with a little scrubbing.
It turned out just the way I hoped it would. The pockets are nice and uniform and they lighten the blank by about 40%. The band of solid glass around the edge
is a nice uniform 0.25 inch thick. I think that even the slight grooving in the edge finish, due to my multi-disk grinding wheel, is kind of neat looking.
Dare I say groovy?
Click the photo for a larger view.
The front surface is perfect. I couldn't be more pleased with it. The faint black lines are ink lines I put on it when I was locating the exact center
of the blank before the edging operation.
I can't wait to grind and polish this blank into a mirror. It will be interesting to see if the back pattern prints through to the front during figuring.
It will be several months at least before I have any sort of answer to that. I'll post updates here as I make progress on turning it into a
mirror.
Click the photo for a larger view.
I have plans to make even larger blanks in the near future. I am already working on a mold for a 14.5 inch blank, and should be able to make up to
16 inch blanks in my kiln. I am also planning on experimenting with hexagonal pockets instead of round ones. I will post updates in the future as my
experiments progress.