 This page describes how I make thick glass telescope mirror blanks by fusing together sheets of thinner glass. I have found fusing the glass sheets to be easier and less problematic
than casting the blanks as I do with my light-weight honeycomb blanks, or my earlier attempts at casting solid blanks. The main problems
with casting are that much higher temperatures are required, and lots of air bubbles tend to get trapped throughout the volume of the glass. The air bubbles are the big problem. Grinding
into at least a few of them while putting the curve in the mirror is pretty much inevitable, and annoying. Fusing can eliminate that problem if done right. Any air bubbles trapped in the
blank will be at least one glass thickness away from either surface. By using glass thicker than the expected sagittal depth of the curve, bubbles will never be encountered. The fusing
process is really pretty easy if you have the right equipment.
This page describes how I make thick glass telescope mirror blanks by fusing together sheets of thinner glass. I have found fusing the glass sheets to be easier and less problematic
than casting the blanks as I do with my light-weight honeycomb blanks, or my earlier attempts at casting solid blanks. The main problems
with casting are that much higher temperatures are required, and lots of air bubbles tend to get trapped throughout the volume of the glass. The air bubbles are the big problem. Grinding
into at least a few of them while putting the curve in the mirror is pretty much inevitable, and annoying. Fusing can eliminate that problem if done right. Any air bubbles trapped in the
blank will be at least one glass thickness away from either surface. By using glass thicker than the expected sagittal depth of the curve, bubbles will never be encountered. The fusing
process is really pretty easy if you have the right equipment.
What is the right equipment? A kiln large enough to do the fusing, a wet tile saw with a diamond blade, and an edge grinding machine. The edge grinding
machine is the only item that you
would need to build yourself. My setup is more elaborate than necessary if you are only going to make one or two blanks. I turn them out by the dozen, so I have invested in better equipment.
 Where to get the glass? I prefer to use plate glass at least 1/2 inch thick. I get it by cutting up glass tabletops and glass from old aquariums. I often find suitable glass at yard sales,
thrift stores, and sometimes sitting beside the road on trash day. My friends know I need glass, so they are always on the lookout for glass for me, and saving it for me when they see it.
I like to make my blanks at least 1.25 inches thick. 1.5 inches is ideal, and there is really no need to go thicker than that with modern mirror cells. I can achieve 1.25 thickness by
fusing two sheets of 5/8 thickness glass. I can achieve 1.5 thickness by either fusing three sheets of 1/2 thickness glass, or by fusing two sheets of 3/4 thickness glass. What I do
depends on what glass I have on hand. Important! Each blank must be made entirely of pieces cut from a single sheet of glass. Don't mix glass from different sheets unless you are 100% positive they
came from the same lot of glass. Mixing glasses can cause severe internal stresses in the glass that can't be relieved by annealing. Since I use glass from random sources, I am always
careful to only use glass cut from a single sheet to make each blank.
Where to get the glass? I prefer to use plate glass at least 1/2 inch thick. I get it by cutting up glass tabletops and glass from old aquariums. I often find suitable glass at yard sales,
thrift stores, and sometimes sitting beside the road on trash day. My friends know I need glass, so they are always on the lookout for glass for me, and saving it for me when they see it.
I like to make my blanks at least 1.25 inches thick. 1.5 inches is ideal, and there is really no need to go thicker than that with modern mirror cells. I can achieve 1.25 thickness by
fusing two sheets of 5/8 thickness glass. I can achieve 1.5 thickness by either fusing three sheets of 1/2 thickness glass, or by fusing two sheets of 3/4 thickness glass. What I do
depends on what glass I have on hand. Important! Each blank must be made entirely of pieces cut from a single sheet of glass. Don't mix glass from different sheets unless you are 100% positive they
came from the same lot of glass. Mixing glasses can cause severe internal stresses in the glass that can't be relieved by annealing. Since I use glass from random sources, I am always
careful to only use glass cut from a single sheet to make each blank.
This photo shows only part of my collection of thick glass waiting to be fused into blanks. I have a lot of 1/2 inch thick glass, quite a bit of 5/8 inch thick glass, and a few pieces of 3/4
inch thick glass. I also have some thinner glass I use for other projects.
 I started with this particular blank by cutting two square pieces of 5/8 thick glass at least 1 inch larger across than needed for the finished blank. This will make a slab of glass
1 1/4 inches thick, which is plenty thick enough for a 10 inch blank. I tape the pieces together.
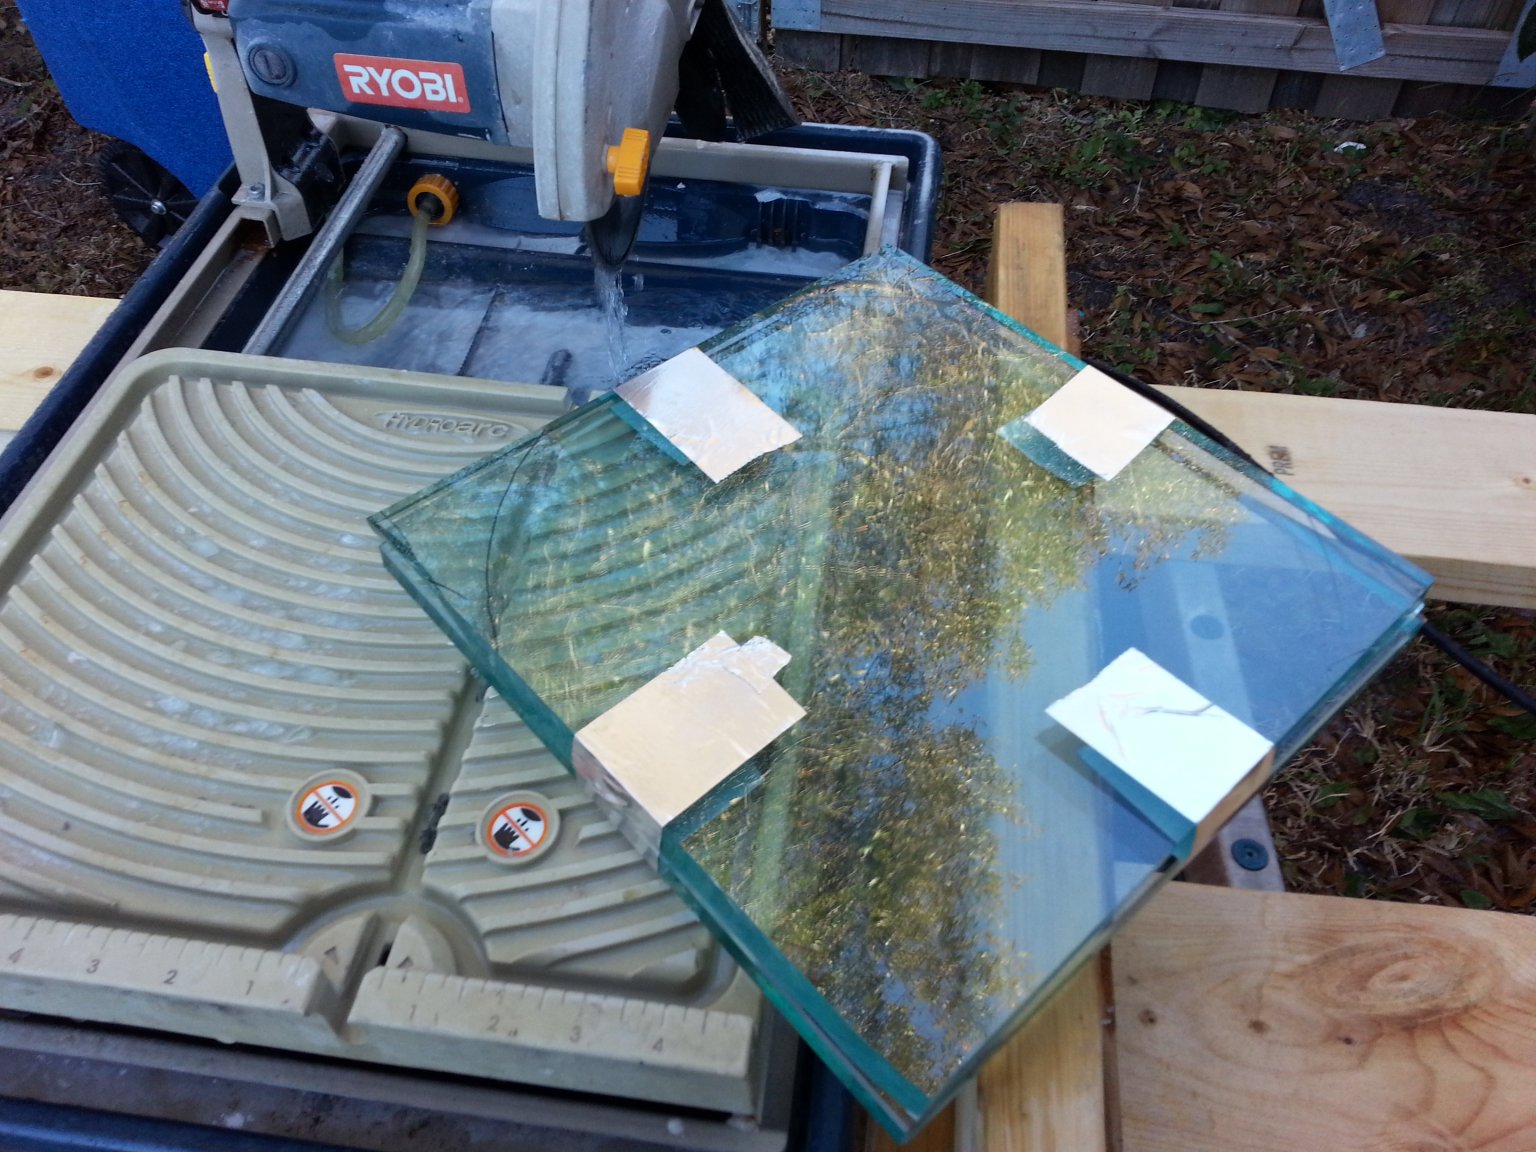
Then I mark where to cut the corners to remove waste glass. I use my wet tile saw for cutting off the corners. This can be done with a glass cutter, but there is always the possibility
of the glass cracking wrong and breaking into the interior of the sheet. The tile saw is quick and safe, if you have access to one, and two pieces can be cut off at once. Or even three
pieces when working with thinner glass.
I started with this particular blank by cutting two square pieces of 5/8 thick glass at least 1 inch larger across than needed for the finished blank. This will make a slab of glass
1 1/4 inches thick, which is plenty thick enough for a 10 inch blank. I tape the pieces together.
Then I mark where to cut the corners to remove waste glass. I use my wet tile saw for cutting off the corners. This can be done with a glass cutter, but there is always the possibility
of the glass cracking wrong and breaking into the interior of the sheet. The tile saw is quick and safe, if you have access to one, and two pieces can be cut off at once. Or even three
pieces when working with thinner glass.
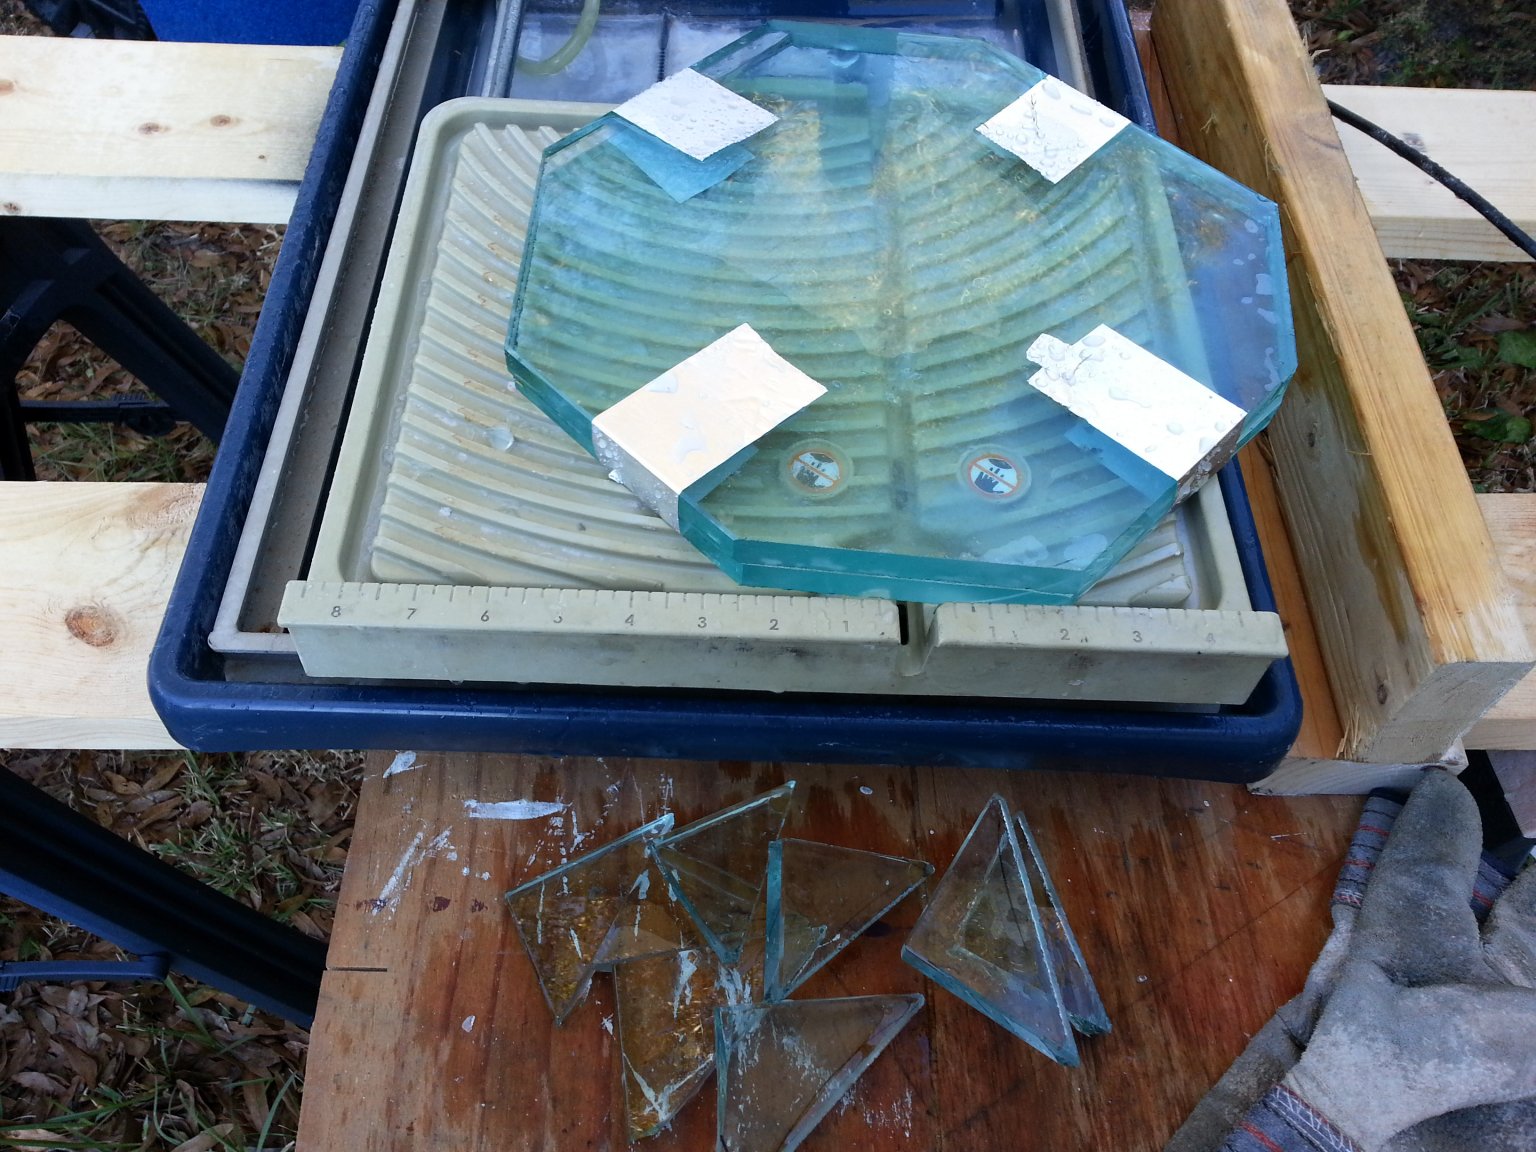
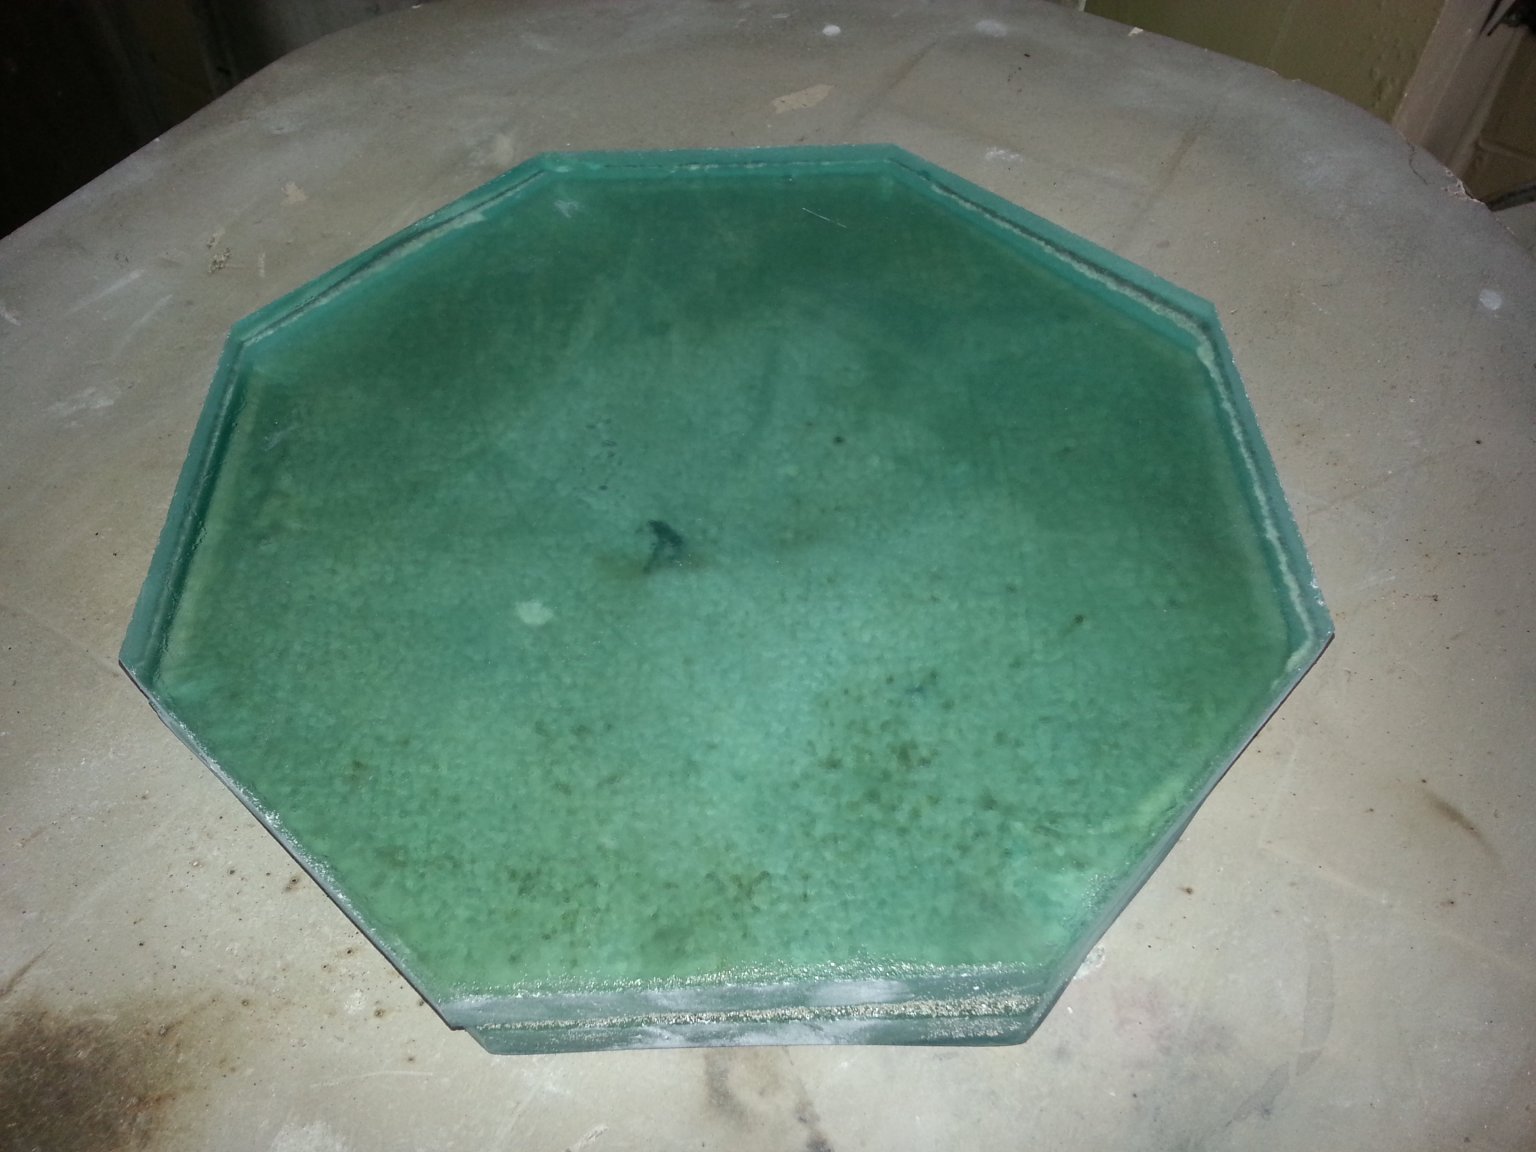
 Here I have cut the corners off of the two sheets making a pair of octagons small enough to fit in the kiln, but still big enough to cut the desired diameter blank. In this case
I was making a 10 inch diameter blank. The two octagons were roughly 11 inches across. The two glass octagons are now thoroughly cleaned before going into the kiln. The cleaner
they are before fusing, the better looking the resulting blank will be. Oils and dirt on the glass can create areas of minor devitrification on the glass. This mostly just a
cosmetic problem, and not really a serious defect in the glass. Still, I try to avoid it. I usually put the glass through my dishwasher, then wipe down both sides with glass
cleaner before fusing it. After cleaning, I handle the glass only by the edges, and I usually wear gloves to prevent getting any skin oils on them.
Here I have cut the corners off of the two sheets making a pair of octagons small enough to fit in the kiln, but still big enough to cut the desired diameter blank. In this case
I was making a 10 inch diameter blank. The two octagons were roughly 11 inches across. The two glass octagons are now thoroughly cleaned before going into the kiln. The cleaner
they are before fusing, the better looking the resulting blank will be. Oils and dirt on the glass can create areas of minor devitrification on the glass. This mostly just a
cosmetic problem, and not really a serious defect in the glass. Still, I try to avoid it. I usually put the glass through my dishwasher, then wipe down both sides with glass
cleaner before fusing it. After cleaning, I handle the glass only by the edges, and I usually wear gloves to prevent getting any skin oils on them.
 The first step in preparing for firing is to start with a clean, smooth kiln shelf. Cleanness and smoothness is important. Dirt or grit on the shelf will leave a divot in the surface of the
finished blank. Any pits or scratches in the shelf will leave a raised lumps on the finished blank. Minor pits and peaks in the blank are just cosmetic defects, but they are
easily avoided. If your shelves have pits and scratches, paint them with several coats of shelf primer and sand it smooth after it dries.
The first step in preparing for firing is to start with a clean, smooth kiln shelf. Cleanness and smoothness is important. Dirt or grit on the shelf will leave a divot in the surface of the
finished blank. Any pits or scratches in the shelf will leave a raised lumps on the finished blank. Minor pits and peaks in the blank are just cosmetic defects, but they are
easily avoided. If your shelves have pits and scratches, paint them with several coats of shelf primer and sand it smooth after it dries.
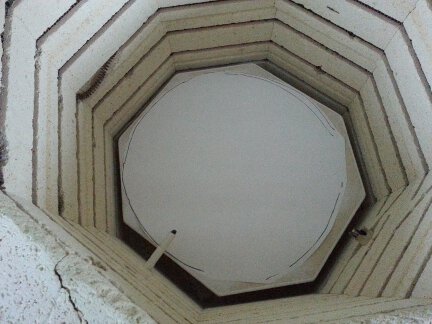
Then I place a circle of Bullseye ThinFire Shelf Paper on the shelf with the
printed side down. The circle is cut large enough to fit under the entire surface of the glass octagons. No part of the glass can touch the self without the paper in between or
the glass may stick to the shelf and crack during cooling.
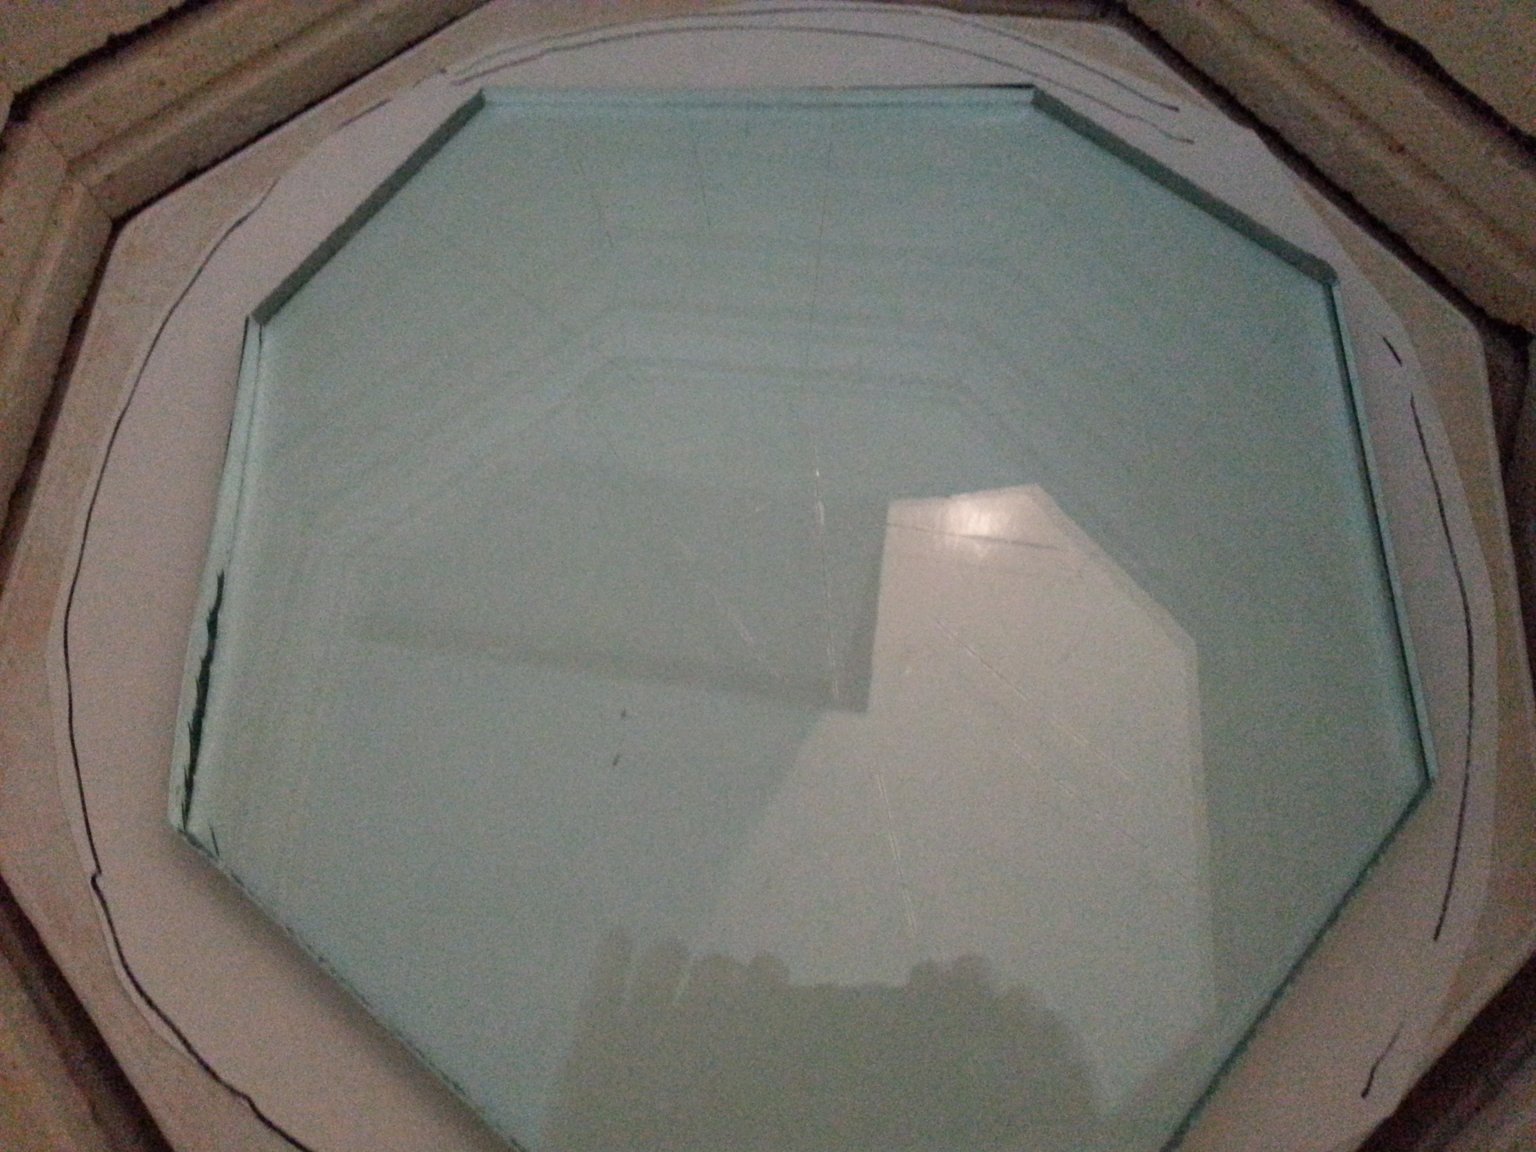
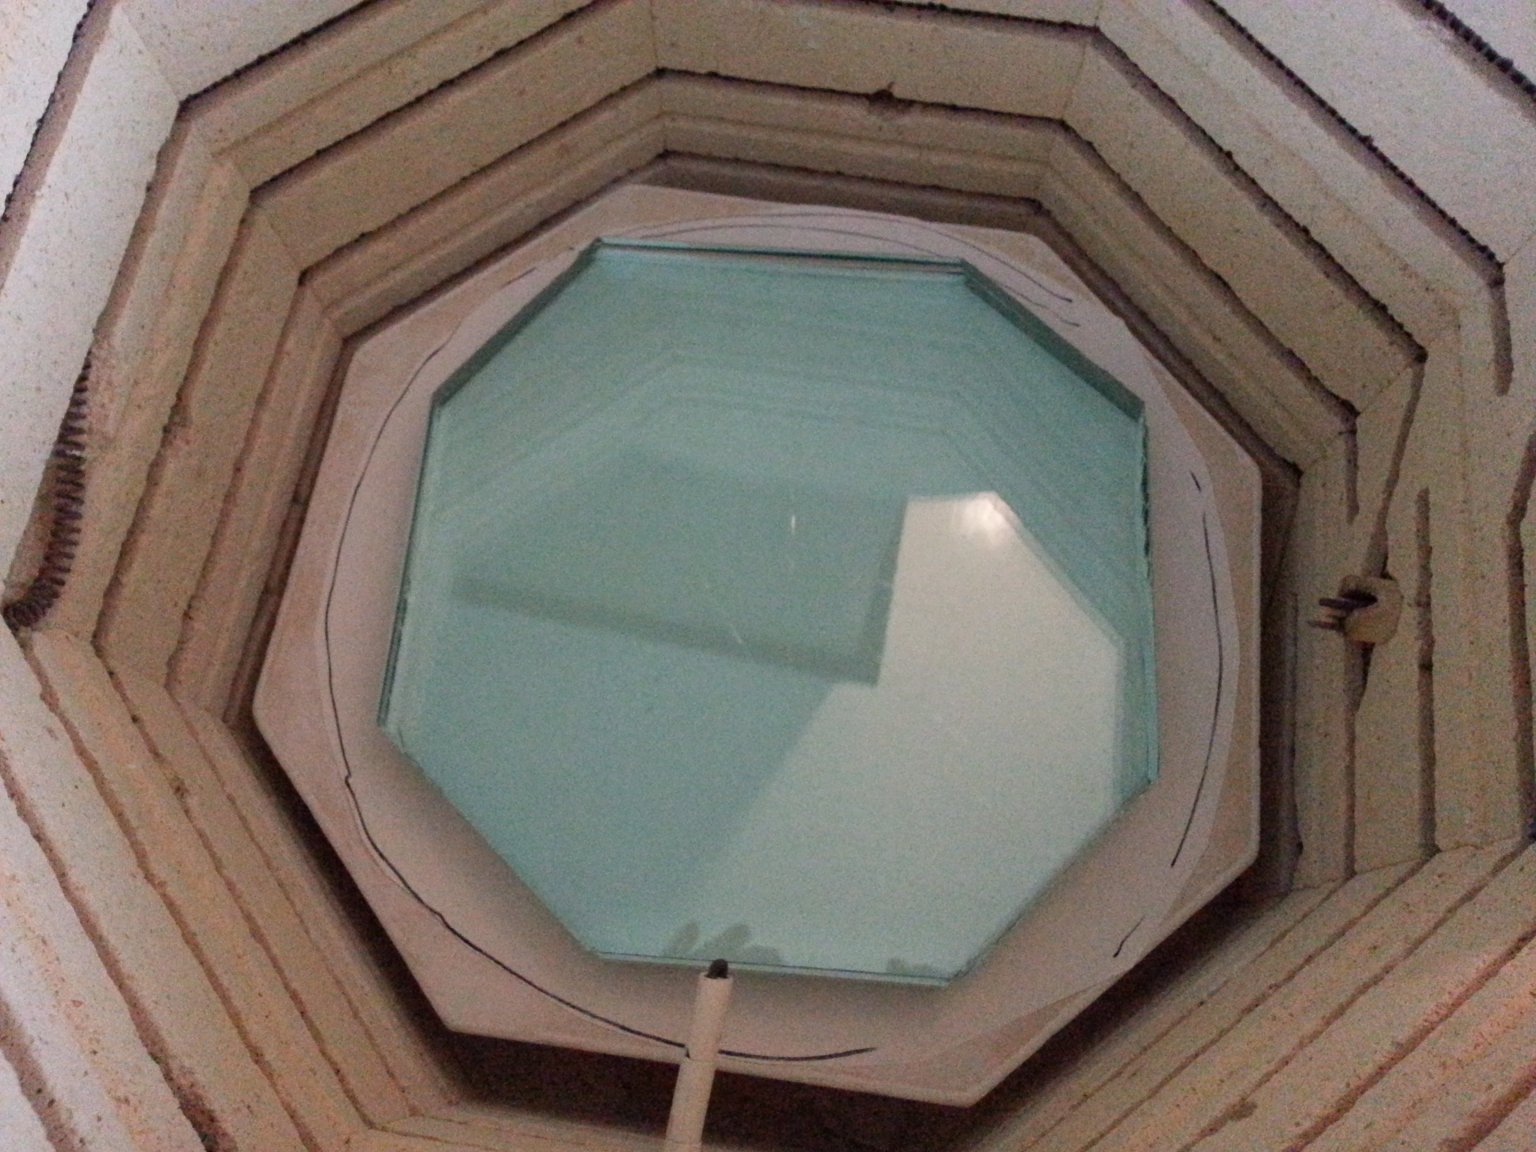
 Next I place the first glass octagon in the kiln, on top of the shelf paper. Next I use my glass cutter and scribe radial score marks from the center of the glass out to the edge.
Unfortunately the score marks aren't showing up very well in these photos. There is a photo further down that shows them better.
These score marks provide tiny channels for air trapped between the sheets of glass to escape. Don't clean the surface of the glass after scoring. The tiny shards of glass ejected
during scoring also help allow air to escape by holding the two pieces of glass apart ever so slightly until they soften and flatten out.
Next I place the first glass octagon in the kiln, on top of the shelf paper. Next I use my glass cutter and scribe radial score marks from the center of the glass out to the edge.
Unfortunately the score marks aren't showing up very well in these photos. There is a photo further down that shows them better.
These score marks provide tiny channels for air trapped between the sheets of glass to escape. Don't clean the surface of the glass after scoring. The tiny shards of glass ejected
during scoring also help allow air to escape by holding the two pieces of glass apart ever so slightly until they soften and flatten out.
This is an important step. Fusing large sheets of glass together runs the risk of trapping a sheet of air between the pieces if the edges fuse together before the air between
the sheets escapes. Getting all the air out from between the sheets is nearly impossible, but a few small bubbles aren't really a problem. Large sheets of air though will ruin the blank.
This scoring process and the particulars of the firing schedule will allow almost all the air to escape. Any remaining small bubbles will be one glass thickness inside the finished blank,
and won't be an issue when grinding and polishing in the curve on the finished mirror.
 Next the second piece of glass is placed in the kiln on top of the first. This particular blank only requred two pieces of glass. If stacking more than two sheets of glass, I always
score the top of the previous piece before setting the next piece on on top of it. I have done as many as four layers this way.
Next the second piece of glass is placed in the kiln on top of the first. This particular blank only requred two pieces of glass. If stacking more than two sheets of glass, I always
score the top of the previous piece before setting the next piece on on top of it. I have done as many as four layers this way.
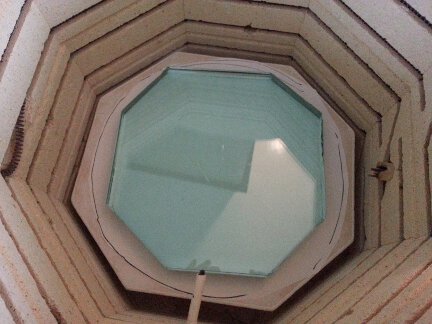
 For some reason my radial score marks show up really nicely in this photo. The photo also shows that I have surrounded the glass octagons with a stainless steel mold ring. It is important that the
glass does not touch the ring, or it may stick to it during firing. Next I have poured fine, dry silica sand into the gap between the glass and the metal ring. The reason for this is because I
don't want the glass to sag and flow outward to fill the ring. I just want the pieces to fuse together. The ring and the sand packing keep the glass from sagging and flowing. Carefully clean
any sand grains off the top sheet of glass before firing, or they will stick to the glass and give it a sandpaper-like texture. I use a clean paint brush to bush any sand grains off and to the
side. I use ordinary "play sand" available at big box home improvement stores in 40 pound bags for only a couple of dollars.
For some reason my radial score marks show up really nicely in this photo. The photo also shows that I have surrounded the glass octagons with a stainless steel mold ring. It is important that the
glass does not touch the ring, or it may stick to it during firing. Next I have poured fine, dry silica sand into the gap between the glass and the metal ring. The reason for this is because I
don't want the glass to sag and flow outward to fill the ring. I just want the pieces to fuse together. The ring and the sand packing keep the glass from sagging and flowing. Carefully clean
any sand grains off the top sheet of glass before firing, or they will stick to the glass and give it a sandpaper-like texture. I use a clean paint brush to bush any sand grains off and to the
side. I use ordinary "play sand" available at big box home improvement stores in 40 pound bags for only a couple of dollars.
The photo also shows that the thermocouple for measuring the temperature of the kiln has been put in place. I like to get the thermocouple as close to the surface of the glass as I can without
any chance of it actually touching the glass. The glass is now ready to fire.
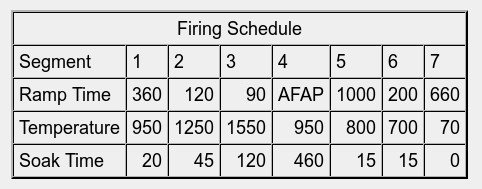 Here is the firing schedule I use for fusing sheets of glass. Time is in minutes. Temp is in degrees F. AFAP means As Fast As Possible. The slow ramp up to 1250 and the 45 minute soak
there allows air to escape from between the sheets as the glass slowly softens and sags. I also believe traction of the edges of the blanks against the sand packing helps prevent the
edges of the blanks from sealing together before almost all the air has a chance to escape from between the sheets. Segment 4 is an annealing segment. It has proven to be long enough
for plate glass blanks up to 1 1/2 inches thick. For thicker blanks the soak time should be increased. Slow cooling after annealing is key. You don't want to thermally shock the blank by cooling
it too quickly. It can crack or even explode in the kiln.
Here is the firing schedule I use for fusing sheets of glass. Time is in minutes. Temp is in degrees F. AFAP means As Fast As Possible. The slow ramp up to 1250 and the 45 minute soak
there allows air to escape from between the sheets as the glass slowly softens and sags. I also believe traction of the edges of the blanks against the sand packing helps prevent the
edges of the blanks from sealing together before almost all the air has a chance to escape from between the sheets. Segment 4 is an annealing segment. It has proven to be long enough
for plate glass blanks up to 1 1/2 inches thick. For thicker blanks the soak time should be increased. Slow cooling after annealing is key. You don't want to thermally shock the blank by cooling
it too quickly. It can crack or even explode in the kiln.
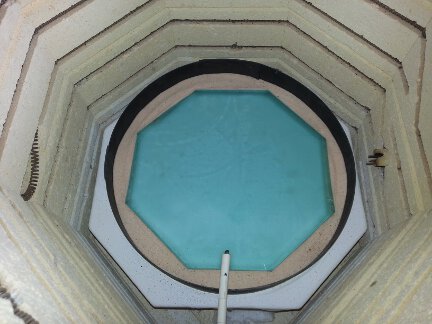 Here is a photo of a completed firing. It has been nearly three days and the kiln has cooled back down to near ambient temperature. I like to use my shop-vac to vacuum out the sand and the fine powder
that remains from the shelf paper before removing the metal ring. That way the debris won't cascade down to the bottom of the kiln. Then I can lift out the glass. Warning, it is now a single, very
heavy piece of glass, and it is covered with a slippery film of dust on the bottom from the shelf paper that is as fine as talcum powder. It is hard to get hold of and easy to drop. I take the blank outside
and brush off the film of powder. Do not breathe the dust. Then, if the blank is cool, I rinse it under running water. If the blank is still pretty warm, I let it cool down before rinsing.
Here is a photo of a completed firing. It has been nearly three days and the kiln has cooled back down to near ambient temperature. I like to use my shop-vac to vacuum out the sand and the fine powder
that remains from the shelf paper before removing the metal ring. That way the debris won't cascade down to the bottom of the kiln. Then I can lift out the glass. Warning, it is now a single, very
heavy piece of glass, and it is covered with a slippery film of dust on the bottom from the shelf paper that is as fine as talcum powder. It is hard to get hold of and easy to drop. I take the blank outside
and brush off the film of powder. Do not breathe the dust. Then, if the blank is cool, I rinse it under running water. If the blank is still pretty warm, I let it cool down before rinsing.
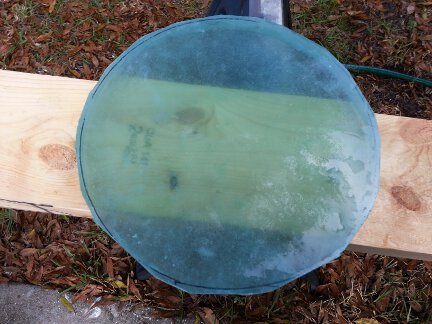
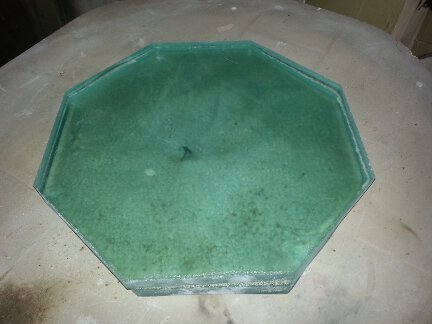 Here is a completed fusion of two 5/8 inch thickness of glass. They are now a single sheet of 1 1/4 inch thick glass, and ready to be cut into a mirror blank. After each slab of glass has cooled down and
equilibrated to ambient temperature, I check it for internal stresses with my redneck polarimeter. If nothing interrupted the firing cycle of the kiln, the glass is usually very stress free.
Here is a completed fusion of two 5/8 inch thickness of glass. They are now a single sheet of 1 1/4 inch thick glass, and ready to be cut into a mirror blank. After each slab of glass has cooled down and
equilibrated to ambient temperature, I check it for internal stresses with my redneck polarimeter. If nothing interrupted the firing cycle of the kiln, the glass is usually very stress free.
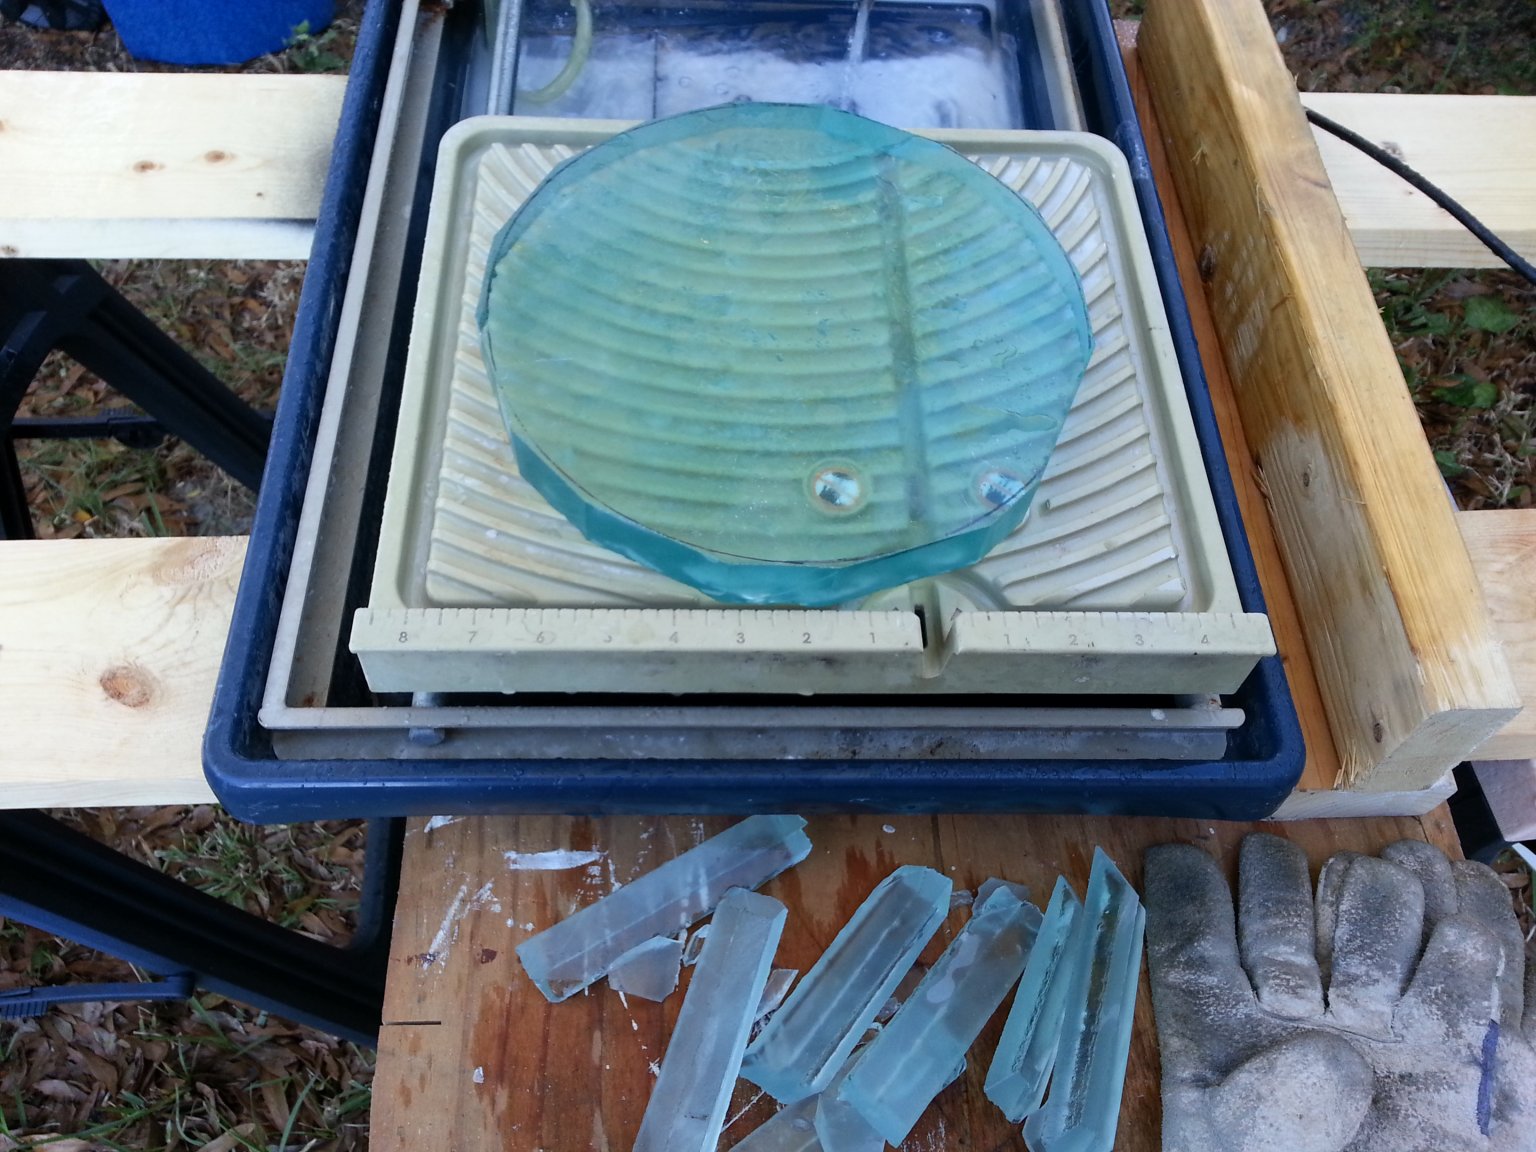
 Here is another slab of glass made from three layers of 1/2 inch glass to make a 1 1/2 inch thick slab. My next step is to draw a circle on the slab at least 1/4 inch larger in diameter than the finished
blank. The glass outside the circle needs to be cut away. The best way to do it is to go back to the wet tile saw.
Here is another slab of glass made from three layers of 1/2 inch glass to make a 1 1/2 inch thick slab. My next step is to draw a circle on the slab at least 1/4 inch larger in diameter than the finished
blank. The glass outside the circle needs to be cut away. The best way to do it is to go back to the wet tile saw.
 The best way to get rid of the excess glass and roughly round out the blank is to just keep cutting off the corners of the blank, outside the circle. It only takes a few minutes with the tile saw. Keep a
strong flow of water on the blade to keep from overheating and cracking the glass.
The best way to get rid of the excess glass and roughly round out the blank is to just keep cutting off the corners of the blank, outside the circle. It only takes a few minutes with the tile saw. Keep a
strong flow of water on the blade to keep from overheating and cracking the glass.
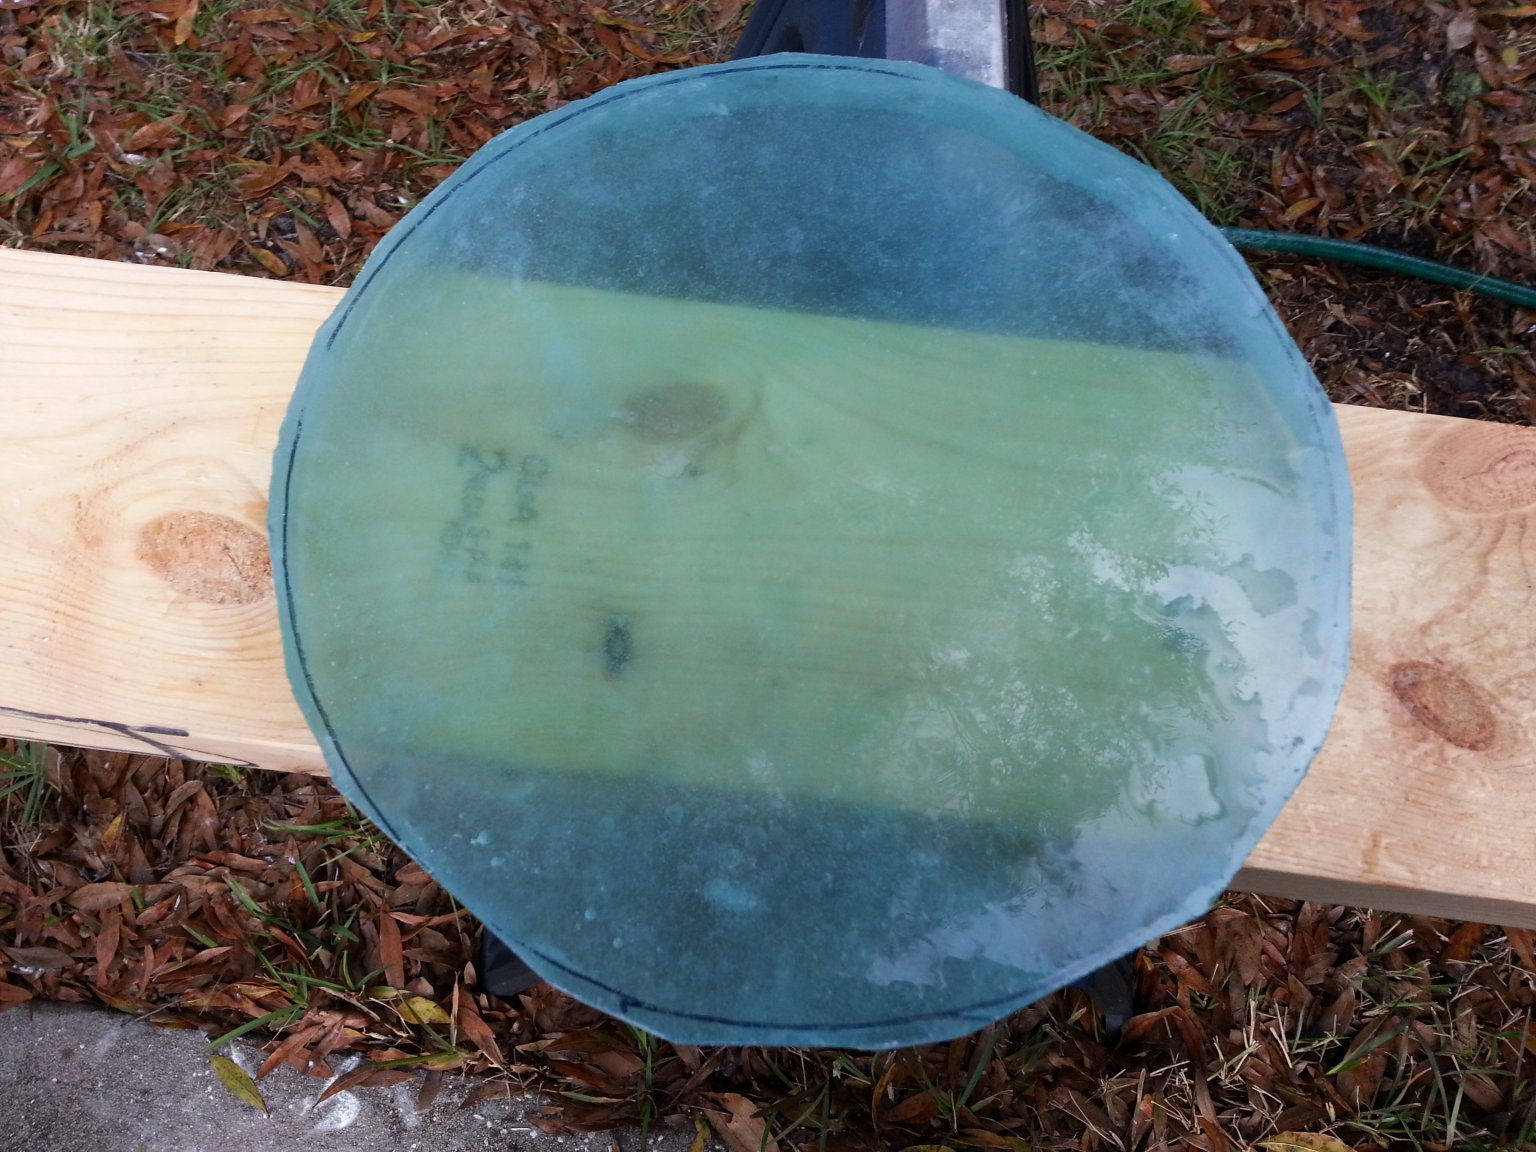
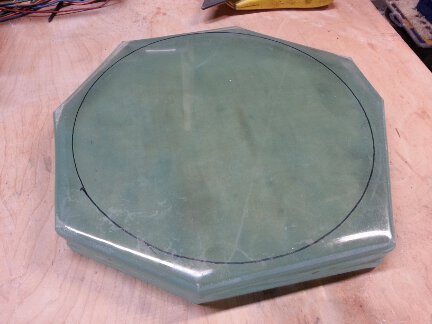
 Here is the blank after roughly rounding it with the tile saw. Now it is ready to be ground perfectly round and ground down to the correct diameter.
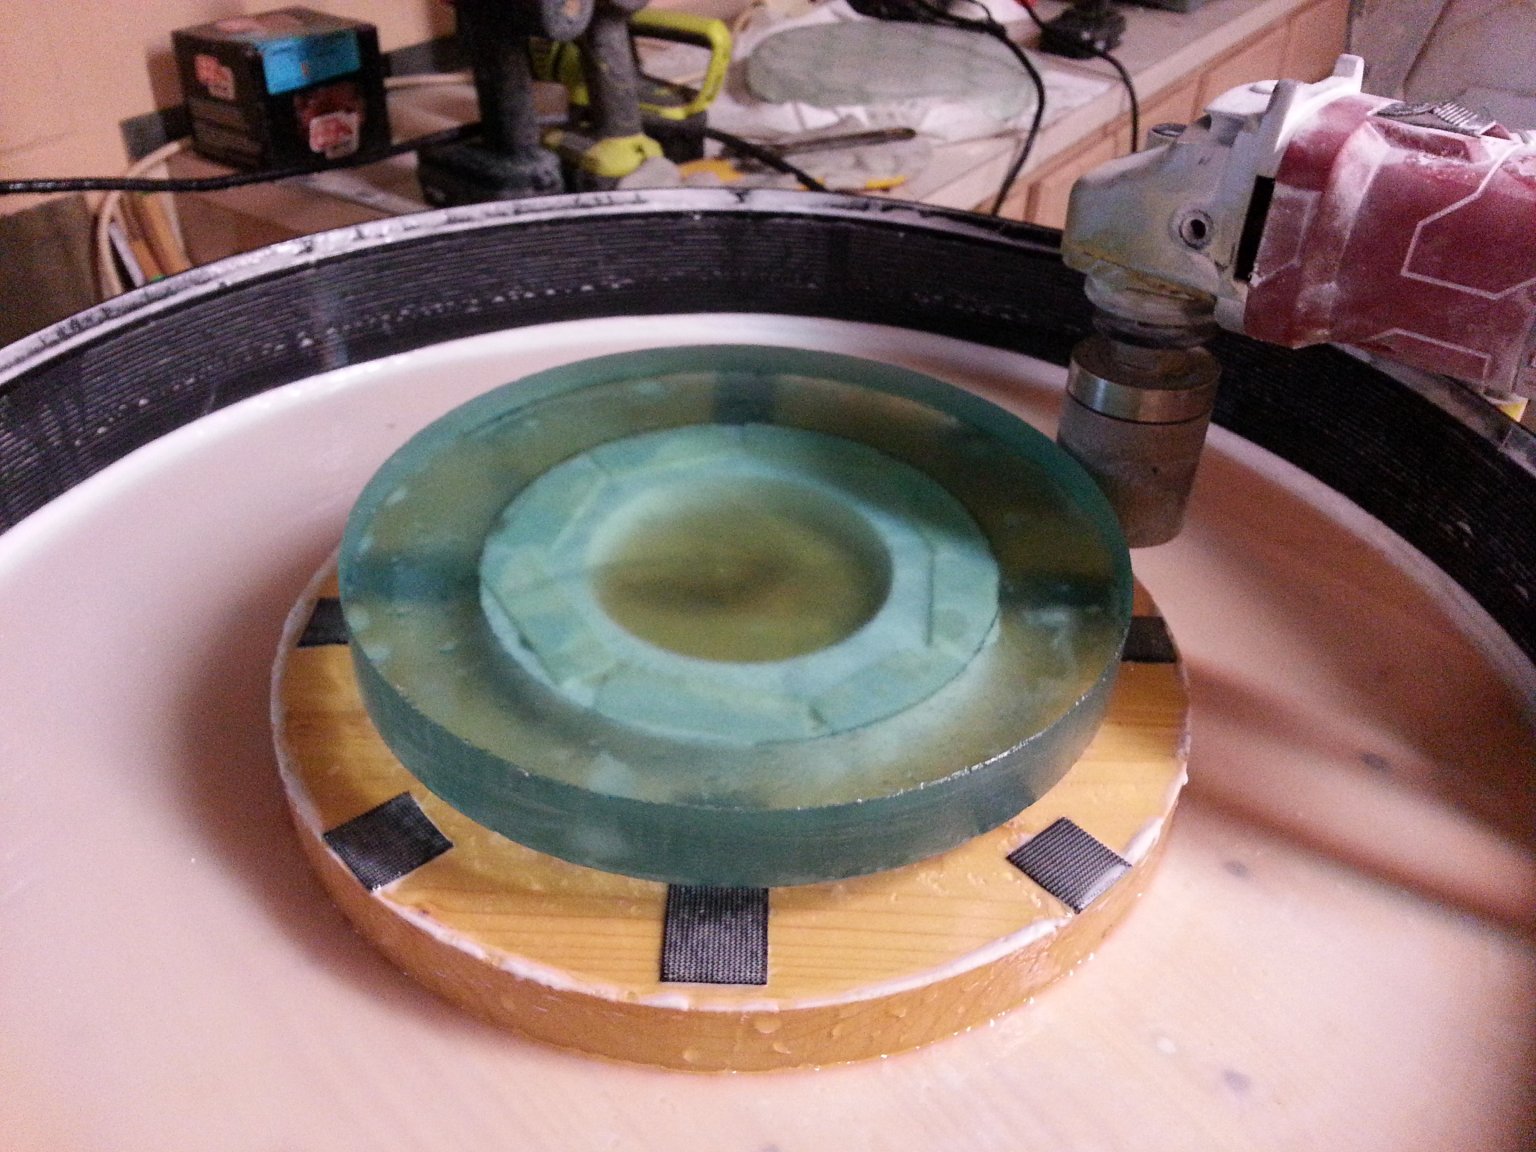
 The blanks are ground perfectly round and to the correct diameter using my home-made edge grinding machine. The machine has a motor-driven turntable and an
adjustable angle-grinder with diamond grinding drums. I start with a coarse drum to remove glass quickly to get the blank round and nearly down to the correct diameter. Then I switch to the fine
drum to remove the last roughly 1/16 inch of glass to get the blank down to the correct diameter. A spray of water is needed to keep the edge of the blank from over-heating and cracking or
spalling. I also keep a bevel on the top and bottom edges with either a diamond hone, or my die grinder with a diamond blade. The bevel prevents chipping of the top and bottom edges during
grinding.
The blanks are ground perfectly round and to the correct diameter using my home-made edge grinding machine. The machine has a motor-driven turntable and an
adjustable angle-grinder with diamond grinding drums. I start with a coarse drum to remove glass quickly to get the blank round and nearly down to the correct diameter. Then I switch to the fine
drum to remove the last roughly 1/16 inch of glass to get the blank down to the correct diameter. A spray of water is needed to keep the edge of the blank from over-heating and cracking or
spalling. I also keep a bevel on the top and bottom edges with either a diamond hone, or my die grinder with a diamond blade. The bevel prevents chipping of the top and bottom edges during
grinding.
I wear a face shield, good quality dust mask, gloves, and ear protection while running the edge grinder. I normally only use it outside because it makes a horrible mess as it slings muddy water
(water full of fine glass particles) all over the place. Here I was using it inside because it was coming down in buckets outside. It really trashed my workshop. I probably won't use it inside
any more. I'll just wait for better weather.
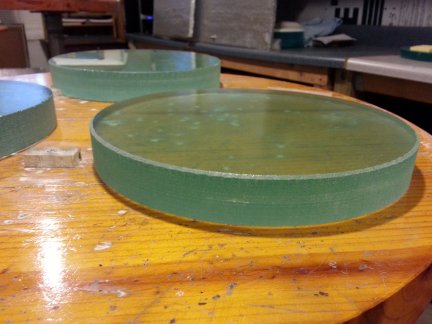
 Here is a finished 10 inch diameter blank. This particular blank was made from three layers of 1/2 inch thick glass. The glass is so thoroughly fused that the three layers are difficult to
see from the side. Wetting the edge of the blank, as I did to the left side of it, makes the edge more transparent and helps show the layers. Any bubbles trapped in the glass are at the
boundaries between layers, and so are too deep inside the glass to cause issues when grinding and polishing in the curve.
Here is a finished 10 inch diameter blank. This particular blank was made from three layers of 1/2 inch thick glass. The glass is so thoroughly fused that the three layers are difficult to
see from the side. Wetting the edge of the blank, as I did to the left side of it, makes the edge more transparent and helps show the layers. Any bubbles trapped in the glass are at the
boundaries between layers, and so are too deep inside the glass to cause issues when grinding and polishing in the curve.
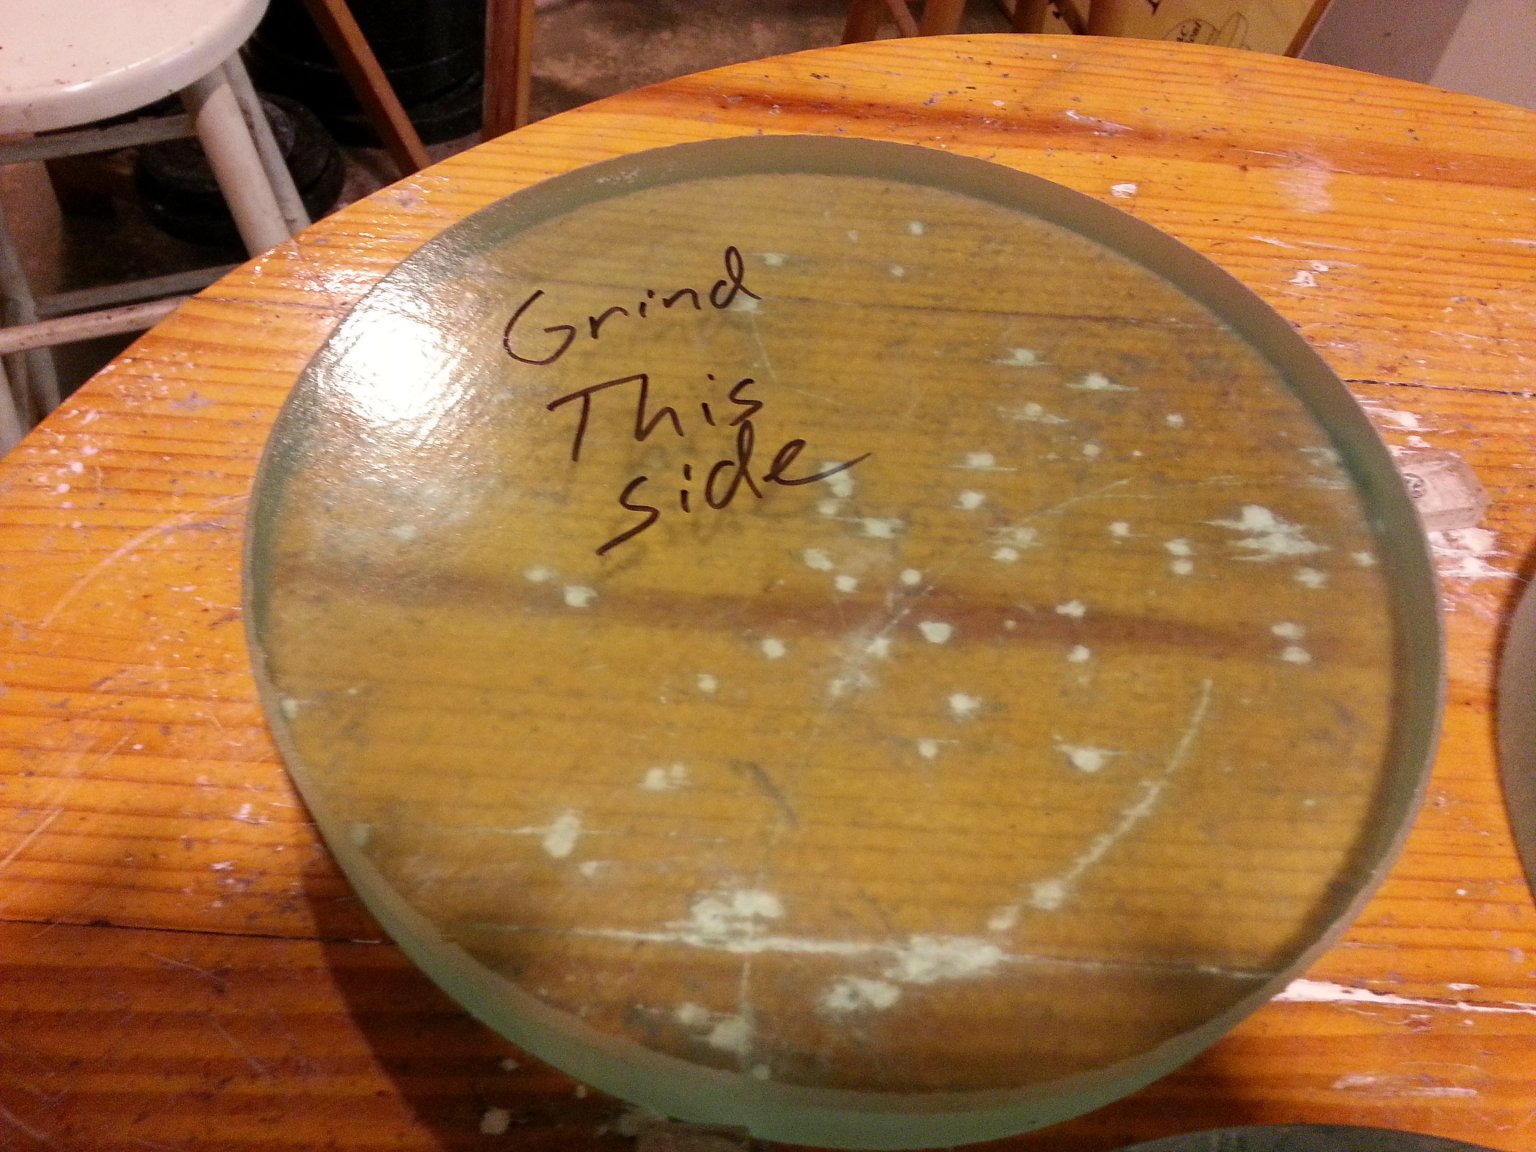
 My kiln shelves sag ever so slightly under the weight of the glass. So the bottom side of each blank becomes slightly convex. The top side is flat or even very slightly concave. I recommend
grinding the curve into the convex side. You might think that grinding the other side would be easier since less glass needs to be removed. That's true, but the blank will tend to rock while
sitting on the convex side. That will cause problems while grinding and especially while figuring. The bottom side of the blank is also a lot rougher than the top. It takes on the texture of
the kiln shelf and shelf paper liner under it while fusing. Grinding away that rough surface also makes for a much nicer looking finished mirror. So I always mark the side that was down in the kiln as
the side to grind.
My kiln shelves sag ever so slightly under the weight of the glass. So the bottom side of each blank becomes slightly convex. The top side is flat or even very slightly concave. I recommend
grinding the curve into the convex side. You might think that grinding the other side would be easier since less glass needs to be removed. That's true, but the blank will tend to rock while
sitting on the convex side. That will cause problems while grinding and especially while figuring. The bottom side of the blank is also a lot rougher than the top. It takes on the texture of
the kiln shelf and shelf paper liner under it while fusing. Grinding away that rough surface also makes for a much nicer looking finished mirror. So I always mark the side that was down in the kiln as
the side to grind.
Note the lack of bubbles. There are usually at least a few small bubbles trapped between the layers of glass. The bubbles will be deep enough inside the glass not to present any problems when
grinding and polishing in the curve. Frankly I have seen worse bubbles in lots of cast Pyrex blanks. You always have to guesstimate the depth of the bubbles in a Pyrex blank and decide which
side to grind based on the likelyhood of hitting them. Not a problem in these fused blanks. The bubbles will always be at least one thickness of the original glass inside the blank. You will
never hit them while grinding even extremely fast mirrors.
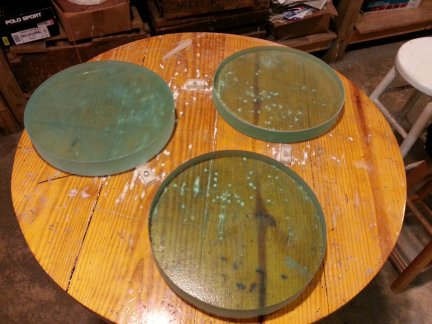 Here are three finished 10 inch diameter mirror blanks ready to be ground and polished into fine telescope mirrors by the students at the SPAC Mirror Lab.
Most of my blanks go to students at the lab.
This method of fusing glass sheets to make thick blanks has allowed for the rapid and inexpensive production of lots of blanks. I can turn out two per week if needed. I have also made several 12.5 inch
diameter blanks, and am gearing up for making 14, 16, and 18 inch blanks in the future. I may even be able to eventually do 20 inch blanks in my largest kiln.
Here are three finished 10 inch diameter mirror blanks ready to be ground and polished into fine telescope mirrors by the students at the SPAC Mirror Lab.
Most of my blanks go to students at the lab.
This method of fusing glass sheets to make thick blanks has allowed for the rapid and inexpensive production of lots of blanks. I can turn out two per week if needed. I have also made several 12.5 inch
diameter blanks, and am gearing up for making 14, 16, and 18 inch blanks in the future. I may even be able to eventually do 20 inch blanks in my largest kiln.
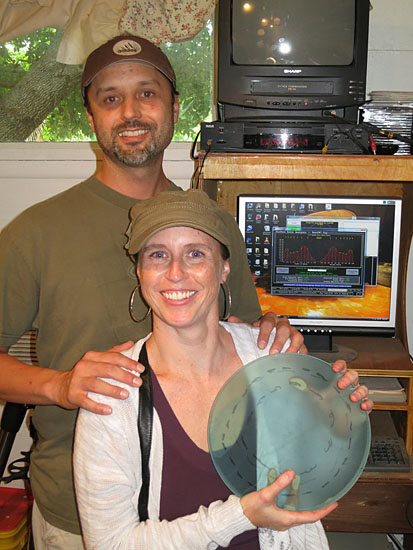 So can these fused blanks be successfully ground and polished into good telescope mirrors? You bet! Many already have been. This photo shows Brent and Joey Hilker proudly displaying
the 10 inch f/5 mirror they ground, polished and figured to better than 1/6 of a wave. About half a dozen of my fused blanks have been turned into mirrors so far. More are in the
process of being worked by students as I write this. Fused plate glass mirror blanks are a great low-cost alternative to Pyrex or other exotic materials, and you can make them yourself.
So can these fused blanks be successfully ground and polished into good telescope mirrors? You bet! Many already have been. This photo shows Brent and Joey Hilker proudly displaying
the 10 inch f/5 mirror they ground, polished and figured to better than 1/6 of a wave. About half a dozen of my fused blanks have been turned into mirrors so far. More are in the
process of being worked by students as I write this. Fused plate glass mirror blanks are a great low-cost alternative to Pyrex or other exotic materials, and you can make them yourself.