 I love my Toyota Tacoma pickup truck. It is the perfect vehicle
for me. I do a lot of traveling in it. I also go to a lot of
estate sales and auctions in it. There's lots of cargo room in the back for the stuff I buy, and with the topper in the bed, I can
even camp in the truck. I usually carry a laptop computer with me when I travel to keep in touch,
and to check what things are worth before buying them at estate sales, yard sales or bidding in auctions. I have a broadband
access card for the laptop, so I can get online from anywhere. I've always wanted a built-in
laptop / notebook computer tray for my truck. The addition of one of
these trays is a great way to bring even old cars into a new era.
The commercially made units are pricey though. Several models I have looked
at cost close to $300. Ouch! I suppose I could make one like the commercially made units, but they are made of metal, and
I'm not much of a metal-worker. The commercially made units also bolt to the floor and take time and tools to install and
remove. I always thought there had to be a better way. One day I had a brainstorm. I figured out
a quick and easy way to build a laptop tray for my Tacoma that cost a
little over $30! That's 1/10 of what the commercially made units cost! And it only took me an afternoon to build it.
I love my Toyota Tacoma pickup truck. It is the perfect vehicle
for me. I do a lot of traveling in it. I also go to a lot of
estate sales and auctions in it. There's lots of cargo room in the back for the stuff I buy, and with the topper in the bed, I can
even camp in the truck. I usually carry a laptop computer with me when I travel to keep in touch,
and to check what things are worth before buying them at estate sales, yard sales or bidding in auctions. I have a broadband
access card for the laptop, so I can get online from anywhere. I've always wanted a built-in
laptop / notebook computer tray for my truck. The addition of one of
these trays is a great way to bring even old cars into a new era.
The commercially made units are pricey though. Several models I have looked
at cost close to $300. Ouch! I suppose I could make one like the commercially made units, but they are made of metal, and
I'm not much of a metal-worker. The commercially made units also bolt to the floor and take time and tools to install and
remove. I always thought there had to be a better way. One day I had a brainstorm. I figured out
a quick and easy way to build a laptop tray for my Tacoma that cost a
little over $30! That's 1/10 of what the commercially made units cost! And it only took me an afternoon to build it.
And before you all start writing me and saying how unsafe it is to use the computer while driving, don't panic. I don't use it while driving.
I use it while stopped, usually at sales. It's a lot more convenient than trying to balance it on my lap or the armrest.
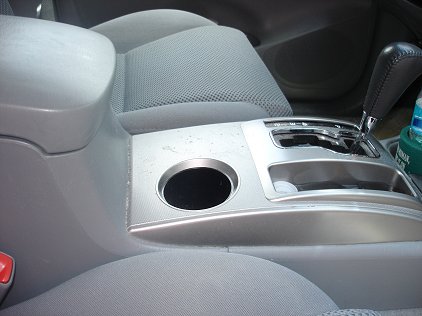 I was sitting in my truck and thinking about how to mount a laptop
tray on the cheap, when I noticed the cup-holder in the center
of the console. I thought that there ought to be some way to utilize that cup-holder to anchor a tray. I don't really use that
cup-holder. I use the ones in the front of the console. The one in the center tends to just be a catch-all for spare change
and miscellaneous junk. I'd never miss it. I got to thinking that a piece of PVC pipe might fit tightly in there, and could
be the base for some sort of tray made from PVC pipe fittings.
I was sitting in my truck and thinking about how to mount a laptop
tray on the cheap, when I noticed the cup-holder in the center
of the console. I thought that there ought to be some way to utilize that cup-holder to anchor a tray. I don't really use that
cup-holder. I use the ones in the front of the console. The one in the center tends to just be a catch-all for spare change
and miscellaneous junk. I'd never miss it. I got to thinking that a piece of PVC pipe might fit tightly in there, and could
be the base for some sort of tray made from PVC pipe fittings.
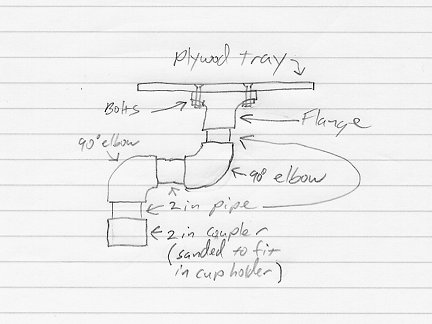 I drew up my idea. It looked good, but I needed to know what size PVC pipe to use. I measured the inside diameter of the
cup-holder and found that it is almost exactly the same size as the outside diameter of a 2 inch PVC pipe coupler. So the
tray would be made of 2 inch PVC pipe and fittings.
I drew up my idea. It looked good, but I needed to know what size PVC pipe to use. I measured the inside diameter of the
cup-holder and found that it is almost exactly the same size as the outside diameter of a 2 inch PVC pipe coupler. So the
tray would be made of 2 inch PVC pipe and fittings.
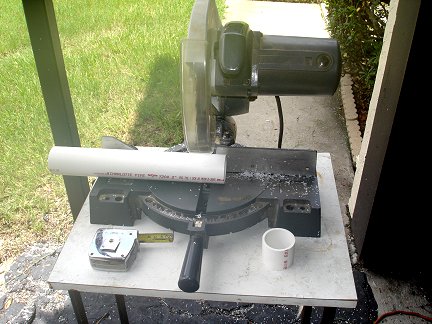
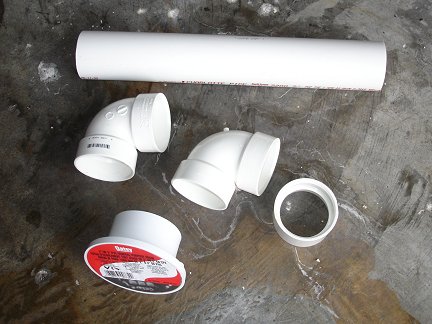 A trip to the local mega homecenter store was necessary to pick up the parts I'd need to build the tray. I needed two 90
degree elbows, a coupler, some sort of flange, a short length of 2 inch pipe to cut up to make connecting pieces, nuts and bolts.
I also bought some fresh PVC pipe glue. I already had some scrap plywood on hand to build the tray. I couldn't find a flange.
All the flanges were for 3 inch and larger pipe. But I did find a drain fitting that would work just as well. I just had to remove
the metal grate on top of it and drill some holes around the edge of it for the bolts that would hold the tray top on. Total cost
for all these parts was less than $15 so far. Not bad.
A trip to the local mega homecenter store was necessary to pick up the parts I'd need to build the tray. I needed two 90
degree elbows, a coupler, some sort of flange, a short length of 2 inch pipe to cut up to make connecting pieces, nuts and bolts.
I also bought some fresh PVC pipe glue. I already had some scrap plywood on hand to build the tray. I couldn't find a flange.
All the flanges were for 3 inch and larger pipe. But I did find a drain fitting that would work just as well. I just had to remove
the metal grate on top of it and drill some holes around the edge of it for the bolts that would hold the tray top on. Total cost
for all these parts was less than $15 so far. Not bad.
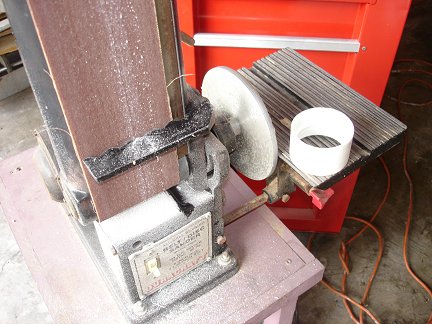 The 2 inch PVC coupler is an almost exact fit into the top of the cup-holder. However, the cup-holder must have a slight taper
to it, because the coupler would jam part-way down. So I got out my sander and sanded down the outside of the coupler until it
would slip all the way down to the bottom of the cup-holder. I left it a snug fit though. I didn't want it too loose.
The 2 inch PVC coupler is an almost exact fit into the top of the cup-holder. However, the cup-holder must have a slight taper
to it, because the coupler would jam part-way down. So I got out my sander and sanded down the outside of the coupler until it
would slip all the way down to the bottom of the cup-holder. I left it a snug fit though. I didn't want it too loose.
 Next I cut up the length of PVC pipe to make the short pieces I'd need to connect the parts together. I cut 2 pieces at 2
inches long, and one piece at 3 inches long to go in the middle of the arm (see drawing above). These measurements are pretty arbitrary, but
I didn't want to cantilever the laptop out any further than I had to. I just wanted it to clear the shift lever and armrest.
Next I cut up the length of PVC pipe to make the short pieces I'd need to connect the parts together. I cut 2 pieces at 2
inches long, and one piece at 3 inches long to go in the middle of the arm (see drawing above). These measurements are pretty arbitrary, but
I didn't want to cantilever the laptop out any further than I had to. I just wanted it to clear the shift lever and armrest.
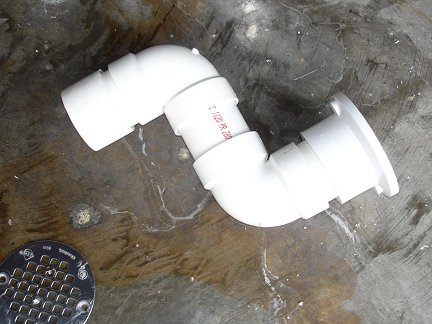 Once I had all the pieces of the arm cut, I dry-fitted the parts together to see how it looked. I also removed the metal
grate from the top of the drain fitting.
Once I had all the pieces of the arm cut, I dry-fitted the parts together to see how it looked. I also removed the metal
grate from the top of the drain fitting.
 Next I test-fitted the arm in the cup-holder. It fit great, and it looked like I had just the right clearance.
 I needed to measure up the dimensions of my laptop to know how large to make the plywood tray. My laptop is 11 inches deep by
13 inches wide. I also wanted to measure the position of the cooling fan, so I could cut a hole in the tray for air flow.
I needed to measure up the dimensions of my laptop to know how large to make the plywood tray. My laptop is 11 inches deep by
13 inches wide. I also wanted to measure the position of the cooling fan, so I could cut a hole in the tray for air flow.
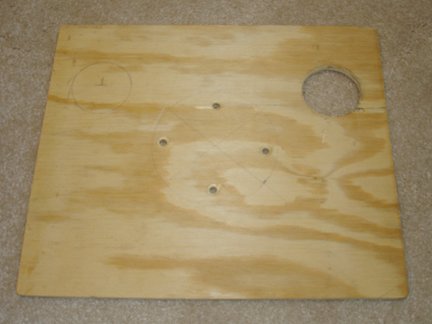 I cut a piece of 1/4 inch thick plywood to 11 by 13. I rounded off all the corners. I also drilled and countersunk mounting
holes, and drilled out a hole where the laptop cooling fan will be for improved air-flow. I forgot that I had the laptop
upside-down when I measured the position of the cooling fan intake. I almost drilled the air hole on the wrong side of
the board (as can be seen by the circle drawn on the upper left). It wouldn't have mattered much, since I could have
always flipped the board over, but I wanted the best looking side up.
I cut a piece of 1/4 inch thick plywood to 11 by 13. I rounded off all the corners. I also drilled and countersunk mounting
holes, and drilled out a hole where the laptop cooling fan will be for improved air-flow. I forgot that I had the laptop
upside-down when I measured the position of the cooling fan intake. I almost drilled the air hole on the wrong side of
the board (as can be seen by the circle drawn on the upper left). It wouldn't have mattered much, since I could have
always flipped the board over, but I wanted the best looking side up.
 I drilled holes in the PVC drain fitting to match the the holes in the plywood.
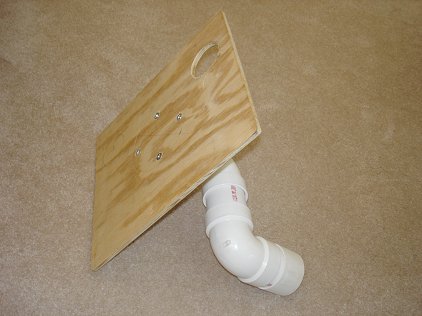 Once the plywood tray top was bolted onto the PVC drain fitting, I could test assemble the whole unit and try it out in the
truck.
Once the plywood tray top was bolted onto the PVC drain fitting, I could test assemble the whole unit and try it out in the
truck.
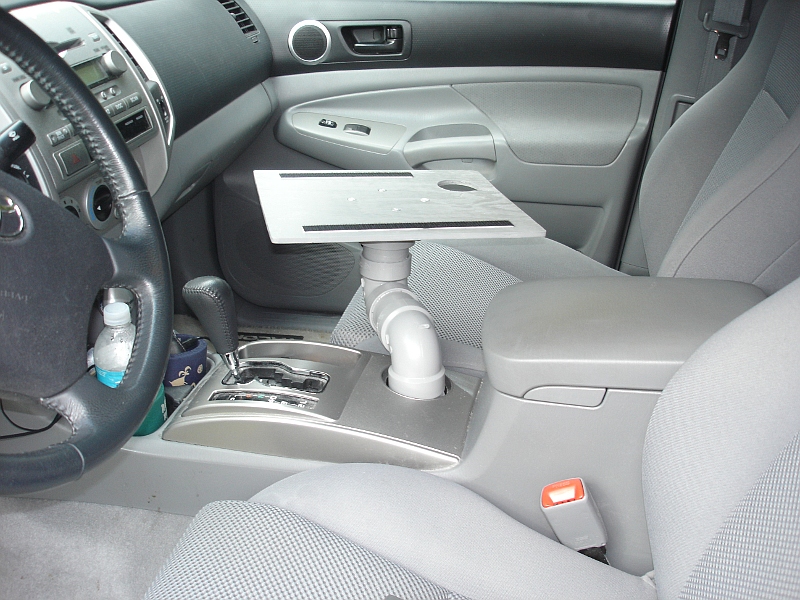
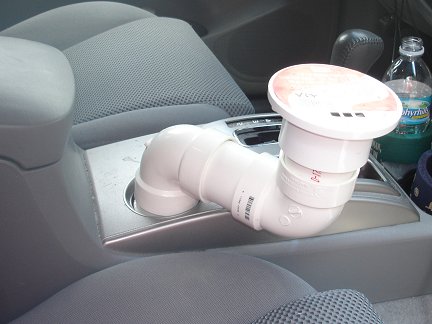
 This photo (click for a bigger version) shows the tray being tested in the truck. It works well and looks great. The PVC pieces
aren't glued together yet at this point.
I wanted to make sure the arm was just right with a full scale test first. Even just fit together dry, the friction of the PVC
pieces held the weight of the laptop just fine. I was very happy with the position of the laptop. So I glued the PVC pieces
together. I like the way the tray will just pull right out when not needed or if I have a passenger. No tools needed. Due to
the snug fit of the coupler in the cup-holder, the
weight of the laptop locks the tray in place. But if I lift up on the tray a little, I can swivel it around to different positions.
It locks again when I let go of it. An unexpected bonus.
This photo (click for a bigger version) shows the tray being tested in the truck. It works well and looks great. The PVC pieces
aren't glued together yet at this point.
I wanted to make sure the arm was just right with a full scale test first. Even just fit together dry, the friction of the PVC
pieces held the weight of the laptop just fine. I was very happy with the position of the laptop. So I glued the PVC pieces
together. I like the way the tray will just pull right out when not needed or if I have a passenger. No tools needed. Due to
the snug fit of the coupler in the cup-holder, the
weight of the laptop locks the tray in place. But if I lift up on the tray a little, I can swivel it around to different positions.
It locks again when I let go of it. An unexpected bonus.
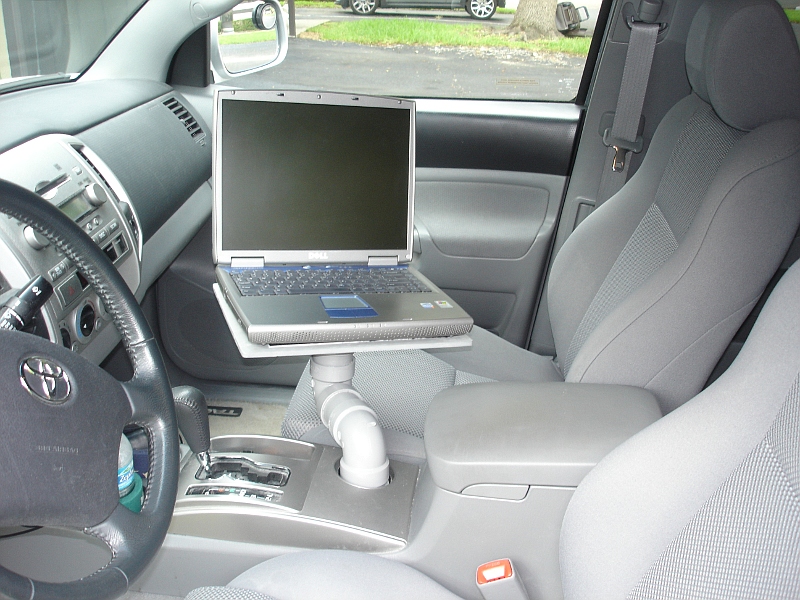
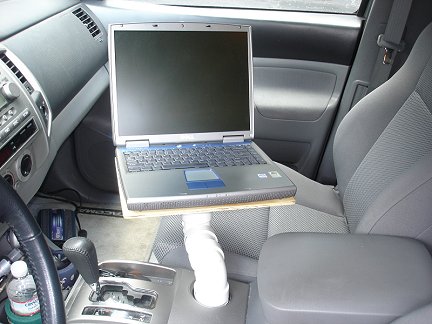
 This photo (click for a bigger version) shows the painted laptop tray installed in the truck. It's hard to tell from the photos,
but the paint job is a good match for the interior color. The pipe still looks white in the photos. Probably over-exposed by
the camera flash. You can also see in this photo the two strips of adhesive-backed Velcro I put down on the top of the tray.
A couple of matching strips were stuck to the bottom of my laptop. The Velcro holds the laptop in place with an iron grip.
However, I can remove the laptop fairly easily by prying up on one corner of it.
This photo (click for a bigger version) shows the painted laptop tray installed in the truck. It's hard to tell from the photos,
but the paint job is a good match for the interior color. The pipe still looks white in the photos. Probably over-exposed by
the camera flash. You can also see in this photo the two strips of adhesive-backed Velcro I put down on the top of the tray.
A couple of matching strips were stuck to the bottom of my laptop. The Velcro holds the laptop in place with an iron grip.
However, I can remove the laptop fairly easily by prying up on one corner of it.
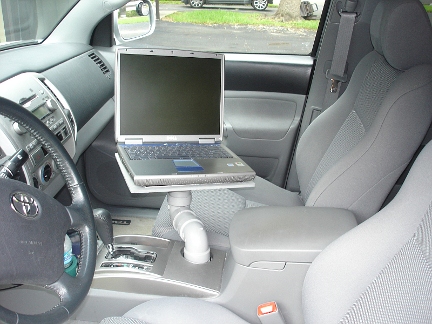 This photo (click for a bigger version) shows the finished tray with the laptop in place. It is a real thing of beauty, if I do
say so myself.
This photo (click for a bigger version) shows the finished tray with the laptop in place. It is a real thing of beauty, if I do
say so myself.
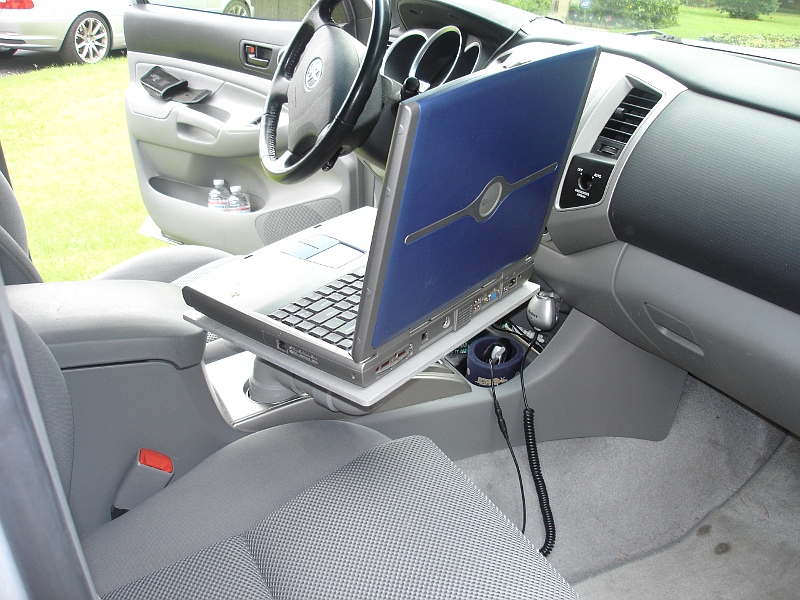
 This photo (click for a bigger version) shows a passenger side view of the laptop tray.
So how much did it cost to build (including tax)?
PVC Pipe & Fittings - $14.89
Nuts, Bolts & Washers - $0.90
Spray Paint - $4.80
Velcro - $10.69
Scrap Plywood - Free
Total - $31.28
Not bad!
|
Pros & Cons of the laptop tray:
Pros: It works great, it looks good, and it was cheap to build.
Cons: I'm not sure it is legal to use a laptop computer while driving, so be careful if you build one of these. I don't use it
while driving, only while stopped, and I close the screen while moving, both to prevent attracting attention to the computer from
other drivers, and to reduce my own temptation to diddle with it while driving. Also, I am a little worried about the stress I am putting on
the plastic center console. On bumpy roads the laptop can really bounce around. I can see a scenario where repeated stress, or one
big pothole could cause the plastic to crack. Since the tray is so easy to remove by just pulling it out of the cup-holder, I generally
leave it on the passenger side floor when I am moving, and only pop it in place when I am parked and need to use it to research
an item.
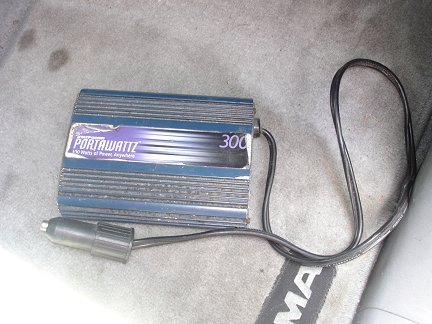 I was going to need an inverter to run the laptop for any extended period of time in the truck. I only get about 2 hrs of battery
life, under ideal conditions. I picked up this 300 Watt inverter at a yard sale for only $3. Its a little beat up, but it works
great. My Tacoma actually has a built-in power inverter. However the outlet is in the bed of the truck. I didn't want to run an
extension cord all the way from the back and in through the rear window. So I bought this bargain inverter.
I was going to need an inverter to run the laptop for any extended period of time in the truck. I only get about 2 hrs of battery
life, under ideal conditions. I picked up this 300 Watt inverter at a yard sale for only $3. Its a little beat up, but it works
great. My Tacoma actually has a built-in power inverter. However the outlet is in the bed of the truck. I didn't want to run an
extension cord all the way from the back and in through the rear window. So I bought this bargain inverter.
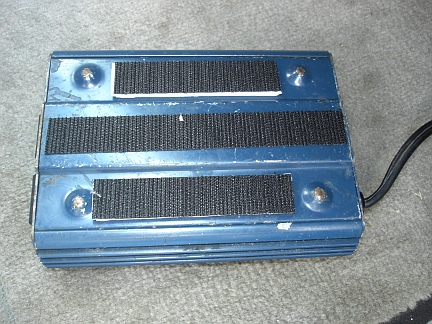 Here I have mounted adhesive-backed Velcro on the bottom of the inverter. I used only the hook side of the Velcro. I discovered that the hook
Velcro stuck quite tightly to the carpet in my truck.
Here I have mounted adhesive-backed Velcro on the bottom of the inverter. I used only the hook side of the Velcro. I discovered that the hook
Velcro stuck quite tightly to the carpet in my truck.
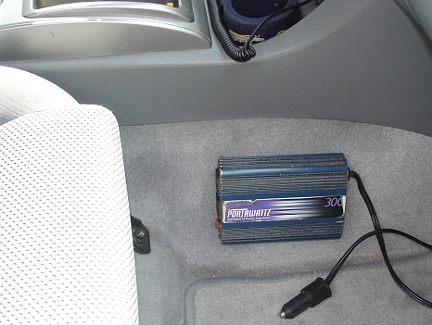 Here I have mounted the inverter by sticking it to the carpeted side of the center console. The Velcro sticks to the carpet as strongly, or maybe
even more strongly than to the loop Velcro. It pulls right off if I don't need it, or if I have a passenger.
Here I have mounted the inverter by sticking it to the carpeted side of the center console. The Velcro sticks to the carpet as strongly, or maybe
even more strongly than to the loop Velcro. It pulls right off if I don't need it, or if I have a passenger.
After using this setup for a few weeks now, I have to say I am very happy with it. The tray (even with the mass of the laptop on it) doesn't move
at all when I brake or corner. I made it
a really snug fit in the cup-holder just for that reason. Also, the off-center weight of the laptop locks the pipe in the cup-holder even more
tightly. I am less concerned about breaking the plastic center console than I was. I tend to leave the laptop in place more as I have grown
more confident in the design. I am only ever concerned about it now on excessively rough roads and when going over speed-bumps. In those circumstances
I drive more slowly than I would without the laptop, and I'll grab the laptop and steady it during the worst of the bumps. The tray has already
paid for itself several times over by allowing me to more easily research items at sales.
 UPDATE 10/04/19
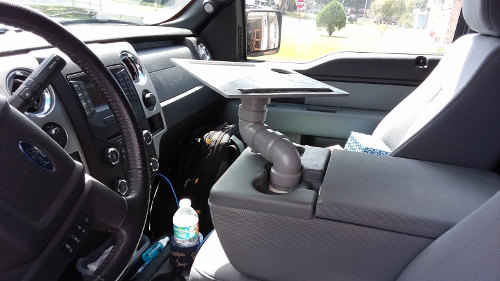
Since I now own an F-150 pickup truck, as well as the Toyota Tacoma, I decided to see if the laptop tray fits in it too. It does! It's been a few years since I built this tray.
I have to admit that I don't use it as much as I used to. Technology has improved a lot. Smart phones and tablets can now do a lot that only a laptop could do back when I first
built this tray. Still, it is occasionally nice to have a full-size laptop for some jobs. It's nice to know it is going to fit in the F-150 too. I may need to put a little tape
around the base to make it a tighter fit in the cup holder, otherwise it works well. The color even matches my F-150 interior. Nice.