Welcome to Mike's World.
Hi, I'm Mike Davis. I like to build things and travel. Here you will find links to, and in-depth
explanations of, all my interesting (I think) projects, hobbies, how-to's and pastimes and travel destinations.
Click on a photo to go to that section, or read blog entries below.
10/16/18 - Back from the hurricane zone.
We went up to the Florida Panhandle yesterday to check on my fiancee's weekend place and deliver relief supplies to some of her relatives who were right in the path when hurricane Michael
came ashore. We loaded the truck down with lots of bottled water, food, diapers, gas cans, propane, a generator, chainsaws, tarps and roof repair supplies. We left Sunday night and stopped in
Chiefland, which was as close as we could get where there were still motel vacancies. Further north everything was full of refugees. We didn't want to arrive after dark since we knew there
would be no power, water or services. We got an early start the next morning and drove the rest of the way to Chattahoochee.
We started seeing trees down just west of Tallahassee. The further west we went the worse it got. We saw amazing destruction. Much of the worst of it was not captured in this video. Power
lines were down for miles at a stretch due to fallen trees. We saw a stretch of forest where almost every tree was snapped off like so many matchsticks. Every street light in Chattahoochee
is twisted or broken off. We saw sturdy concrete power poles snapped like twigs and their high tension power lines dropped into the road. We saw a church with nearly every shingle, and the
underlying tar paper, blown away. We saw awnings and metal carports twisted and blown away. We saw trees dropped on houses and cars. Terrible destruction, and we didn't even get near the
coast where things are so much worse.
My fiancee's place had a dozen trees down, with three of them having fallen on the roof. Fortunately the damage was very minor. We attacked the downed trees with our chainsaws and cleared
everything off the roof in about two hours of really sweaty hot work. Just as we finished clearing the roof and ensuring there was no serious damage, a professional landscaping crew pulled
up and gave her an estimate on cleaning up the rest of the downed trees and debris. Since we were pretty much spent by then, she jumped on the offer. In only a few more hours they had the
entire property cleaned up and back to normal. We were amazingly lucky. Not only was there no serious damage, but we got the whole place cleaned up before we had to start the long drive
back home.
While we were working, a stream of her relatives who live in the area stopped by to receive the supplies we had brought with us. They were incredibly thankful and grateful for the supplies.
Things are going to be a mess up there for a while. I have to say though, I was amazed at how great the response from FEMA was. We passed multiple distribution points where bottled water,
MREs, tarps and other supplies were being handed out free of charge to the locals. We saw several staging areas where massive piles of bottled water and other supplies were being stockpiled.
we saw helicopters bringing in lots of supplies in big cargo nets slung below them. Nothing like that response happened around here when Irma came through last year. FEMA seems to actually
have it's act together this time.
10/14/18 - I'm Engaged!
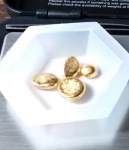
Just got back from an amazing two week vacation to Tanzania Africa and Dubai in the UAE. WOW! words fail me to describe just how awesome it was. The highlight was my girlfriend and I
getting engaged in Dubai. We went ring shopping in the famous Gold Souk gold market in Dubai. That was undoubtedly the highlight of the trip, but every day was just amazing. Eight days
on safari in the Serengeti was the trip of a lifetime. We saw truly amazing things. Back in Dubai we went dune bashing out in the Arabian Desert in modified land cruisers, and then got
to fly falcons and eagles at a day long falconry class. I have hours of video and about a thousand photos. Going to take me forever to get it all sorted out and on my blog.
Here is the first of many, many videos from the trip to be uploaded to Youtube. Migrating wildebeest crossing the Mara River in Tanzania. Watch to the end for a big surprise.
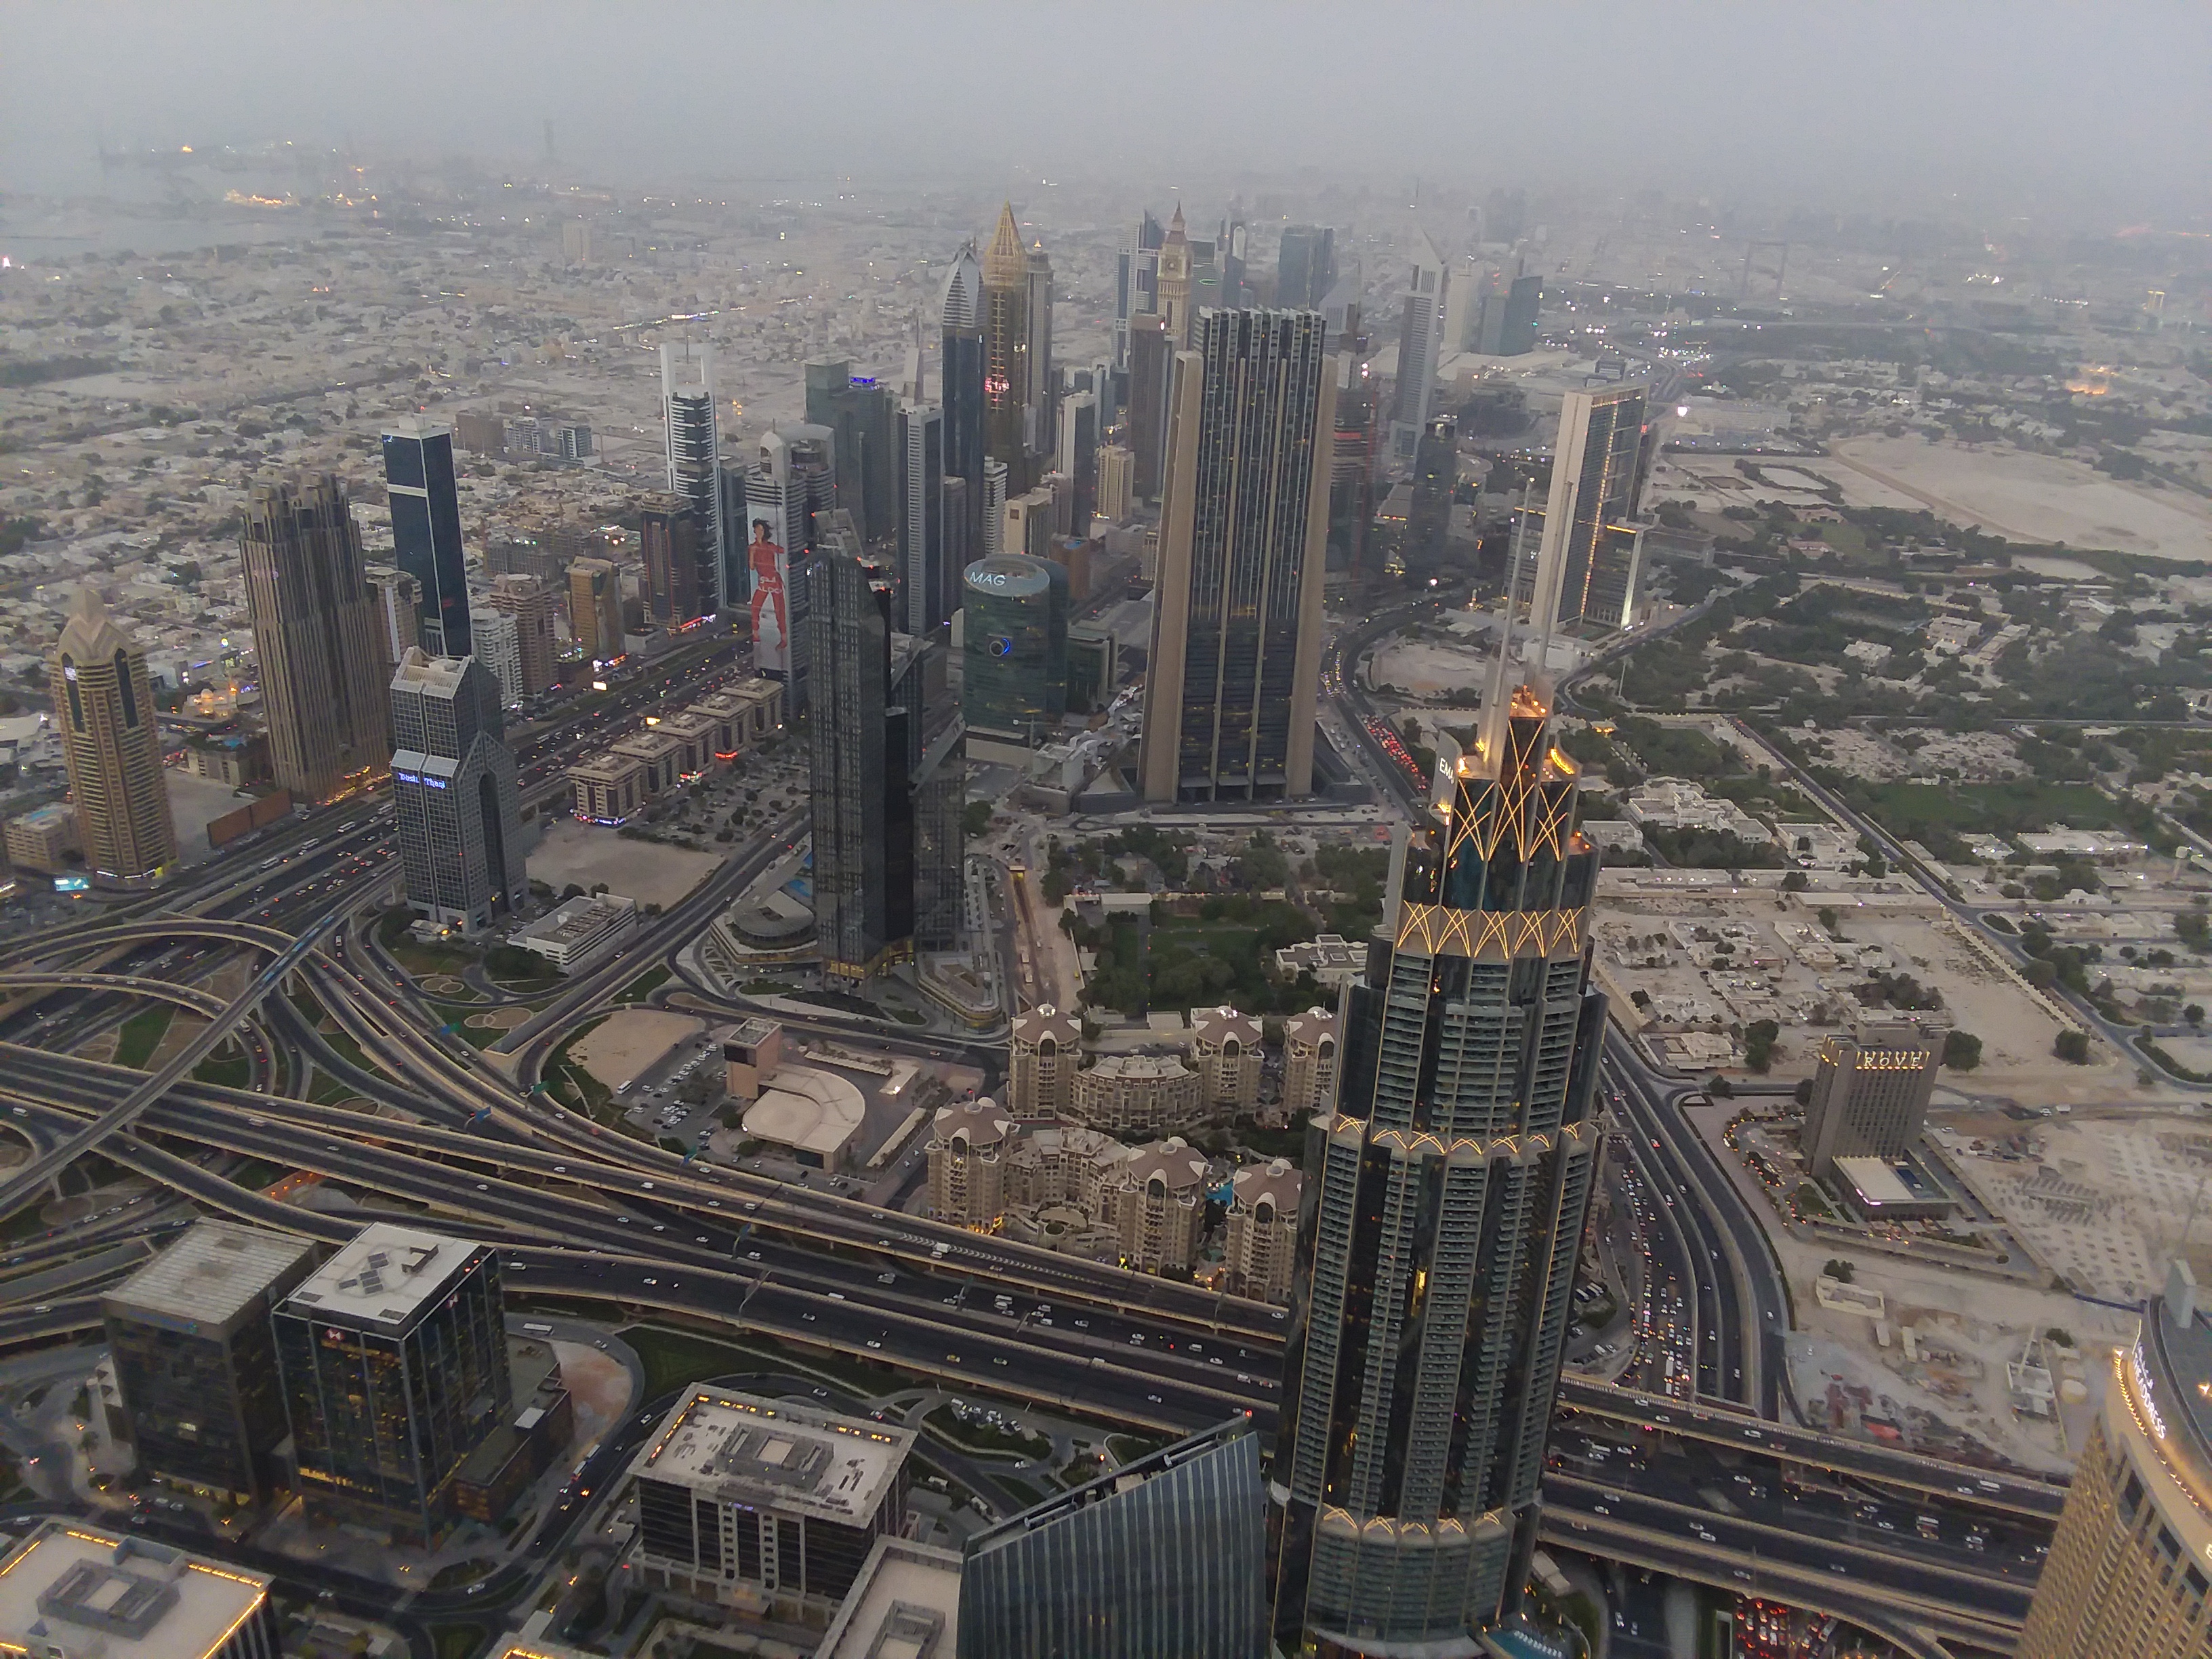
Here is a photo of Dubai from the top of the tallest building in the world, The Burj Khalifa. We went to the top to watch the sunset and see the lights of the city come on below. Absolutely
amazing. Click the photo for a larger view.
Much more to come about this trip. First though we need to head up to the panhandle to help with the hurricane relief efforts. My fiancee (never get tired of using that word) has a weekend place there
and lots of relatives there who were right at ground zero for the landfall. We are taking food, water, gas, a generator, chainsaws, tarps ladders and lots of other stuff up to help out. We'll
probably have lots of photos and video of the area when we return.
09/11/18 - Just got back from vacation.
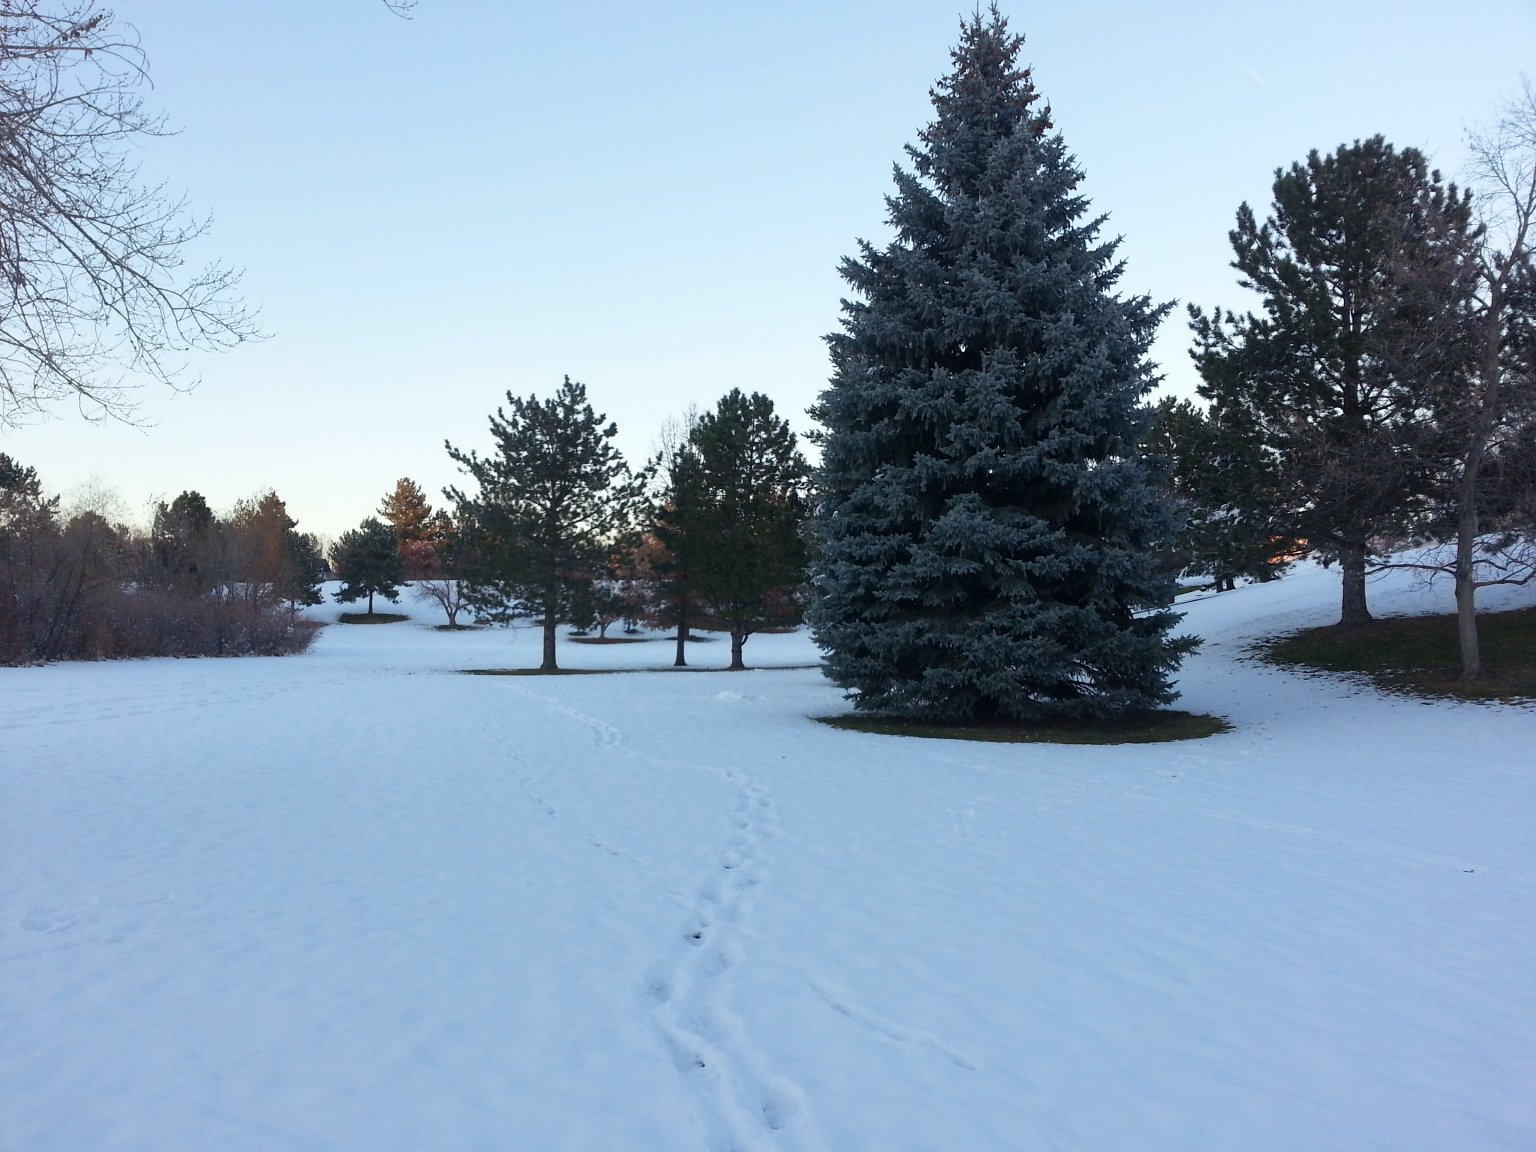
I just got back from a much needed and really great nine day vacation to my remote Arizona property. It was a really restful and relaxing visit. I got a lot accomplished while I was there,
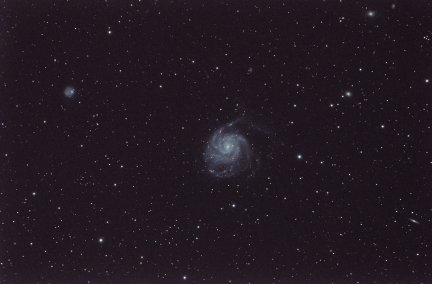
but still found time to just goof off and have fun too. I got to do some astronomy, even though the weather was pretty cloudy most of the time. Here is a 50 minute exposure of M101. It turned out
pretty good. Click the photo to more photos and read about all my adventures from this vacation on my Travel and Vacation Photos page.
08/19/18 - Beach Re-Nourishment at Indian Rocks Beach, Florida.
My girlfriend and I like to take long walks on the beach in the evenings after dinner. We try to get out there at least a couple of times a week, and we walk at least four miles each time.
A four mile walk in the sand is quite a workout. Plus the beach at night is cooler, less crowded, and more romantic;-) Anyway, we could see the beach renourishment happening off in the distance
at the far northern end of our walks. Last night we decided to get a closer look. We parked two miles further north than usual and started our walk from there. It was still 1.3 miles before
we reached the area where they are currently working.
There is some sort of large barge about a mile offshore pumping sand slurry through a pipe about four feet in diameter onto the beach. A big machine separates out any debris, and just let's
clean sand and water flow onto the beach. Two huge bulldozers were spreading the sand around. They were about doubling the width of the beach to provide for protection from storms. We continued
walking for another 0.7 miles beyond the work zone before turning around and heading back to the truck. The new wider beach on the far side was really nice. Since we are both into paleontology,
we wished we could have got a look into the dumpster all the debris separated from the sand was being dumped into. We could hear stuff banging its way down the length of the pipe. There were
probably a lot of nice shells and maybe some big shark teeth and fossils in there. No dice though. A guy was patrolling the parameter of the work zone and shooing everyone away. Gotta find out
where they dump that stuff.
08/14/18 - Facing off a plaster mold and lost foam casting in Aluminum.
Last weekend used my Woodpile CNC mill to face off the top of a refractory plaster mold I had cast earlier using the foam mold in the below video from 7/14/18. It was my first experiment
with milling plaster. I dished out the top surface to f/4 so the resulting cast glass telescope mirror blank would have a constant glass thickness. It went well, but I am concerned
about tool life. The tool seems to have been dulled a lot by the cut. The refractory plaster I use for molding glass is filled with silica and alumina to make it more heat resistant.
That also tends to make it dull cutting tools quickly. I'll keep experimenting though. Maybe cutting the molds out of disks of plaster will be a better method than cutting a pattern in foam
and then casting the plaster in it. Time will tell.
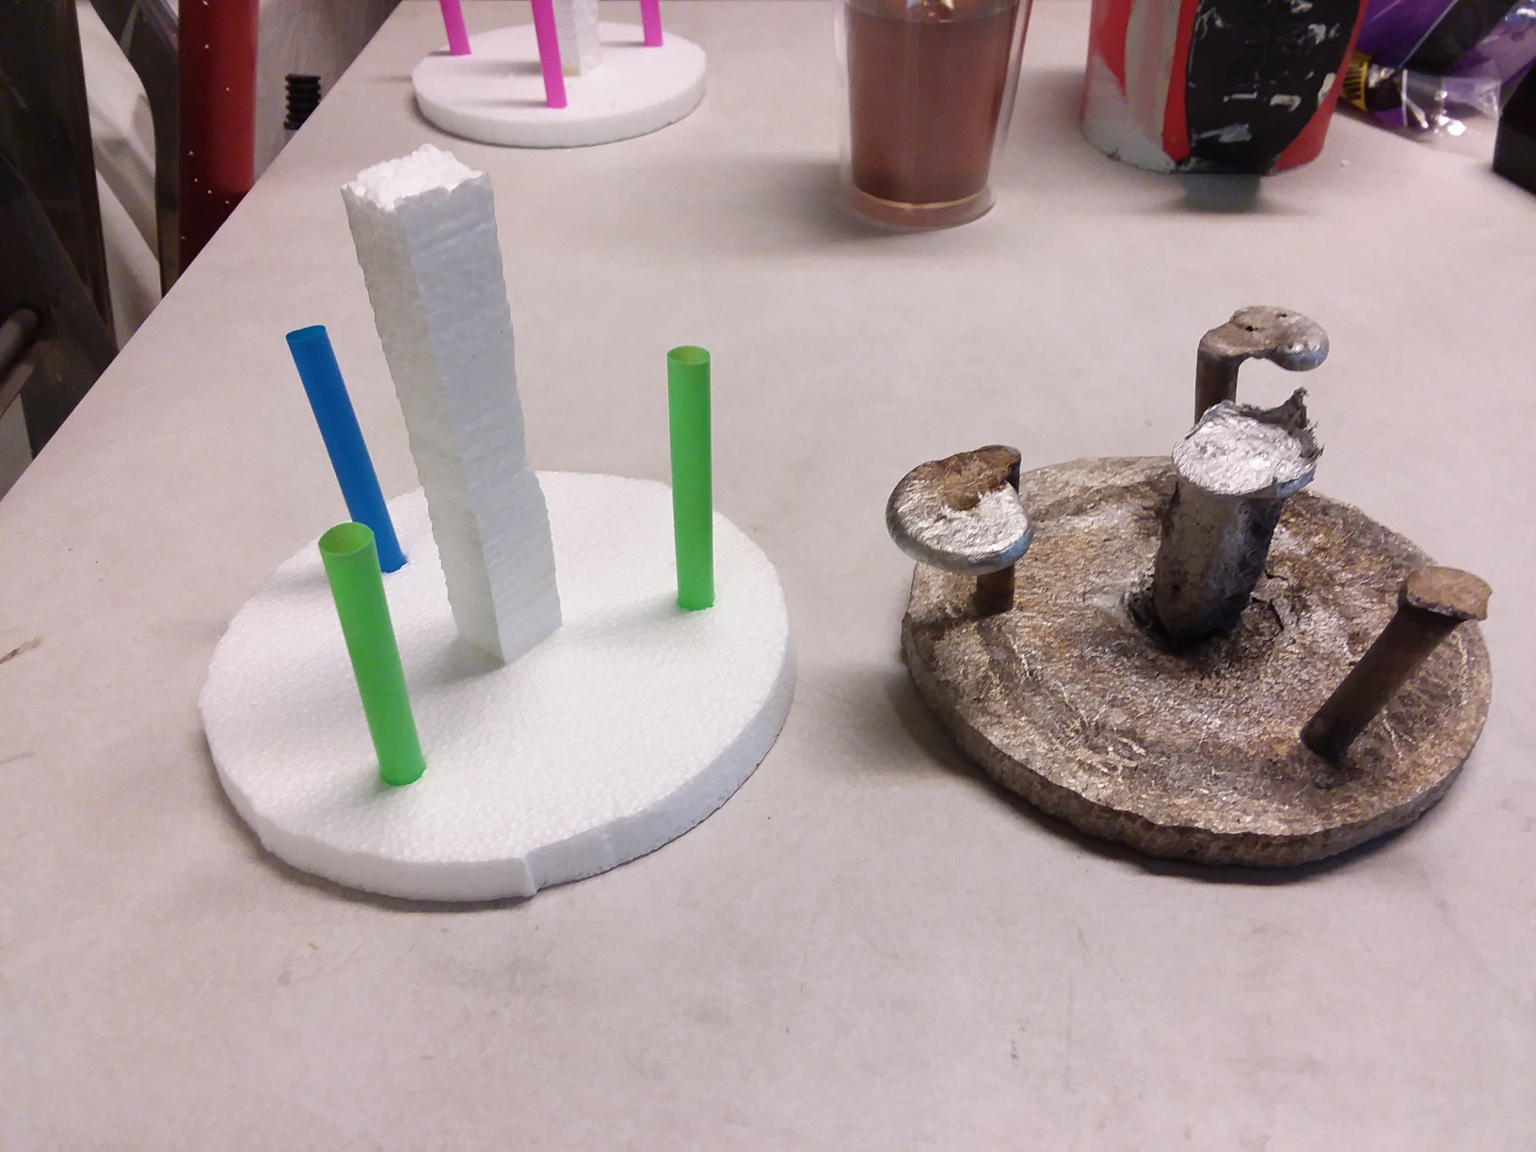
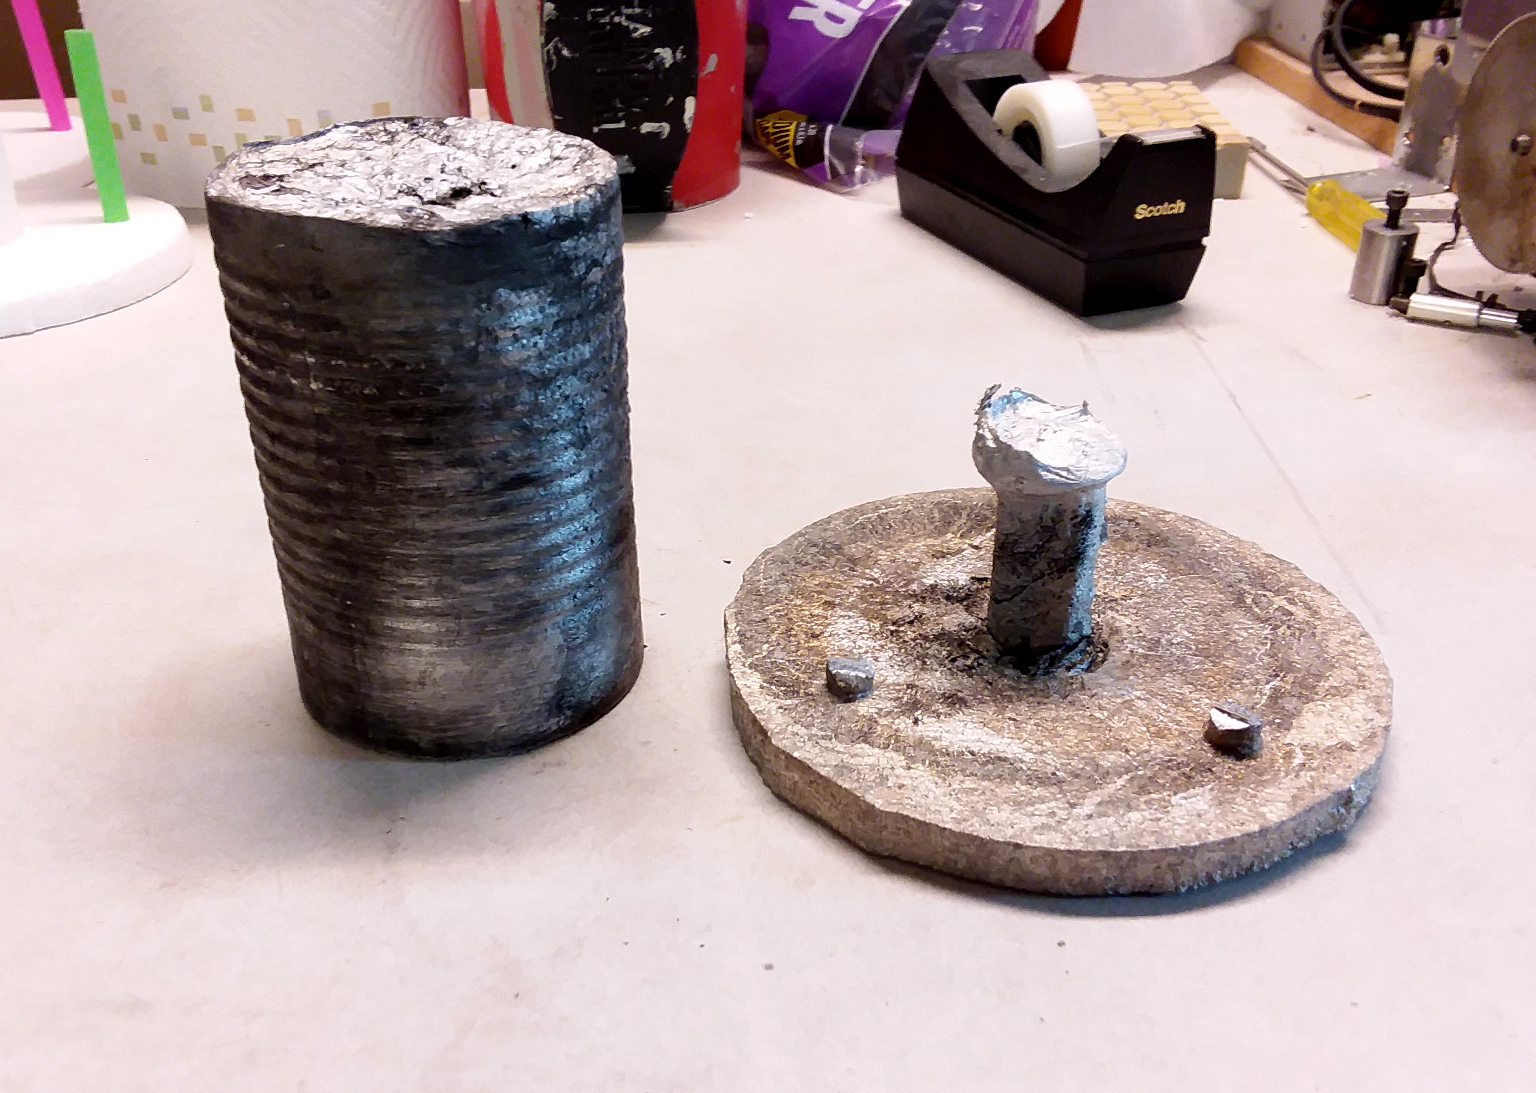
I also did a little lost foam casting last weekend. I needed an aluminum disk 1/2 inch thick for another project. I didn't have any flat stock on hand that I could cut it out of, so naturally
I thought of firing up the foundry and casting one. It went surprisingly well, or at least seemed to at first. It always surprises me how easy lost foam casting in ordinary sand is. On the left
is the kind of pattern I was using. On the right is the result. I don't know if the three soda straw vents were really needed, but they take no time to add, and they are easy to cut off the
finished castings.
Here I have cut off the vents from the disk casting. I also sawed off the riser in the middle later. I then center drilled the disk and screwed it onto an arbor so I could mount it in a lathe.
My plan was to take the disk in to work early on Monday and clean it up on the toolroom lathe we have there. I had also cast a large round rod of Aluminum using a bean can as a mold. I can turn it
down to make any large parts I would need large diameter round stock for.
Things didn't go quite as planned. I knew the disk was a little warped (kind of like a potato chip) but didn't think it was too
bad. Once it was turning in the lathe though, I could see just how bad it really was. There was no salvaging it. I tried casting another disk the next day, with even worse results. I think the
problem is that the foam I am using has essentially no rigidity. As I ram the sand in the molds around the foam, the sand flows and warps the foam. I may try again with a more rigid foam and lighter
ramming. Either that or bite the bullet and get some 1/2 inch flat plate to cut the disk from. I may also experiment with coating the forms with a ceramic shell and burying them in loose dry sand
for support during casting. Anyway, it was an interesting learning experience. Plus it's always fun to play with molten metal.
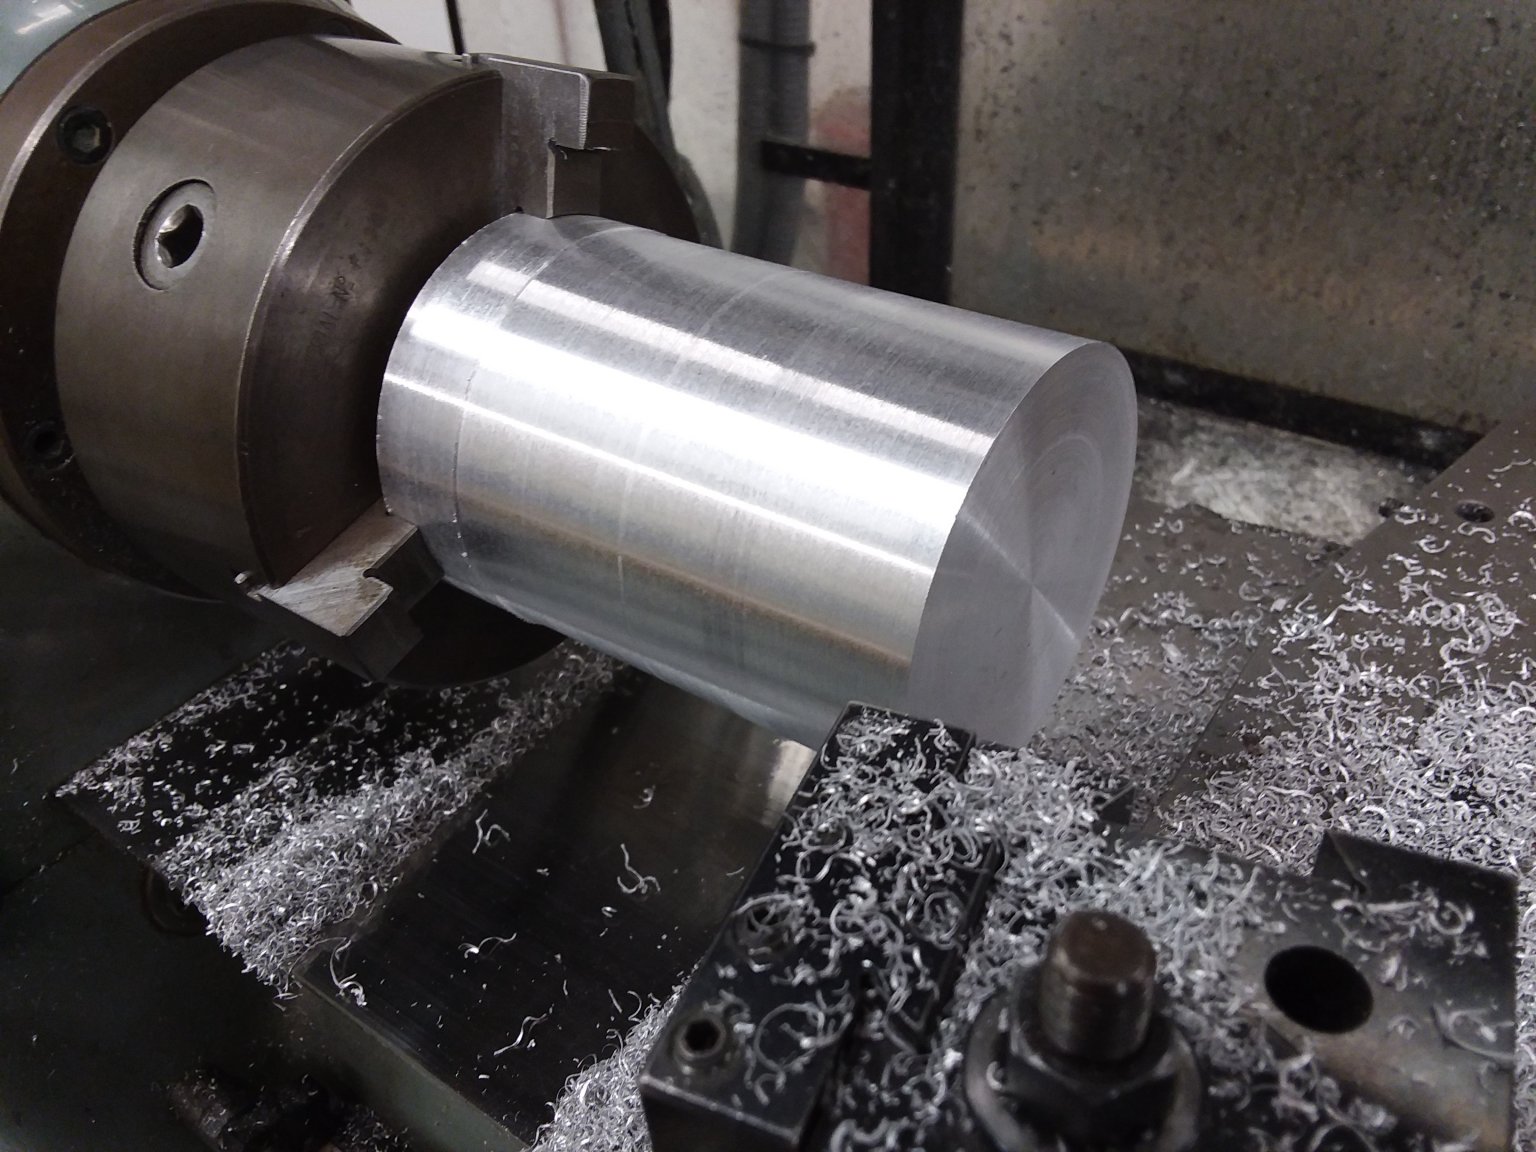
UPDATE: This is the above bean can aluminum casting after cleaning it up on the lathe. Wow! That really turned out nice. I cleaned up the ripples left on the surface by the ribs in the
can. I also squared up the ends. Both ends had been dished in from shrinkage and the top was really rough and irregular. That all cleaned up and squared off nicely. The final diameter after cleanup is
just a few thousandths under 3 1/8 inches. I see no gas bubbles or voids. It machines nicely and leaves a nice looking surface. This is totally going to be a great piece of stock for future machining projects.
On another note, I am starting to experiment with ceramic shell molds for my lost foam casting. Not only do my lost foam castings sometimes warp when packed in sand (see above), but they also tend to have a
lot of tiny gas bubbles in them. I kind of doubt the bubbles are a big issue for most things I do. They are really tiny, but there are a lot of them. I guess as the foam vaporizes some gas gets incorporated
in the molten metal. So I'm thinking that the ceramic shell method could eliminate two problems at once. I'll burn out or dissolve out the foam from the shell prior to casting. I'll post results as soon as
I have some to share.
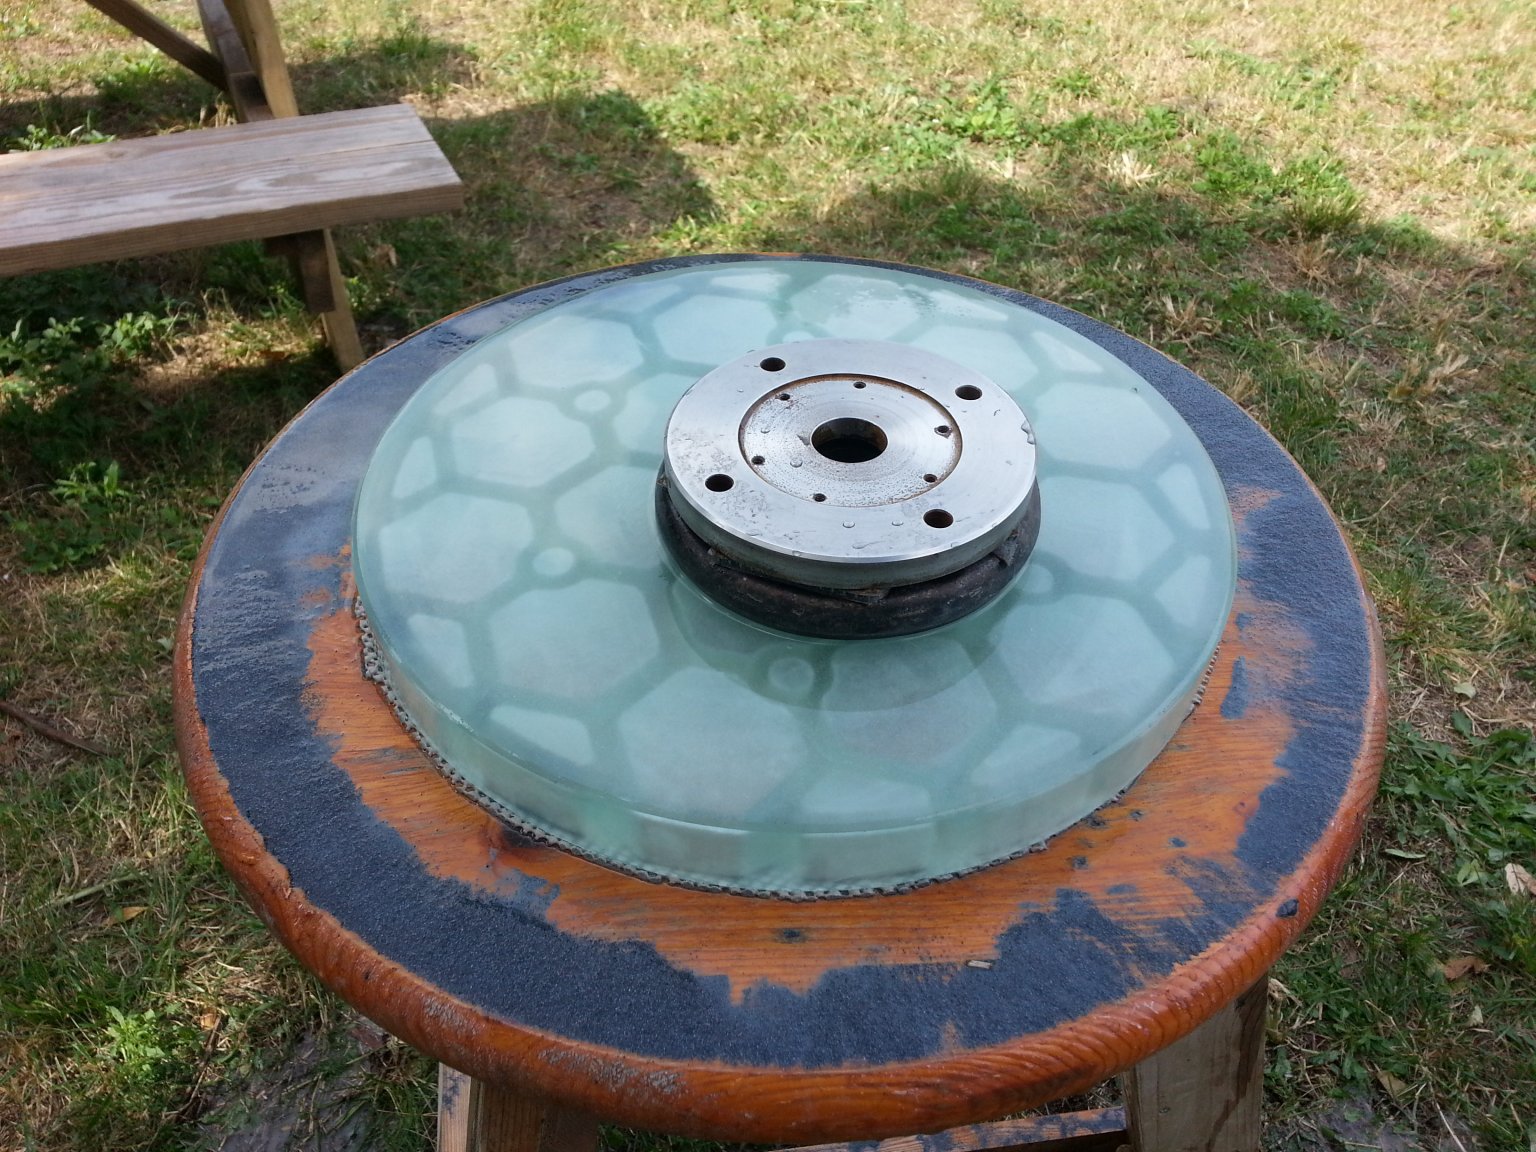
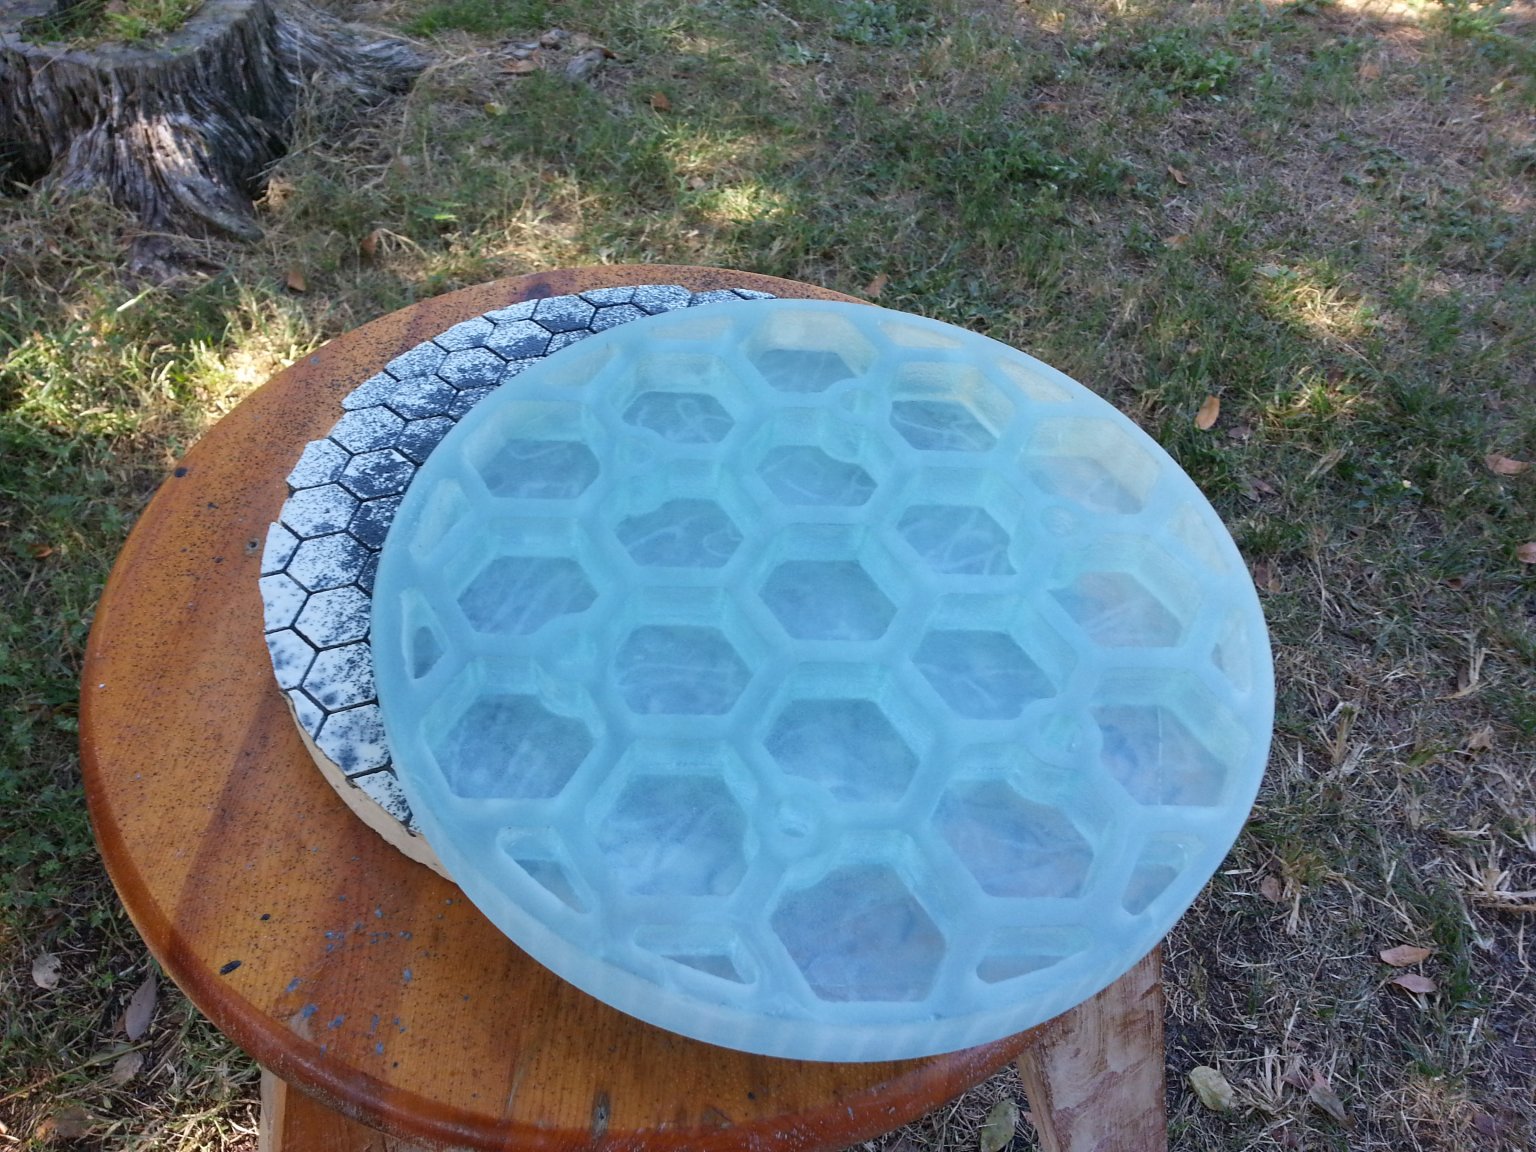
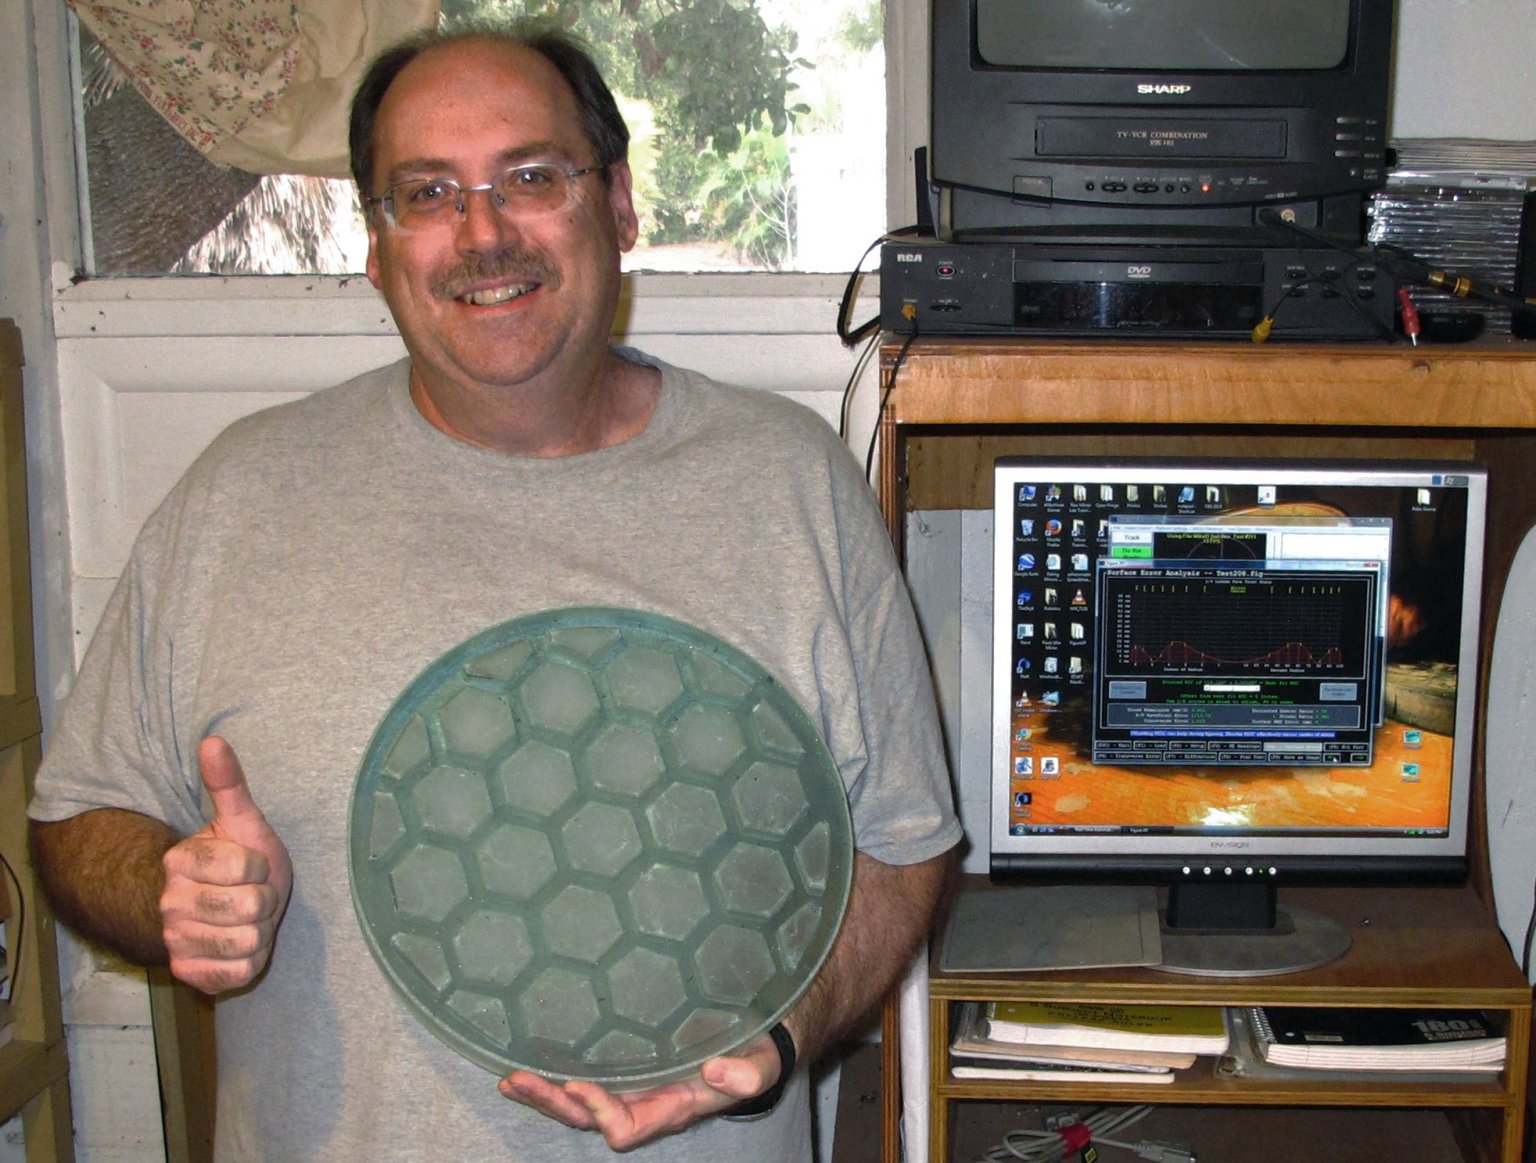
07/14/18 - Birthday CNC Milling Mirror Molds.
My birthday was a few days ago. I've successfully completed another orbit around the Sun! My girlfriend and I had a great celebration of my birthday last weekend and there was a little party
Monday night because that's when everyone could get together. That left me free to do my own thing on my actual birthday. So I naturally took off early from work, went into my workshop, and
spent the evening working on my own beloved projects. That included CNC milling this 14 inch honeycomb-back mold for a light-weight telescope mirror. I finally got the program to run all the way
through the 2 1/2 hour cut without screwing up. It looks great. Can't wait to fill it with plaster and make a negative to use to cast glass. I had better buy more refractory plaster first. I
want to make sure I have enough on hand for the project. I also cut a 10 inch f/3 slumping mold on my home-built CNC router and used it to cast a couple of plaster molds. Mirror slumping is
something I have been wanting to get into big time. So I decided it was high time to get going on it. I love nothing better than building stuff, so it was a great birthday. Even if I did have
to take some time out to fix a sudden bad leak under the bathroom sink. Oh the joys of home ownership. But at least I did manage to fix it myself without calling in a plumber. That gave a great
sense of accomplishment, almost as good as building something.
In this video I show the milling of the honeycomb mirror mold, show and talk about some mirror slumping molds I also made, and talk about issues with and future upgrades to my home-made
"Woodpile" CNC router. Check it out.
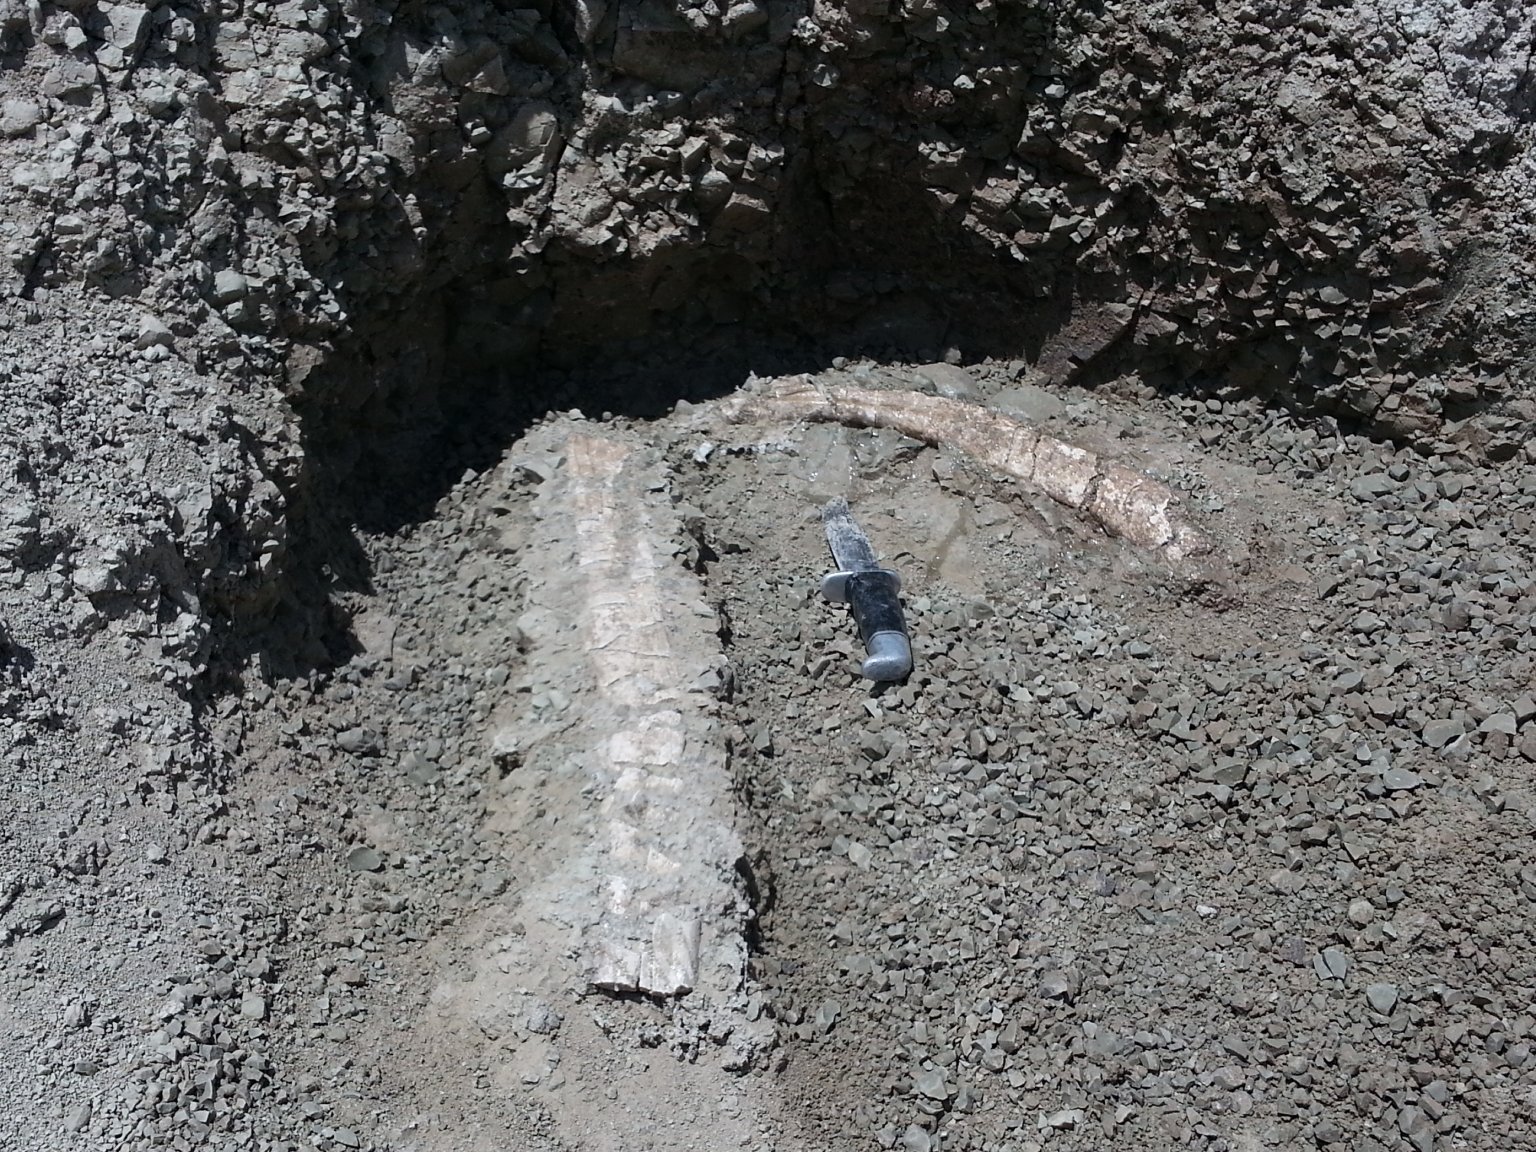
05/17/18 - Nebraska Badlands Fossil Adventure
I hardly had a chance to catch my breath after the Peace River Adventure before we were off to the White River Badlands of Nebraska for a fossil hunting adventure. This was an absolutely amazing trip to one
of the few parts of the country I hadn't been to yet. It was also a much more serious and organized fossil hunt than any I had been on before, with people who take their fossil hunting very seriously and go for the
big game. This photo is of some Titanothere ribs that were found on this trip. I absolutely loved it, and I learned a lot too. I hope to go back again. Check out my fossil
hunting web page for more info and photos.
Click the photo to see more.
05/01/18 - More Fossil Hunting Adventures!
Last weekend my girlfriend and I participated in the Tampa Bay Fossil Club's annual Peace River Adventure. We camped out for several days with a huge group of people and kayaked up the peace river to hunt fossils. We found some really
good stuff this time, and had a really great time too. Check out my fossil hunting web page for more info and photos.
Click the photo to see more.
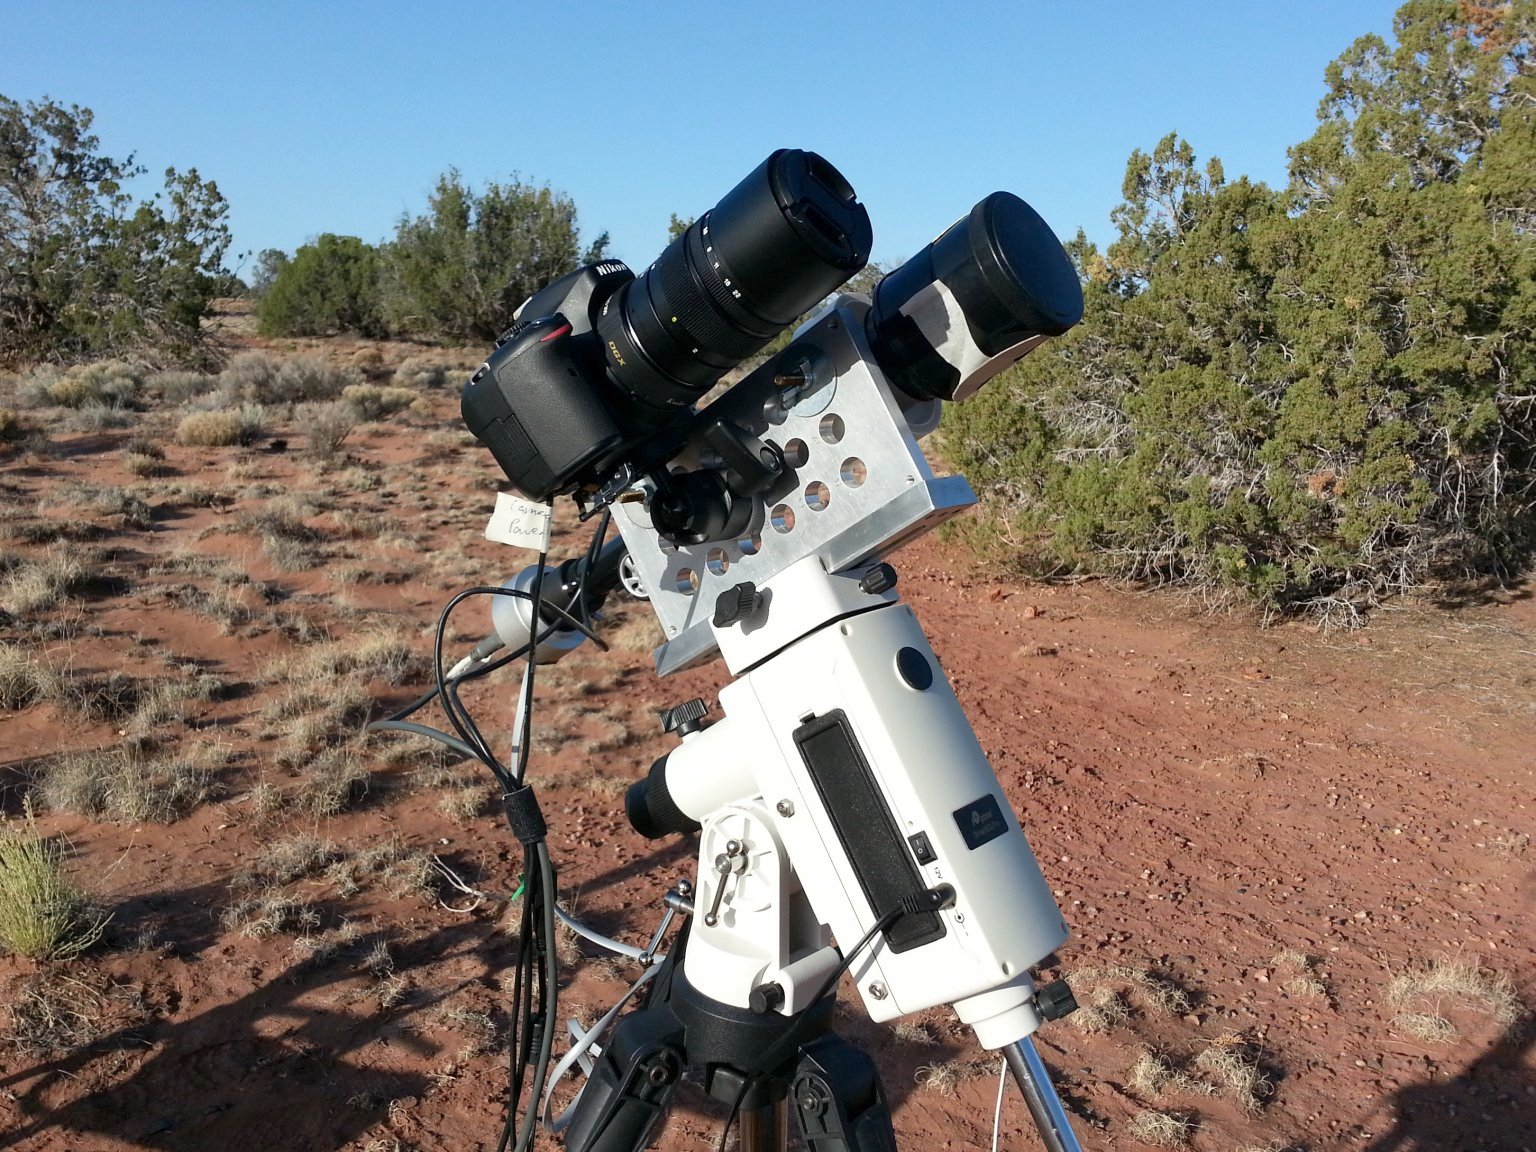
05/01/18 - My Wide-Field Astrophotography Rig.
This is an autoguiding rig I built to allow me to take long-exposure photos using regular camera lenses. I wanted to to do some wide-field astrophotography
but had problems with guiding errors showing up in long exposures of more than a minute or two. So I figured out a way to mount both my camera and my guide scope and autoguider
on top of my telescope mount so I could get auto guided exposures. It was super simple to build and it works great. I used it to take some of the fantastic astrophotos I got
on my last vacation out to my remote Arizona property. Check it out.
Click the photo to see more.
04/20/18 - Just back from vacation.
I just got back from another epically great vacation out to my remote Arizona property. I spent a little over a week living in my little cabin in the woods. It was just the kind of break
I needed from the stress of work. Naturally while I was out there I engaged in lots of astrophotography, and lots of other fun things too. You can see more photos and a full write-up of
the trip on the Vacations and Travel Photos section of my web site or click the photo.
Click the photo to see more.
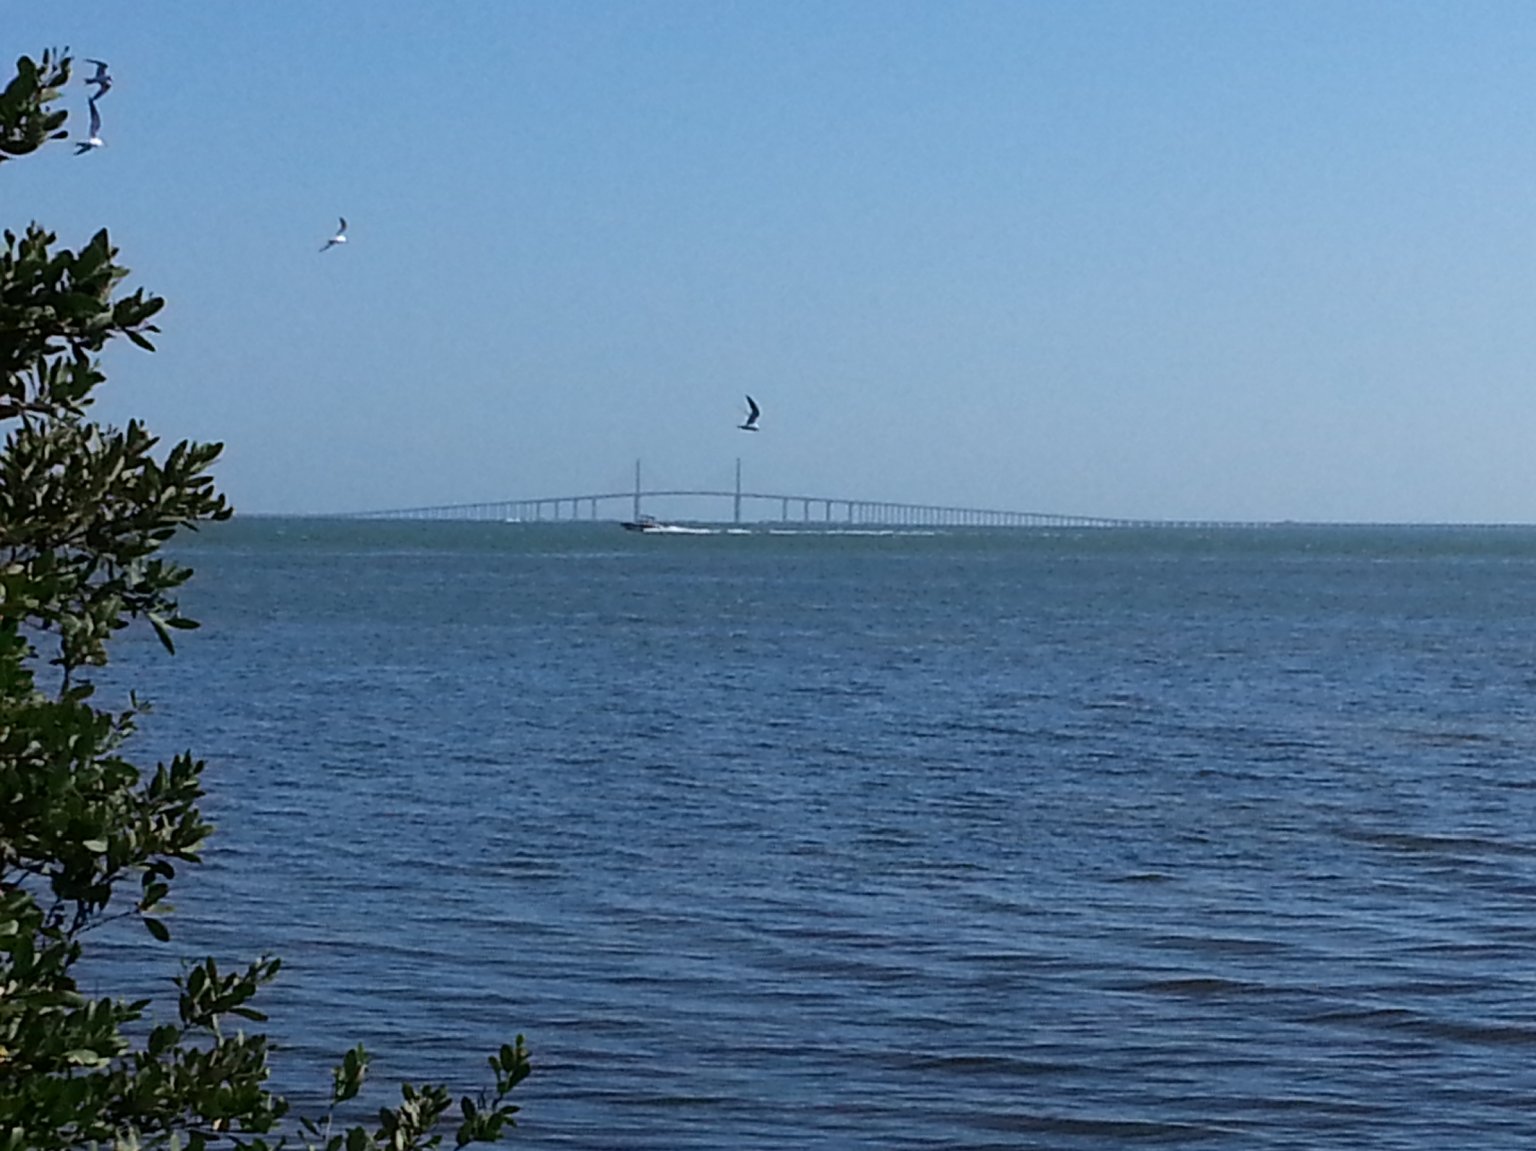
04/03/18 - A nice Easter.
My girlfriend has a huge family. She has lots of cousins and second cousins. Her favorite saying is "I have a cousin for that," whenever any kind of issue arises. We went to Easter
Sunday luncheon at one of her cousin's houses. It was a really great time. There were lots of people. We played lawn games, croquet and lawn darts. We ate way too much really good food.
Then we sat around like lizards in the sun all full and torpid enjoying the pleasant sea breeze blowing in off the water and talking for hours about everything under the sun. The
weather was absolutely perfect. It was a really nice Easter.
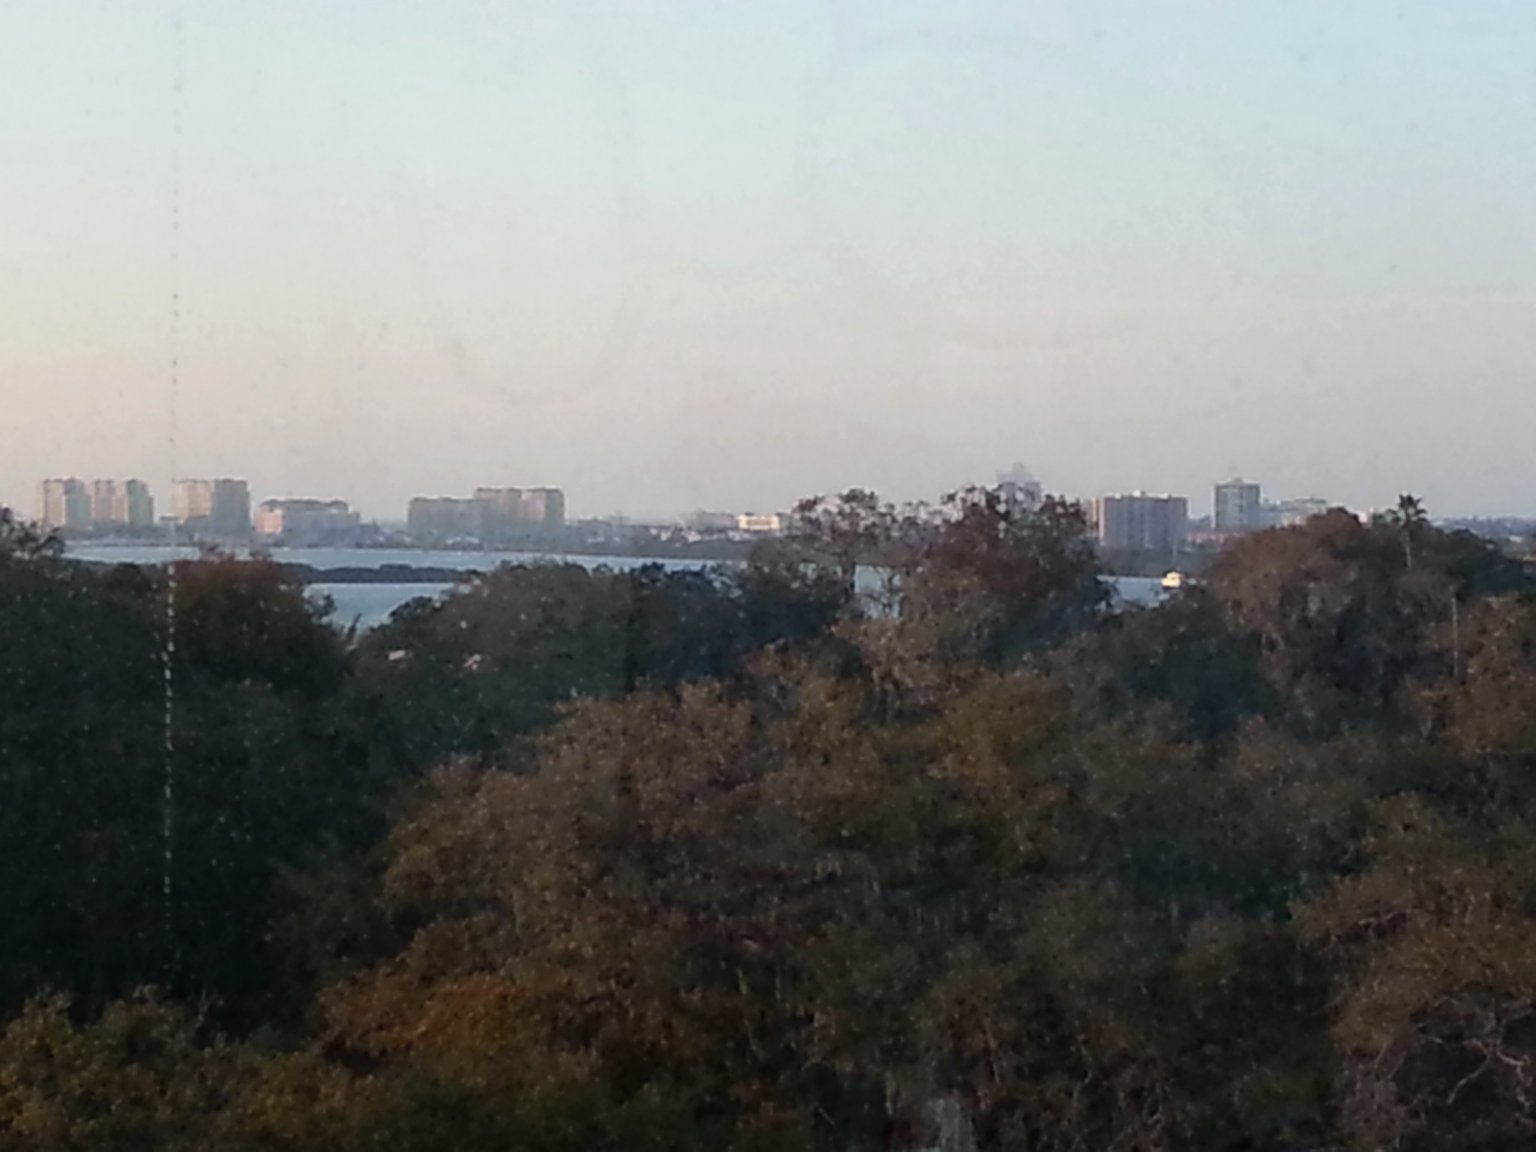
Later in the evening we explored an Indian mound and went for a walk in a waterfront park to try to work off some of the food. Here is a photo of the Sunshine Skyway Bridge on Tampa Bay
taken from the park. It was a nice break from spending all weekend painting like I have been the last few weekends. What a nice day it was.
Click the photo to see a larger image.
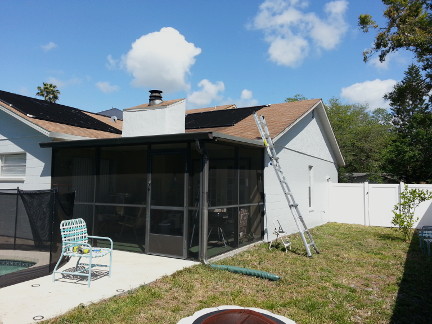
03/26/18 - House Painting!
Lots of house painting has been going on the last few weeks. I want to get the whole job done while the weather is cool and dry. As of now the exterior of the house is about 3/4 painted.
It's been going really well, and it looks fantastic. The story and photos can be found on my House Blog.
Click the photo to see the whole story.
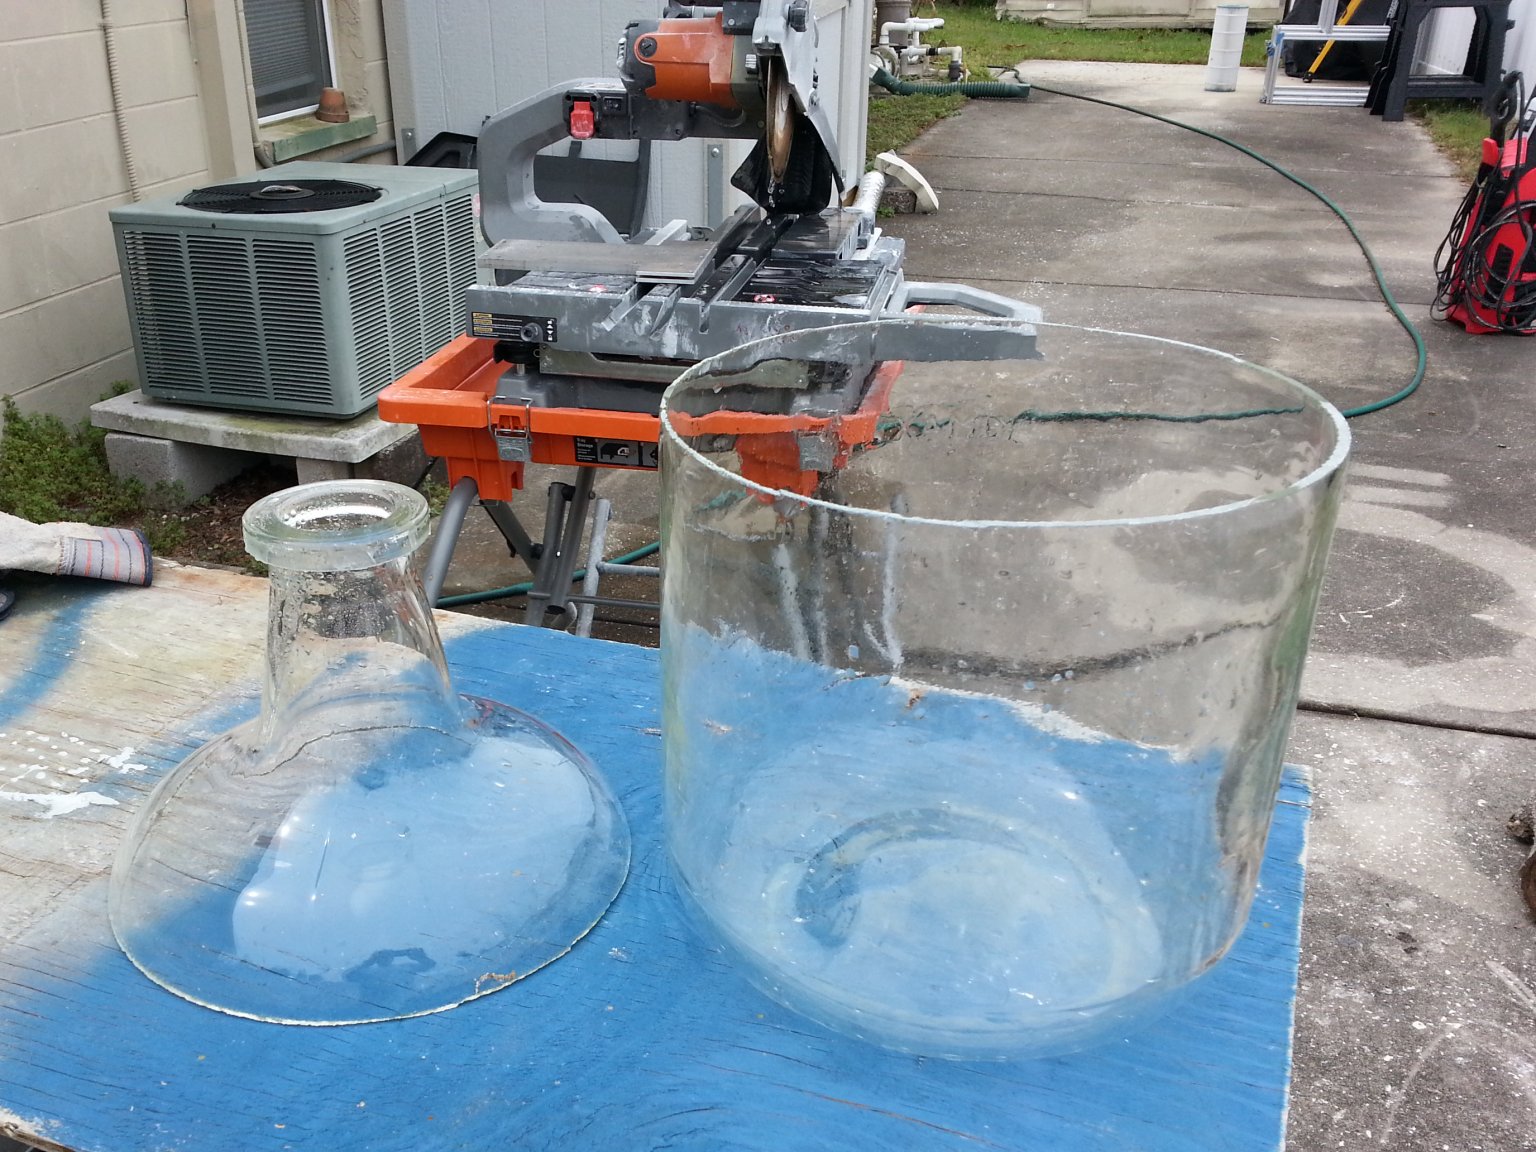
03/10/18 - Slicing a glass jug.
I've been playing with my big wet diamond saw. I used it to cut the top off of a big, 5-gallon, glass jug. I had to build a jig that allowed me to rotate the jug against the blade. It worked pretty well.
At least I didn't break the jug. My idea here is to make a big bell jar for doing some vacuum experiments. I got the jug for free and had no real use for it. So I decided to try making a big bell jar
out of it. I need to flatten, smooth and polish the rim. I'm pretty sure I can do that. One possible fly in the ointment is that after cutting the top off I could see that the wall thickness varies
pretty dramatically from one side of the jug to the other. The thin side is a little worrying. It makes me wonder if it will withstand atmospheric pressure when a vacuum is pulled inside it. I may
build an explosion cage to go over it and stand well back the first few times I pump it down.
A decent size vacuum chamber would allow me to do all kinds of neat experiments. Everything from aluminizing telescope mirrors to growing my own CVD diamonds, and much more. This project is in its infancy.
It may be a while before there are any results.
UPDATE: Even after smoothing out the rim, I don't think the thin glass on one side will withstand atmospheric pressure when if pull a vacuum inside it. Basically it would just be a big shrapnel bomb. Not going
to risk it. I'll buy a nice, thick glass bell jar meant for use with vacuum. Maybe I'll turn this jug into a big round fish tank or something. Either that or melt it down and make a telescope mirror blank out
of it.
Click the photo for a larger view.
02/24/18 - A President's Day Fossil Hunt
This last Monday both my girlfriend and I were off. It is rare that we both have the same day off. So we decided to go kayaking and fossil hunting.
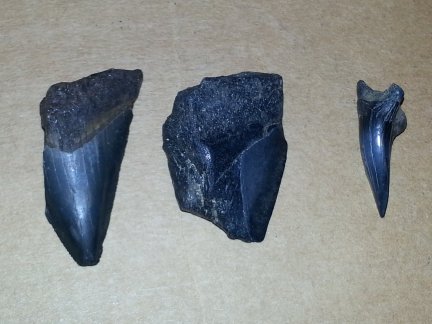
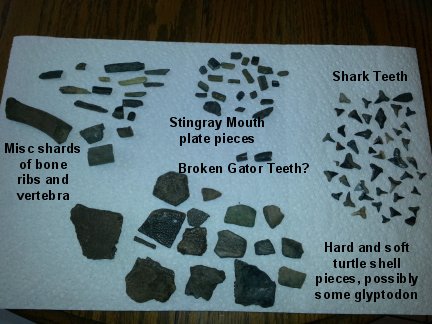
We loaded up our kayaks and headed to the peace river for a day of paddling and fossil hunting. We had a good time, and found some good stuff too. This is a photo of
two partial Megalodon teeth and a whole Mako shark tooth we found. We found a lot of other stuff too.
Click the photo to see more photos and read more.
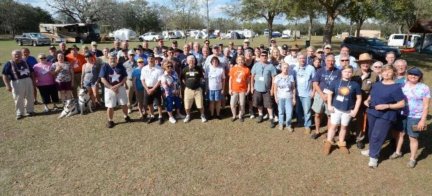
02/21/18 - The 2018 Orange Blossom Special Star Party
I have posted a few photos from this year's Orange Blossom Special Star Party on my Travel and Vacation Photos Page. The weather was pretty bad this year,
but we all had a good time anyway. the star party turned into a just plain party. It takes more than a few clouds to dampen our spirits. Click the photo or the link to see more.
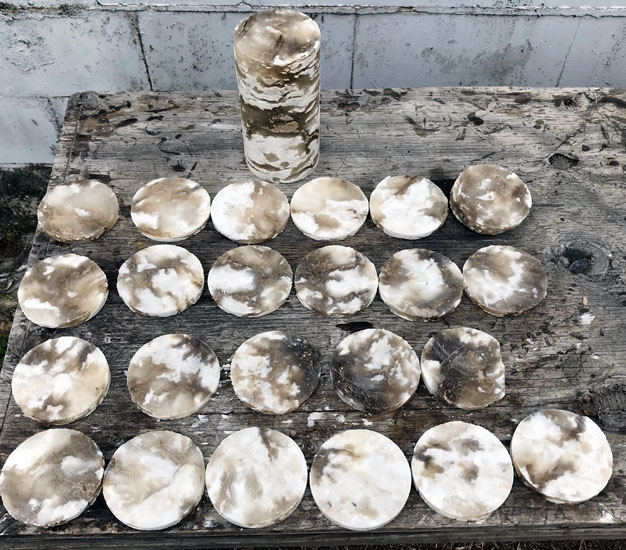
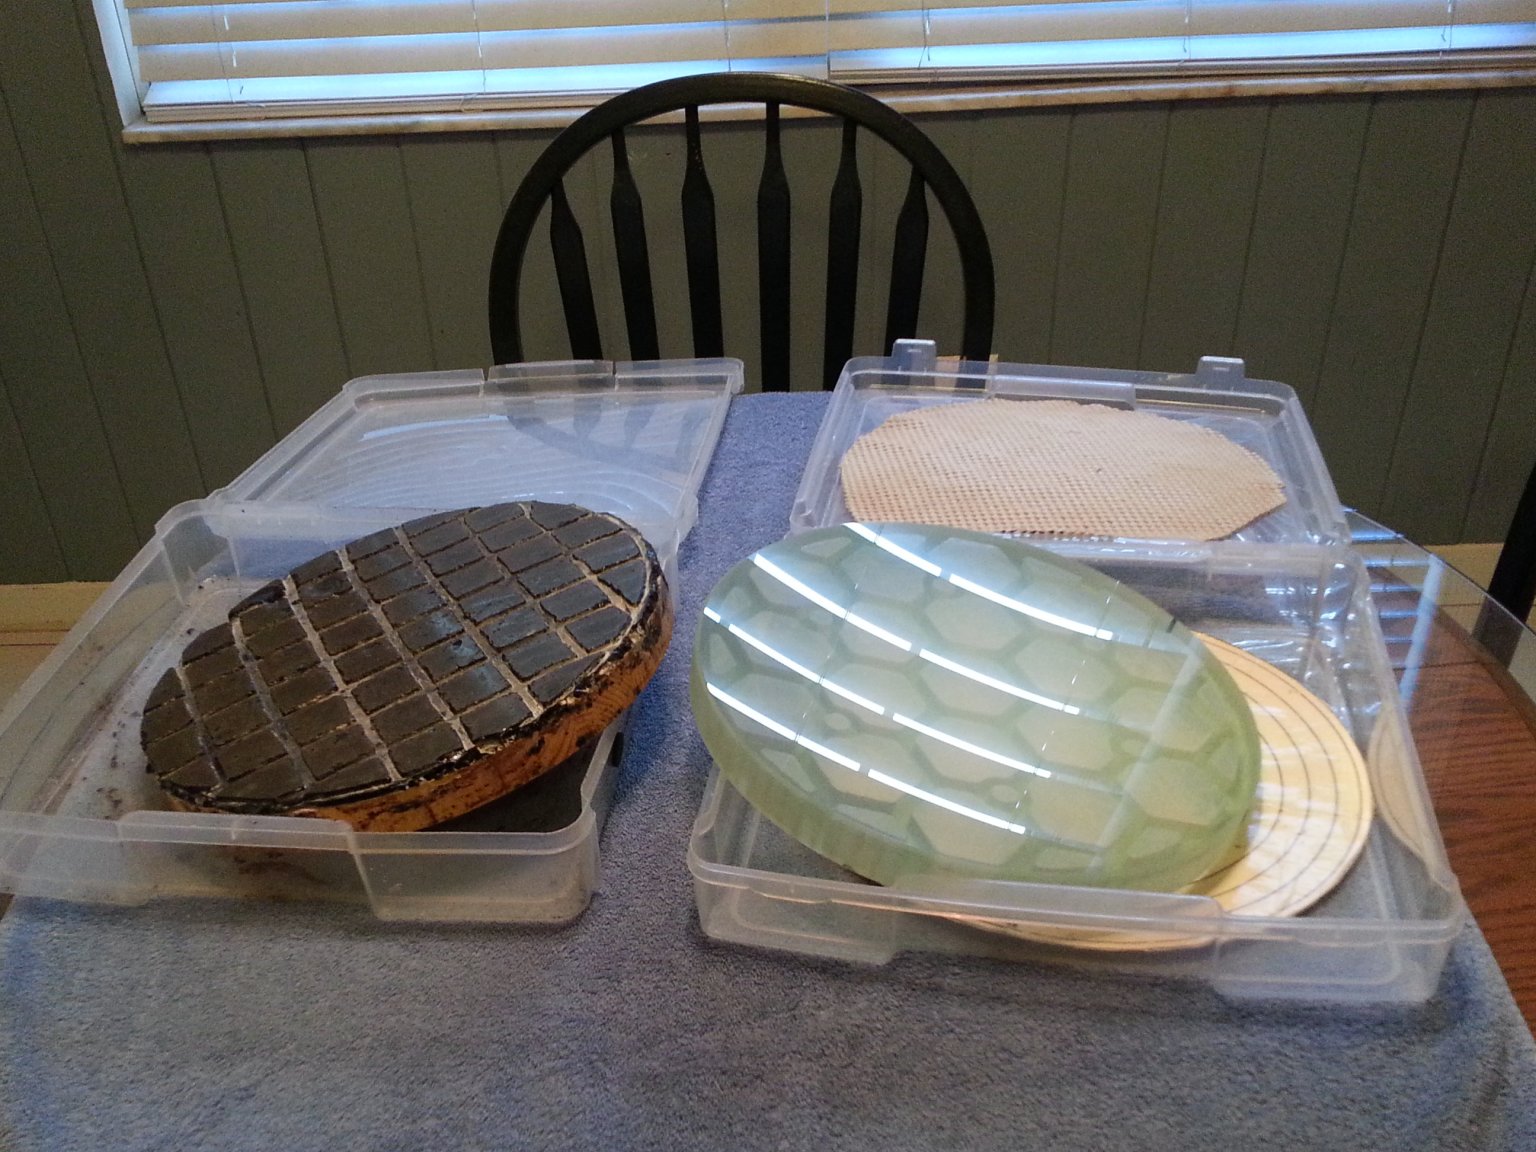
02/03/18 - Making coasters at the Mirror Lab.
We lab rats who like to hang out at The SPAC Mirror Lab are first and foremost astronomy and optics geeks, but all sciences are welcomed, studied and enjoyed by our members.
Geology is a side interest many of us share. So when Ralph Craig showed
up with a four inch diameter core sample from a deep injection well being drilled in Manatee County, we were naturally fascinated by it. Ralph asked if I could use my new diamond wet saw to cut some disks off
of it to see the internal banding of the different minerals. I said sure, and proceeded to turn about a foot and a half of it into 1/2 inch thick stone coasters. It was a lot of fun, and I snagged a few of the disks for
myself to use as coasters. The way the different minerals intertwine with each other is amazing. No two disks are the same, and they are all fascinating. This photo doesn't do them justice. I plan on coating my disks
with polyurethane to bring the detail in them that is only visible otherwise when they are wet. It was a fun and educational day at the lab.
Click the photo for a larger view.
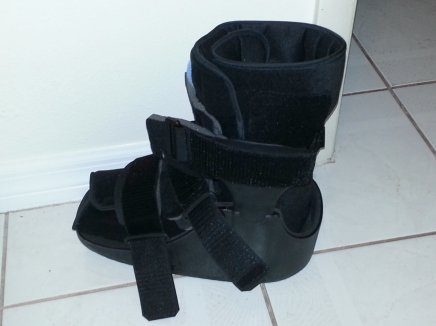
01/30/18 - Goodbye boot.
I've been suffering from a serious high ankle sprain since last September. I've been wearing an orthopedic boot for a few months now to get it to heal. It hasn't been much fun, but the boot
has been a big help. Hobbling around in it has been awkward, but it helped a lot with reducing the pain and promoting the healing. It took a while between my age and the fact that I have to
be on my feet most of each day, the healing has taken a long time. This last week is the first whole week I've gone without the boot. And today is the first day I've had in a long time where
I was almost completely pain free. It feels so good to have two good working feet again. It's not quite 100% yet. I have to be careful how I move and which shoes I wear. I don't want to re-injure
it and go back to the boot. It's great to be able to work around the house again and work on some of my projects and pastimes that got sidelined while I was recovering.
12/17/17 - My Home-made Foundry.
I've added a new section to the web site covering the construction of my home-built foundry for melting aluminum, brass, bronze and copper. The construction
is super easy. The new section also covers my first few lost foam metal casting projects. Almost anyone ought to be able to build a foundry like this and melt down some metal for use in lost
foam or lost wax casting. Check it out.
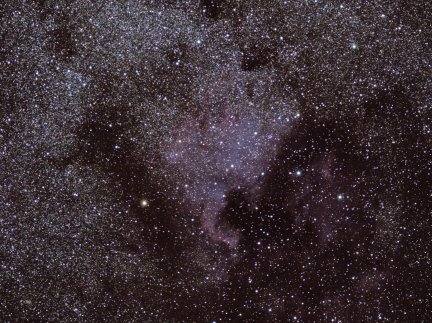
11/22/17 - I'm home from a great vacation.
I just got back from a really great vacation to my remote Arizona property where I relaxed, decompressed and did some astrophotography. This is a photo of the North America Nebula I took
while I was out there. Lots more photos and descriptions can be seen on the travel and vacation section of the web site, or you can click the photo at the left to see more.
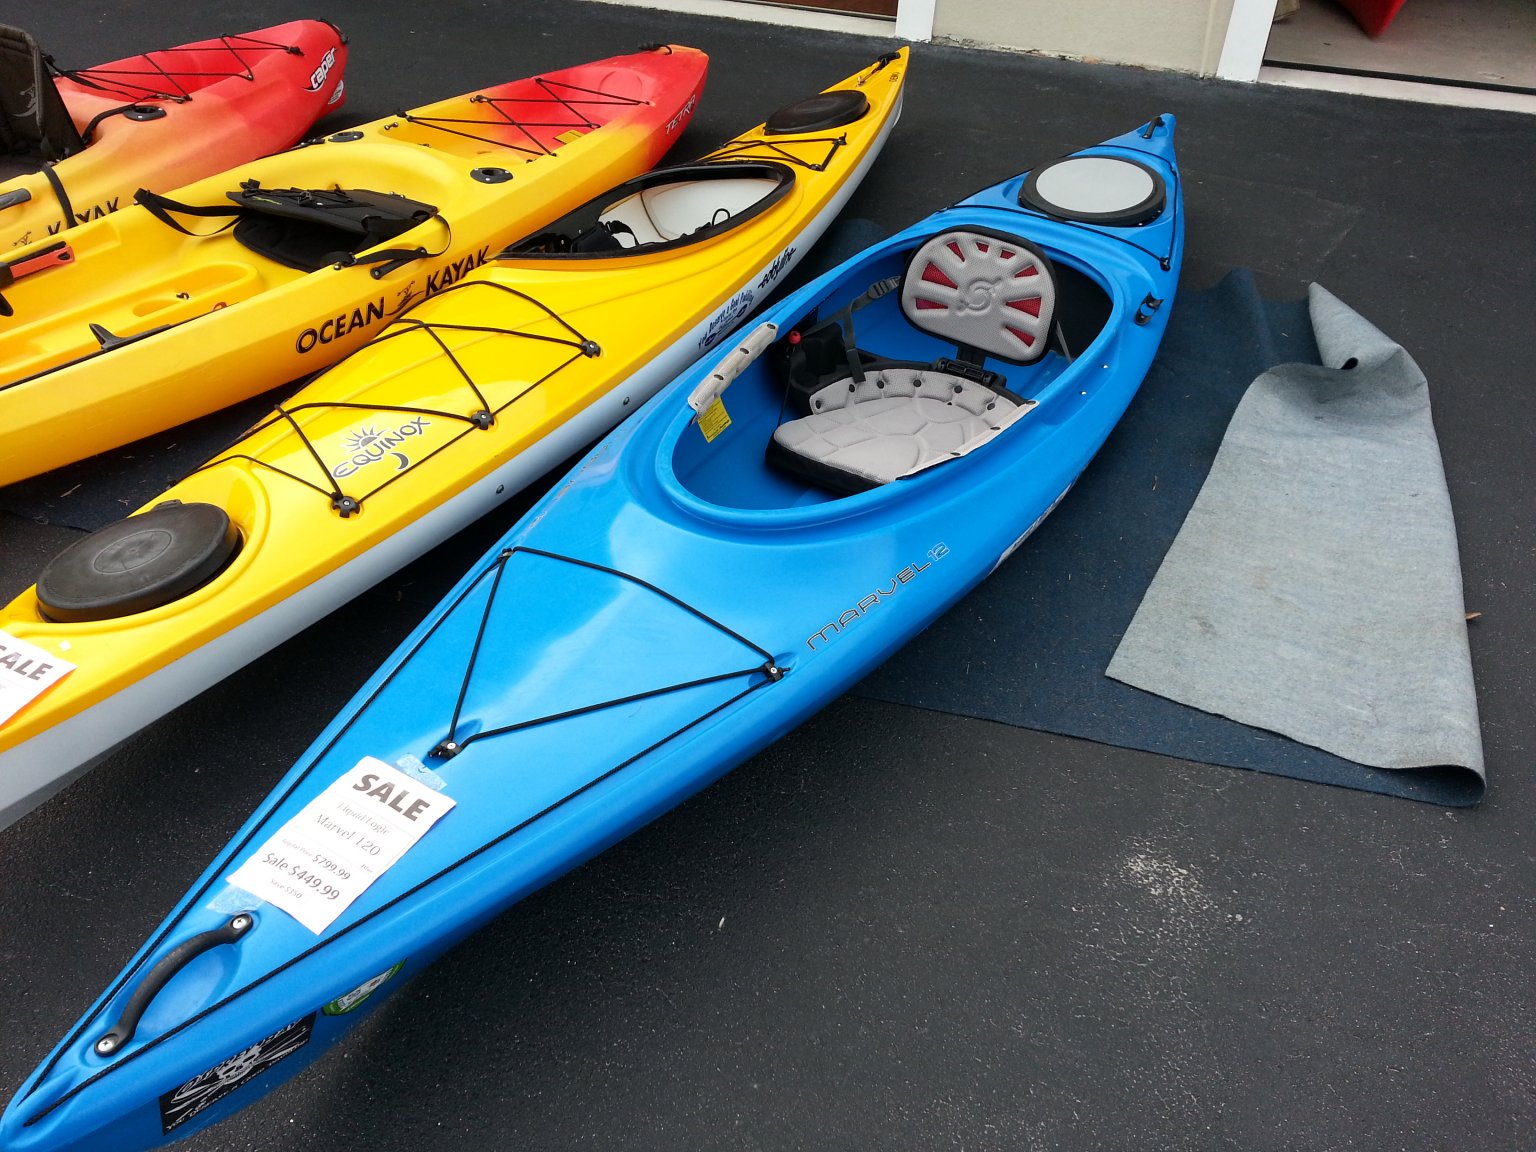
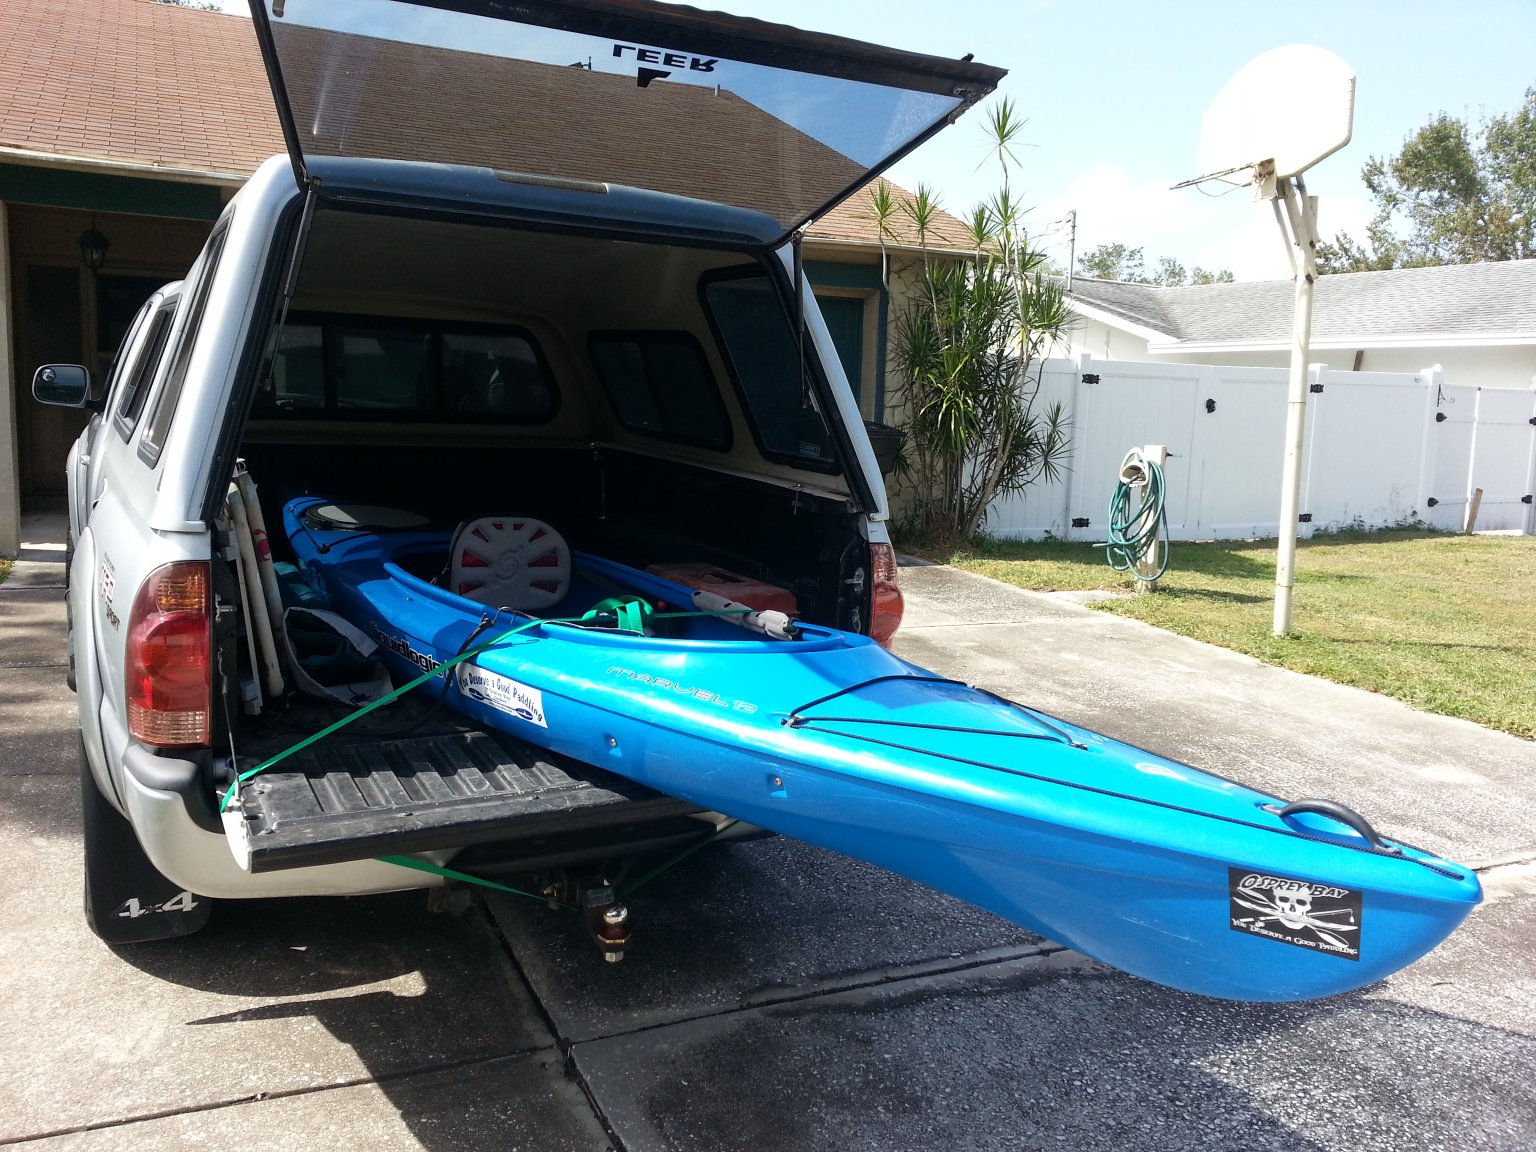
10/22/17 - I bought a kayak!
I decided a while ago that I needed to buy my own kayak. So I don't have to keep borrowing my girlfriend's son's kayak when the two of us want to go up the river. I looked at new ones, and I'd been watching
Craig's List for used ones. An outdoor outfitter store near me had a sale on used kayaks this weekend. I went and checked it out. I found this blue beauty there. It was the best used kayak I'd
seen and at a reasonable price. I was there at the end of the day. They were just closing up. I went back the next day and bought it right after they opened. I'm glad I did because another customer
tried to buy it while the salesman was writing up my sale. Whew! Got it just in the nick of time.
The kayak is in great condition. It looks like it was hardly used. The seat is very comfortable and all kinds of adjustable. It also has nice adjustable foot pegs. It is a little wider than the kayak
I had been borrowing, but that's ok because I am a little wider than the owner of that kayak. I had to buy a paddle too since the boat didn't come with one. But the whole thing only cost me about $500.
Not too bad at all for a nearly new kayak. I can't wait for the rivers to go down during the dry season so my girlfriend and I can go out fossil hunting again.
08/28/17 - I just got back from a fantastic and much needed two week vacation to Arizona and Wyoming. I spent the first week at my remote Arizona property engaged in home improvement
projects and astrophotography. Then I spent the second week with my girlfriend in Wyoming where we witnessed the eclipse, went fossil hunting, explored the back roads, soaked in the hot springs, and engaged in
home improvement projects at her place. It was an amazingly great vacation. I took a literal ton of photos. A select group have been put on the vacation and travel section
of the web site, along with a writeup about all the stuff we did.
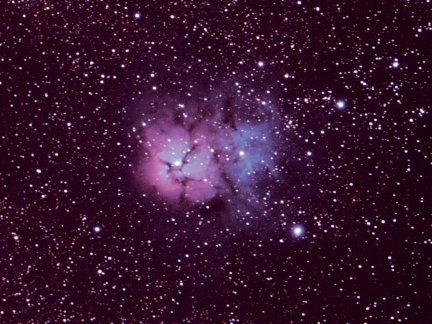
By the way, here is a shot of the Trifid Nebula I took while at my remote Arizona property. Click the photo for more.
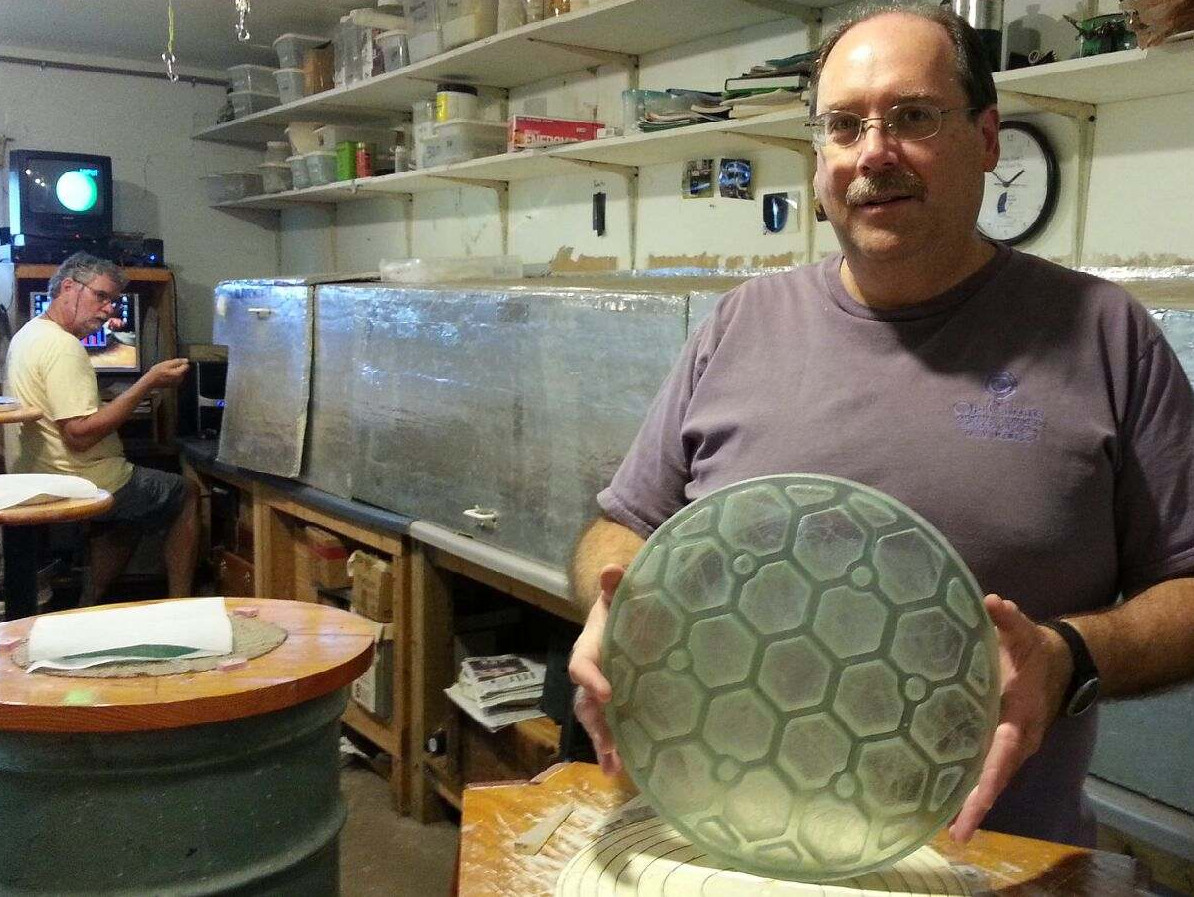
07/15/17 - I just finished my 4th generation honeycomb mirror.
I just finished the figuring on the first of my 4th Geration design Honeycomb Telescope mirrors. This mirror is 12.5 inches in diameter, f/4.5, and only weighs 7 lbs. Here I am in this photo showing off the
completed mirror. All it needs is a coating of aluminum to make it reflective. I'll be sending it off for coating soon.
My 4th generation honeycomb design incorporates sockets and weight-bearing pads molded into the glass webbing on the back of the mirror to better facilitate mounting the mirror. My earlier honeycomb
designs lacked such helpful niceties.
Light-weight mirrors seem to be all the rage at the SPAC mirror lab these days. In the background Ralph Craig can be seen testing his own light-weight 11.5 inch
mirror on the Robo-Foco tester. He and several other of the usual lab rats are making light-weight mirrors using very thin blanks.
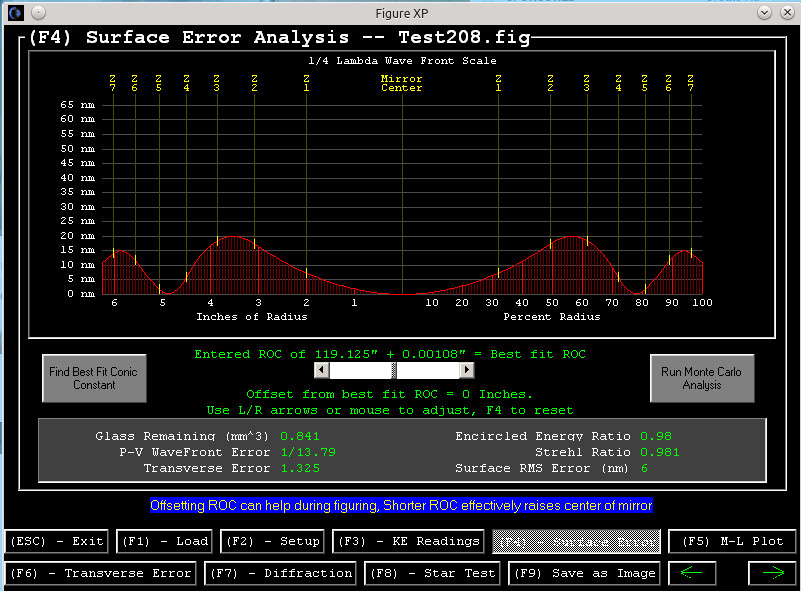
Here is the Surface Error Analysis for the completed mirror. It is better than 1/6 of a wave in green light. Not too shabby at all. I could possibly knock some of those peaks down and get it even better,
but it is also possible I could screw it up. So I decided to stop here.
This mirror was done quite quickly. After the initial polishing with a full size pitch lap, all figuring was done with a series of different size sub-diameter laps. Figuring went surprisingly quickly
and easily. It only took about six months of Saturdays working on this mirror from starting initial rough grinding to final figuring. It would have been even quicker without a month and a half break to recover
from some major surgery.
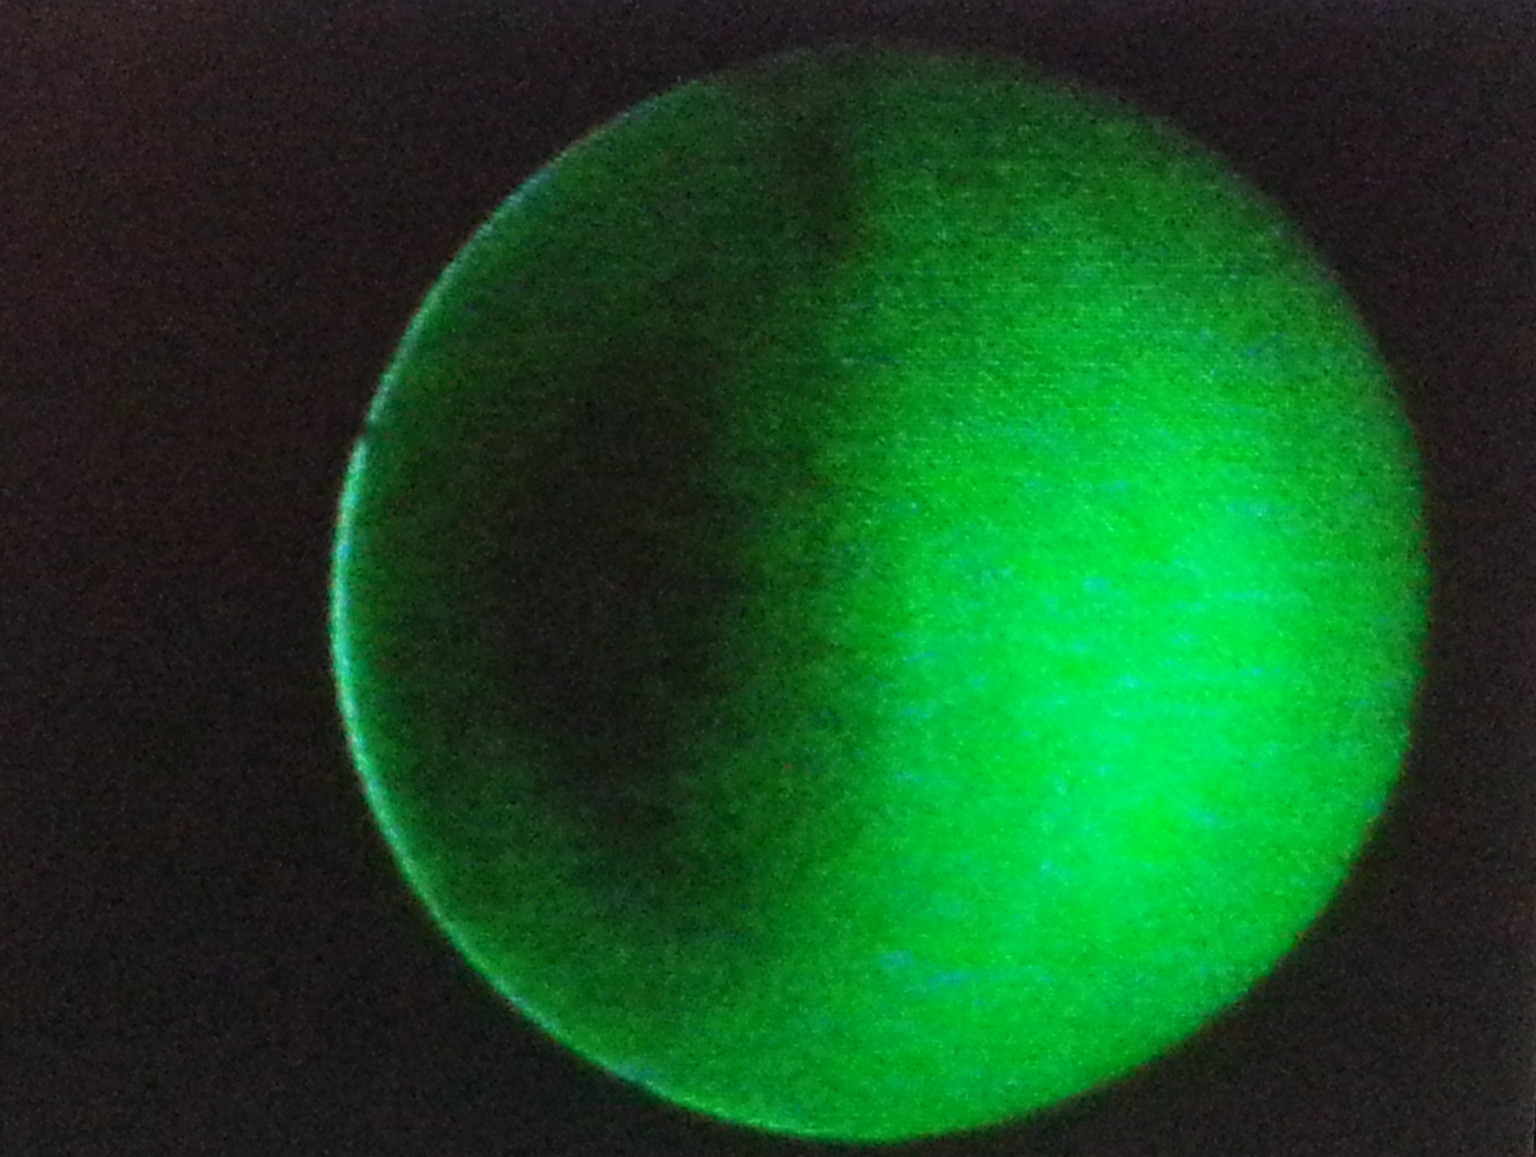
Here is a Focogram of the finished mirror. Pretty smooth. Good edge. No astigmatism to speak of. The dark area near the top center is a camera artefact.
Next up is building the mirror cell. I have a mock-up made from wood. I want to make the real thing out of aluminum. I may try casting some of it now that I have my own foundry and a little bit
of metal casting experience.
07/09/17 - My First Attempts at Lost Foam Casting.
This video shows my first attempts at lost foam casting. Surprisingly it went very well. Usually I screw it up a few times before getting the hang of something new. Not this time. My
very first attempt turned out amazingly well. The second time worked just as well, so I wasn't just beginner's luck. This is actually quite easy. The results aren't perfect. The castings
are rough, but salvageable. I am already working on ways to make future castings even better. But these first results are so good that I will definitely be doing a lot more casting
in the future.
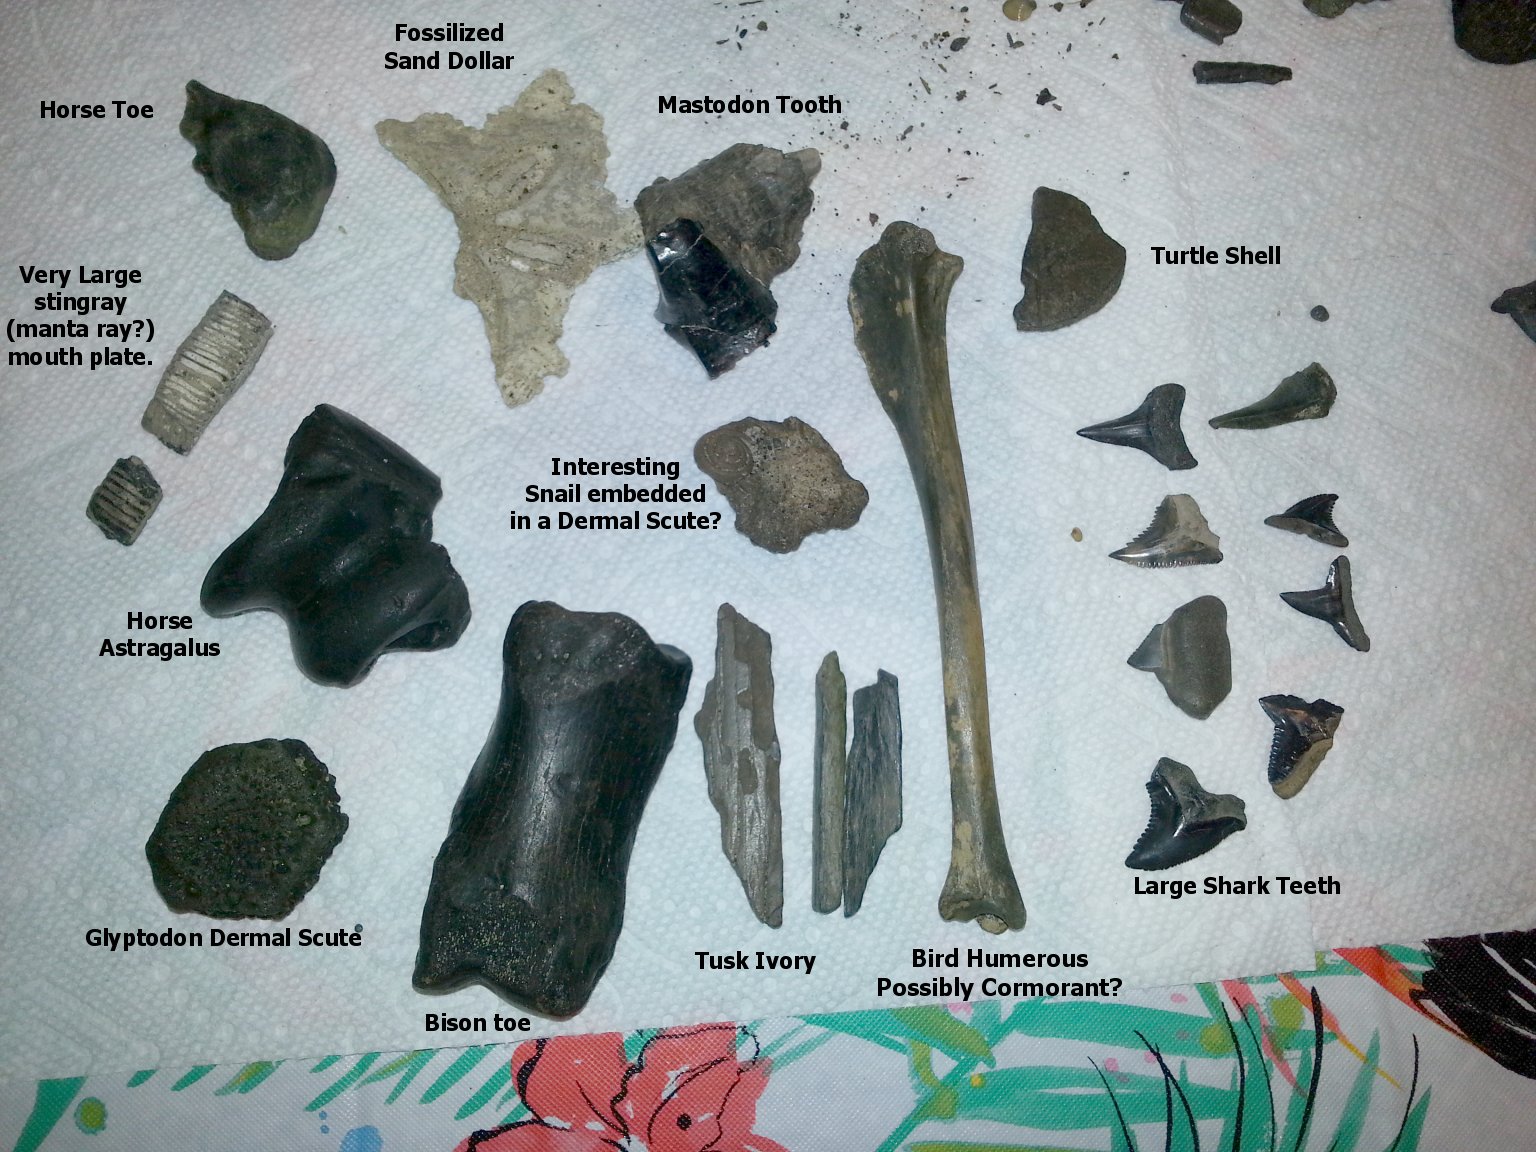
06/16/17 - Kayaking and Fossil Hunting on the Peace River
A couple of weekends ago my girlfriend and I went kayaking up the peace river to hunt for fossils. We had a great time. We paddled quite a way up the river, stopping and sampling
the gravels in several places. After not having much luck for most of the day, we hit on a several spots that were pretty rich in fossils. We dug and screened the gravel and picked out
the fossils. In the end we found quite a bit. This photo shows our sorted finds.
Click the photo for the whole story and more pictures..
05/12/17 - Just got back from a vacation in Colorado
I just got back from a week in Colorado. I really needed a vacation. Work has been nuts since I went back after my time off to recover from my surgery. That recovery time was no vacation,
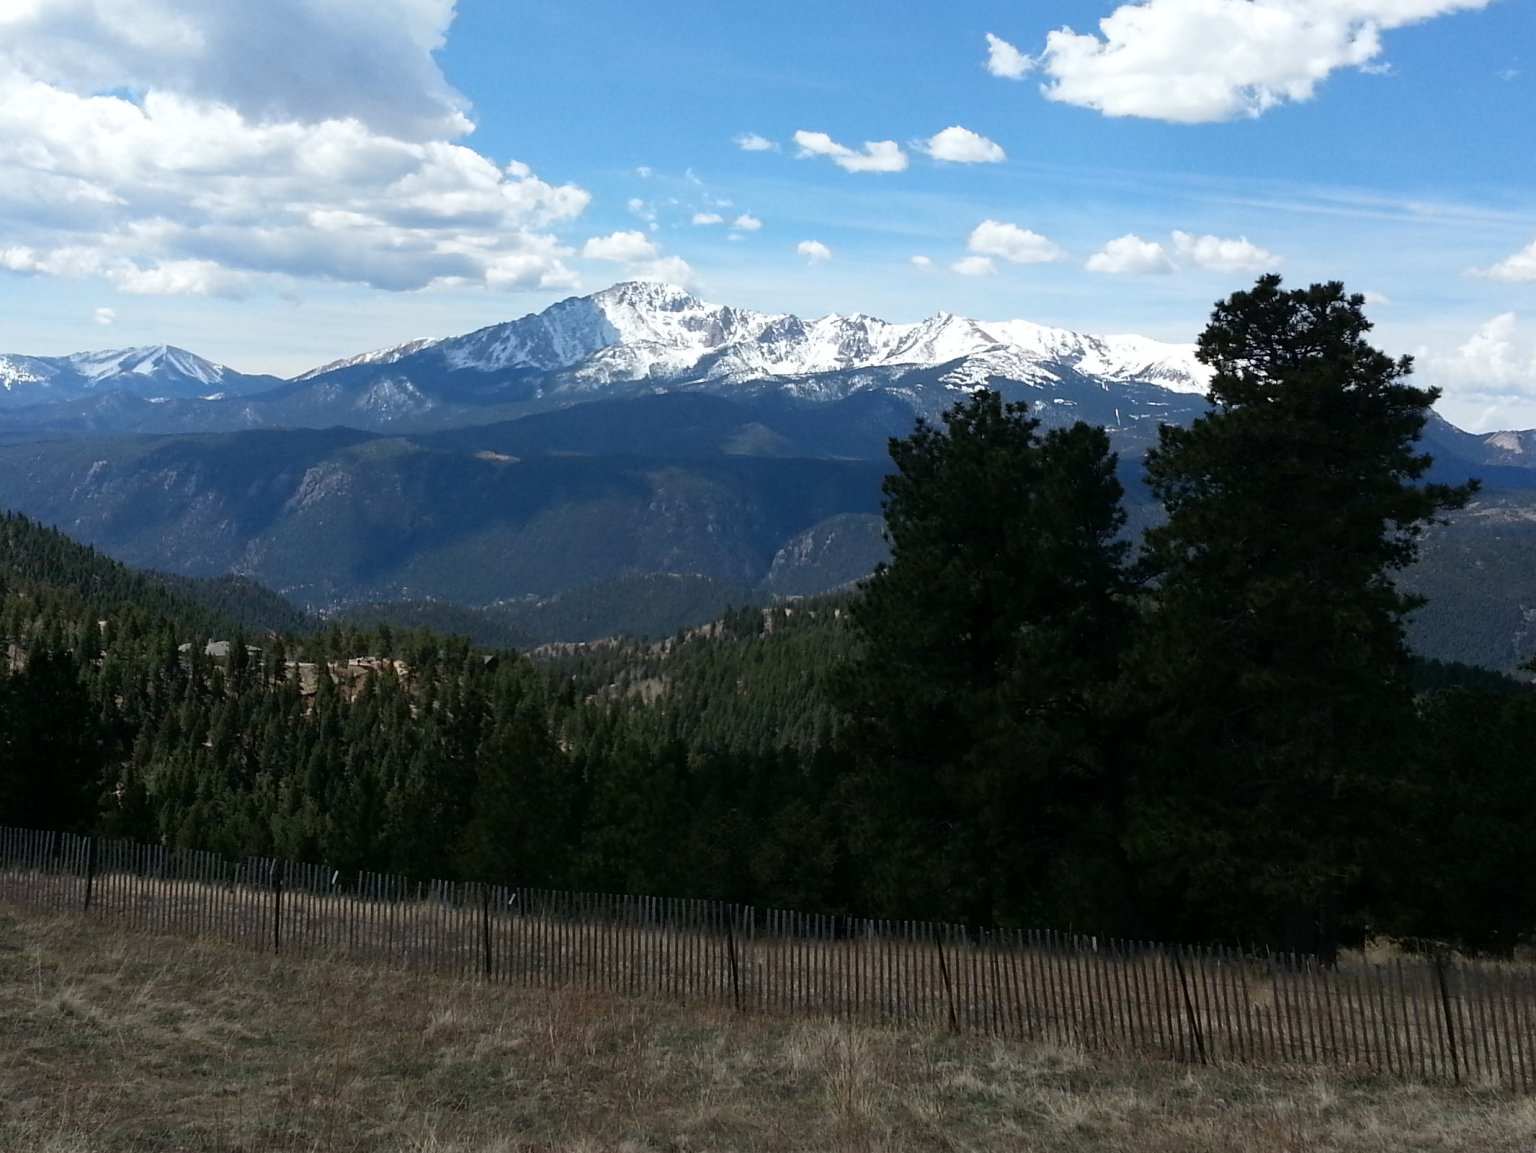
let me tell you. I was getting pretty frazzled. So I just had to get away to the mountains for a while. I did some hiking, exploring, treasure hunting, visited friends, and just plain relaxed.
It was great. This photo is a view of Pikes Peak from on top of Bald Mountain in the Rampart Range. The mountains were awesome. They still had snow on them above about 10,000 feet. The temperature
was just right for hiking. I acclimated to the altitude quickly and hit the trails. I went on a couple of really awesome hikes.
I feel like I have fully recovered from my major abdominal surgery earlier this year based on how well I did in the mountains on this vacation. I had tons of stamina, and no pain at all. I have
my full range of motion back too. It's great to be myself again.
Click the photo for a larger view.
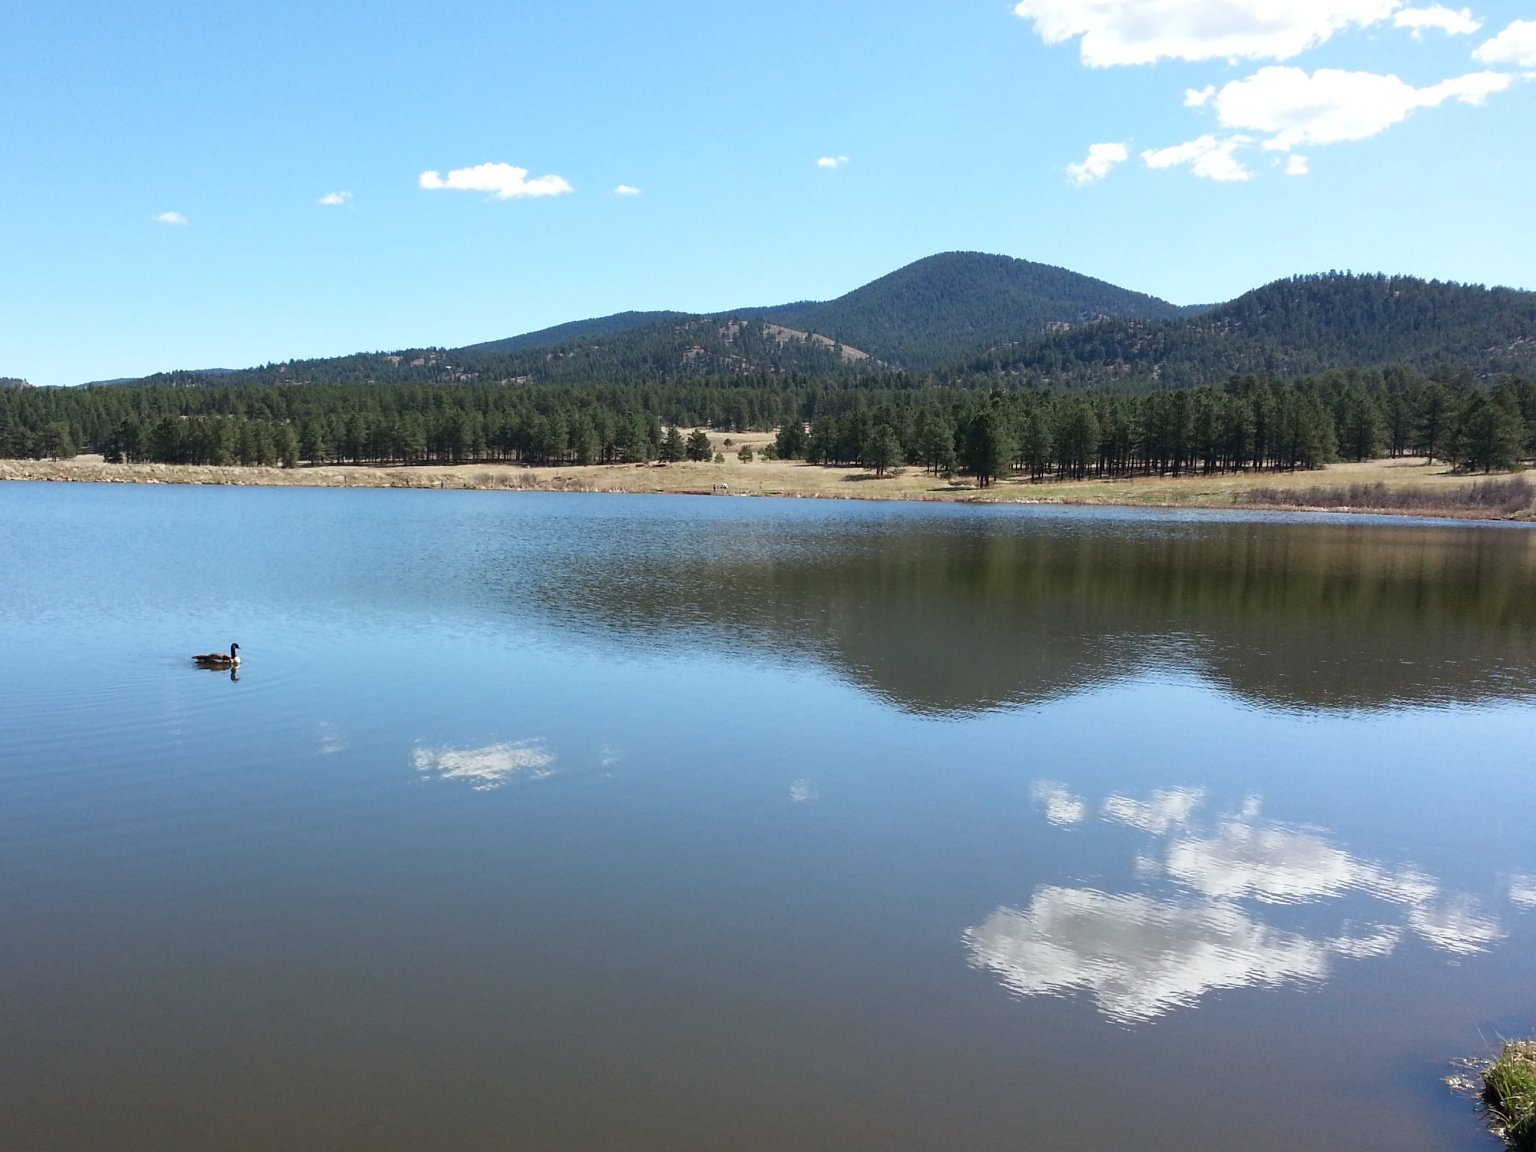
Here is a photo I took at Manitou Lake in Colorado. It is a lovely spot. I caught a goose gliding across the glassy lake surface which was reflecting hills in the background and clouds in the sky.
There is lots to see at Manitou Lake. There are strange rock formations. There is a boardwalk through the wetlands upstream from the lake where lots of wildlife can be seen. There is an
epic beaver dam and lodge on Trout Creek which feeds the lake. Plus there are great views of Pikes Peak off in the distance. I took tons of photos of the area. Eventually they will get
posted in the vacation section of my web site.
Click the photo for a larger view.
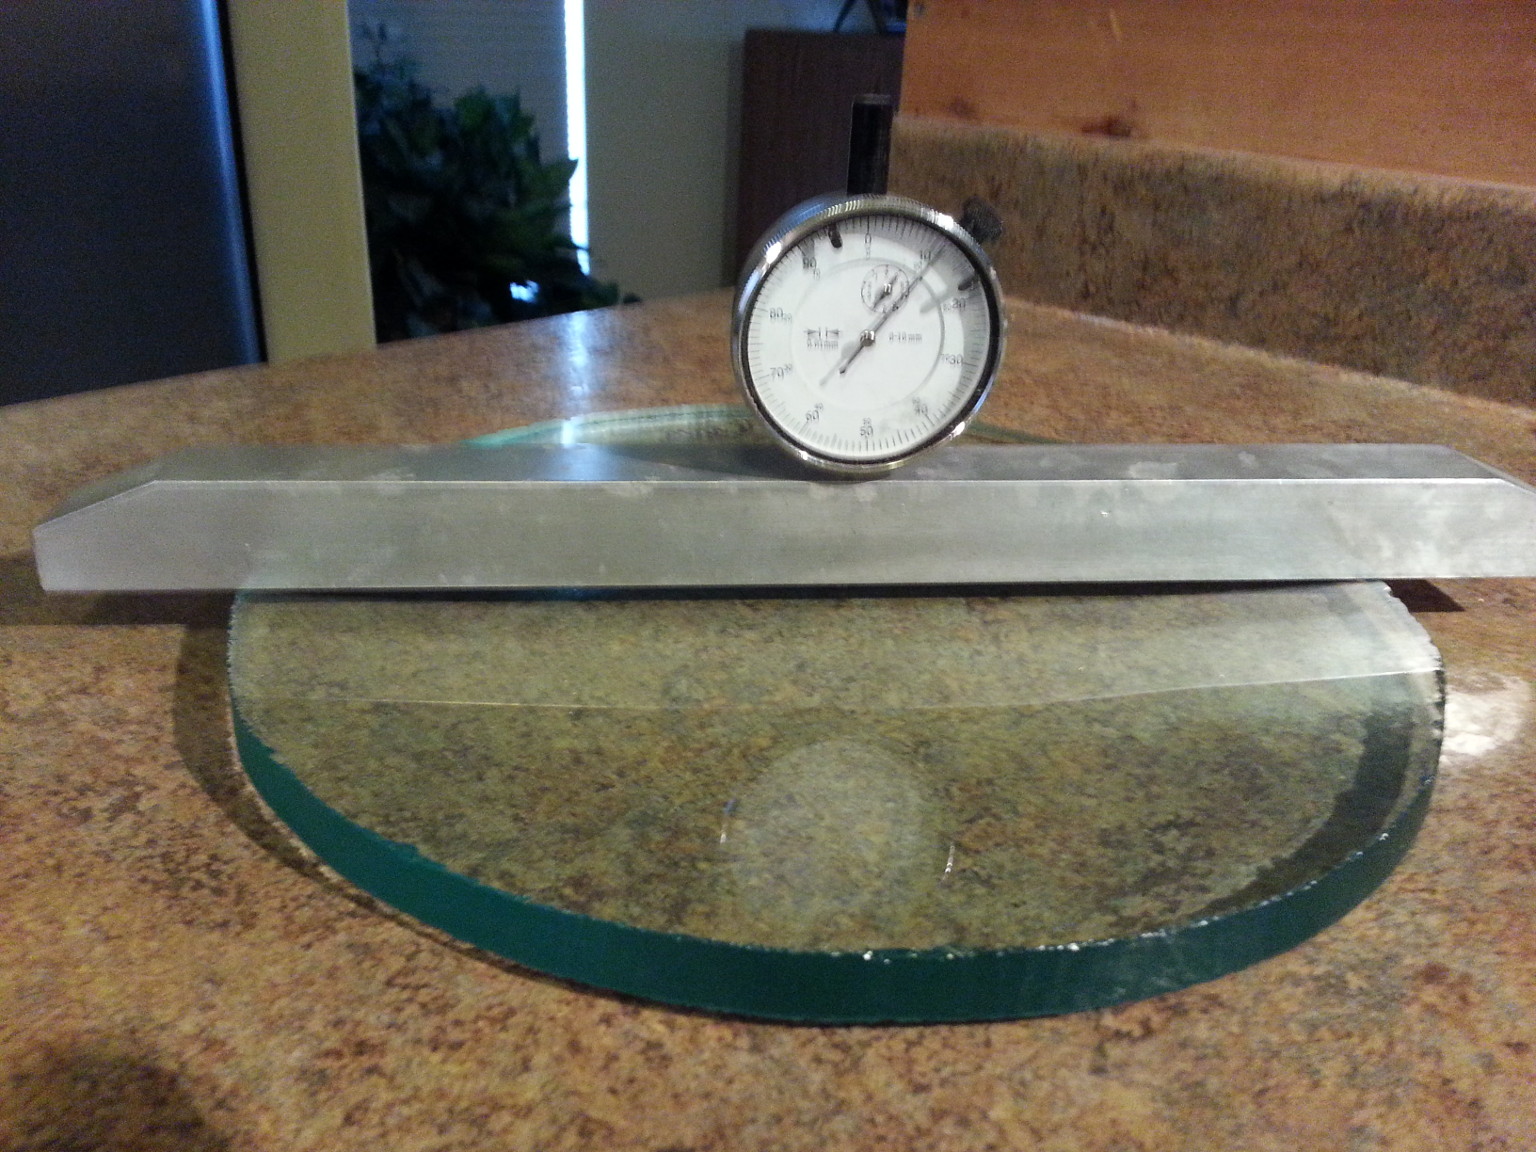
04/28/17 - My first successful slumping of a thin mirror blank.
Here is a photo of my first successful slumping of a thin telescope mirror blank. It has almost 3mm depth of curve slumped into it. The blank is a little over 10 inches in diameter
and at the moment has an f-ratio of about 5.7. That would have taken several days of rough grinding, and a lot of sweat, to achieve this
the usual way, and would have thinned the already thin blank further in the center. This method just took a couple of days time cooking in the kiln, and the blank is still full
thickness in the center.
The blank isn't perfect. The glass was basically a piece of scrap glass I experimented on. It has ragged edges and isn't quite perfectly round. I could put it on my edge grinding machine
and grind it down to a perfectly round 10 inches in diameter, and I may do that. The blank also has a lot of astigmatism. That can be fixed too by doing just a bit of rough grinding,
followed by fine grinding and polishing. The curve could be deepened slightly too in order to shorten the f-ratio, if desired. Basically the hardest part is already done.
UPDATE: My first attempt at slumping was done over a concave mold. This produced a really smooth surface on the concave side of the glass, but it had a lot of really obvious
astigmatism. I re-slumped this same piece of glass over a convex mold. The difference was quite pronounced. The concave side of the glass now has a much more uniform shape,
but at the cost of a rougher surface since it was in contact with the mold. I am not really too concerned about the surface roughness since the blank will need some grinding to
get it to the final shape anyway. Lesson learned: Use convex molds for mirror slumping.
I'll be doing further experiments like this one. Once this process is perfected, it should take a lot of the time and hard effort out of grinding telescope mirrors in the future.
Click the photo for a larger view.
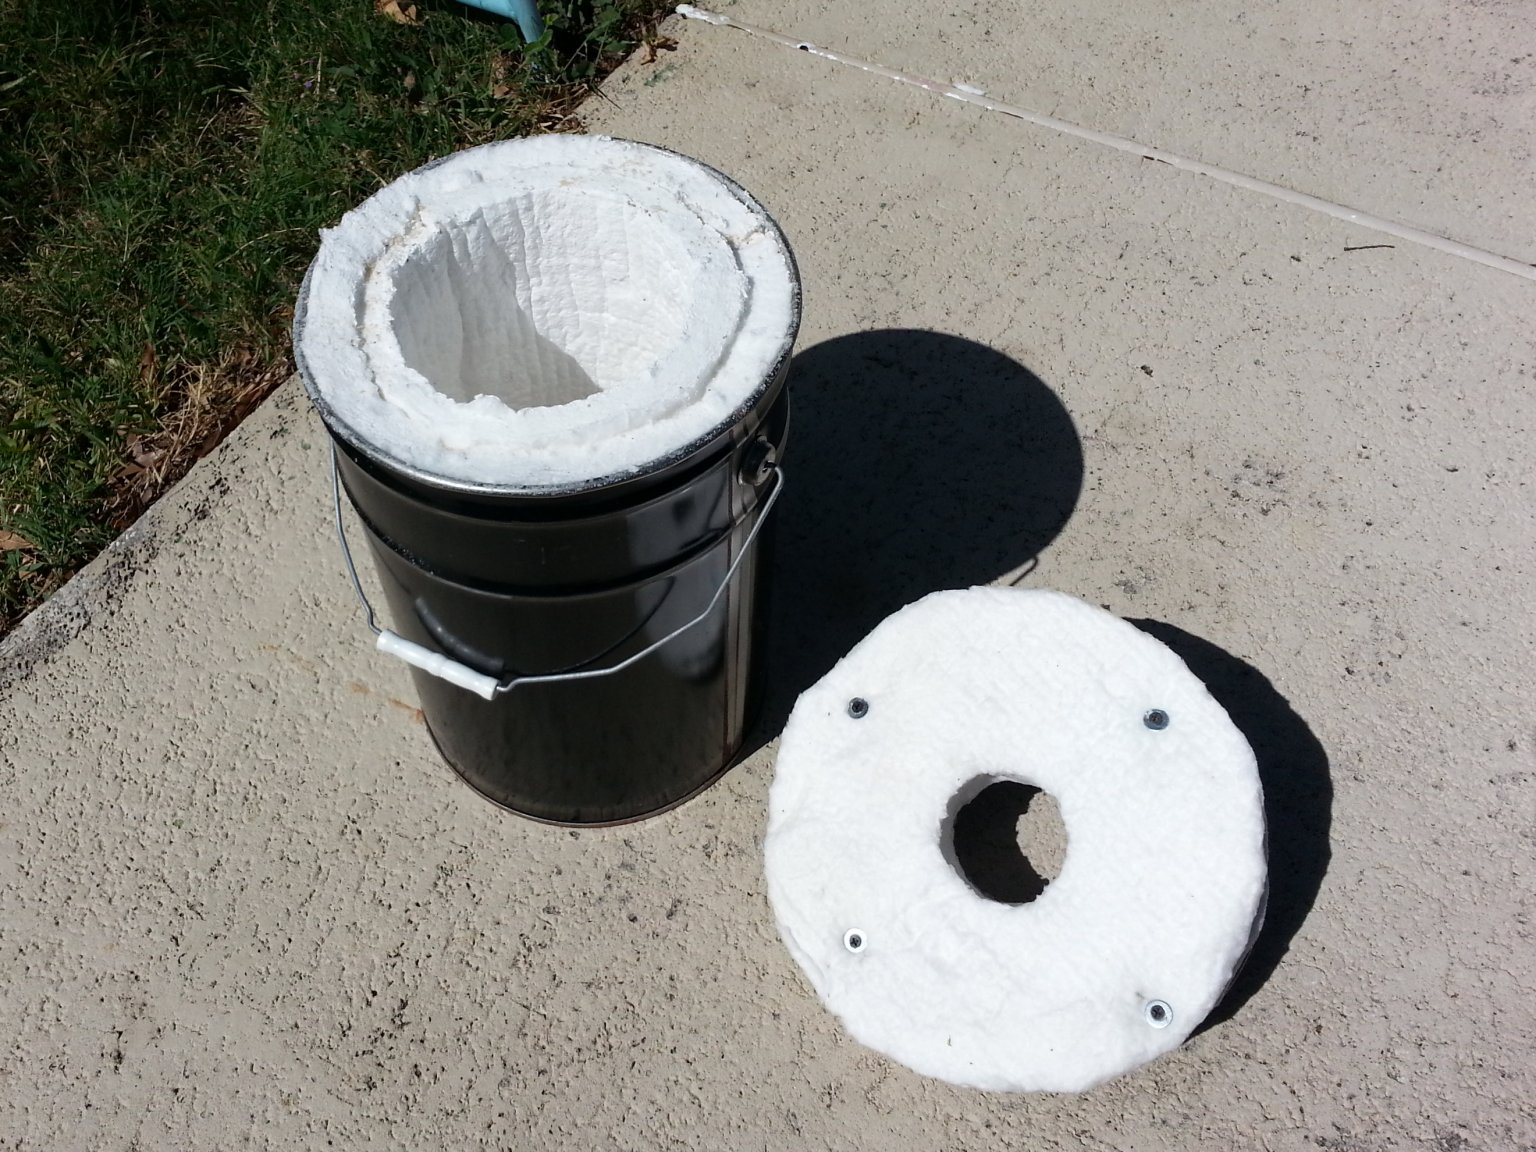
04/17/17 - First Melt With My DIY Foundry Version 2.0.
My foundry version 2.0 is finally completed and it works great. This video shows the foundry in operation for its first ever run. It successfully melted a crucible full of scrap aluminum
very quickly. I am really happy with this new foundry design. It uses ceramic fiber insulation instead of my own home-made refractory mixes which I tried with the first iteration of the
foundry. This insulation works so much better. I also rigidized it with sodium silicate solution to make it more rugged and resistant to abrasion as I use the tongs to get the crucible in and
out of the foundry. That ceramic fiber insulation is amazing. The inside of the foundry got up to bright orange heat, but the outside didn't even get hot enough to burn the paper labels
on the can. Check out the video to see the foundry in operation.
The new foundry started out similar to the first one with a 5 gallon steel can. I used two layers of 1 in. thick ceramic fiber insulation inside the can, and on the underside of the lid.
The insulation is held on the lid with some long screws and washers. The edges of the lid fiber, and the entire inside of the foundry were rigidized with sodium silicate solution.
I did not rigidize the underside of the lid. The natural fluffiness of the fiber helps make a seal between the lid and the foundry. A couple of horseshoe clamps (not shown in this photo)
make great handles for the lid. Three inches of sand mixed with enough sodium silicate to make it pack in firmly lines the bottom of the foundry. A couple of minutes of running the burner
over it set the sand up like concrete. I drilled a hole in the side for the burner at an angle to get a nice swirl inside the foundry. I then added a plinth made from a piece of broken
kiln brick, and the foundry was complete and ready for its first test run. It was a quick and easy build. The only thing I had to buy was the ceramic fiber. Everything else I already had.
My ultimate plan is to rebuild the first foundry the same way as this second one. I'll remove the frayed ceramic fiber and beat out my home-made refractory insulation. Once re-lined with
rigidized ceramic fiber I'll have two excellent foundries. Why two? I can use one as a burnout furnace for molds used in lost wax and lost foam casting. I'll have hot molds from one
furnace to pour the hot metal into from the other.
Click the photo for a larger view.
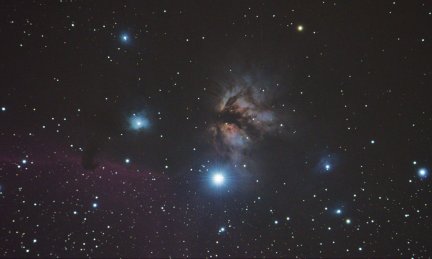
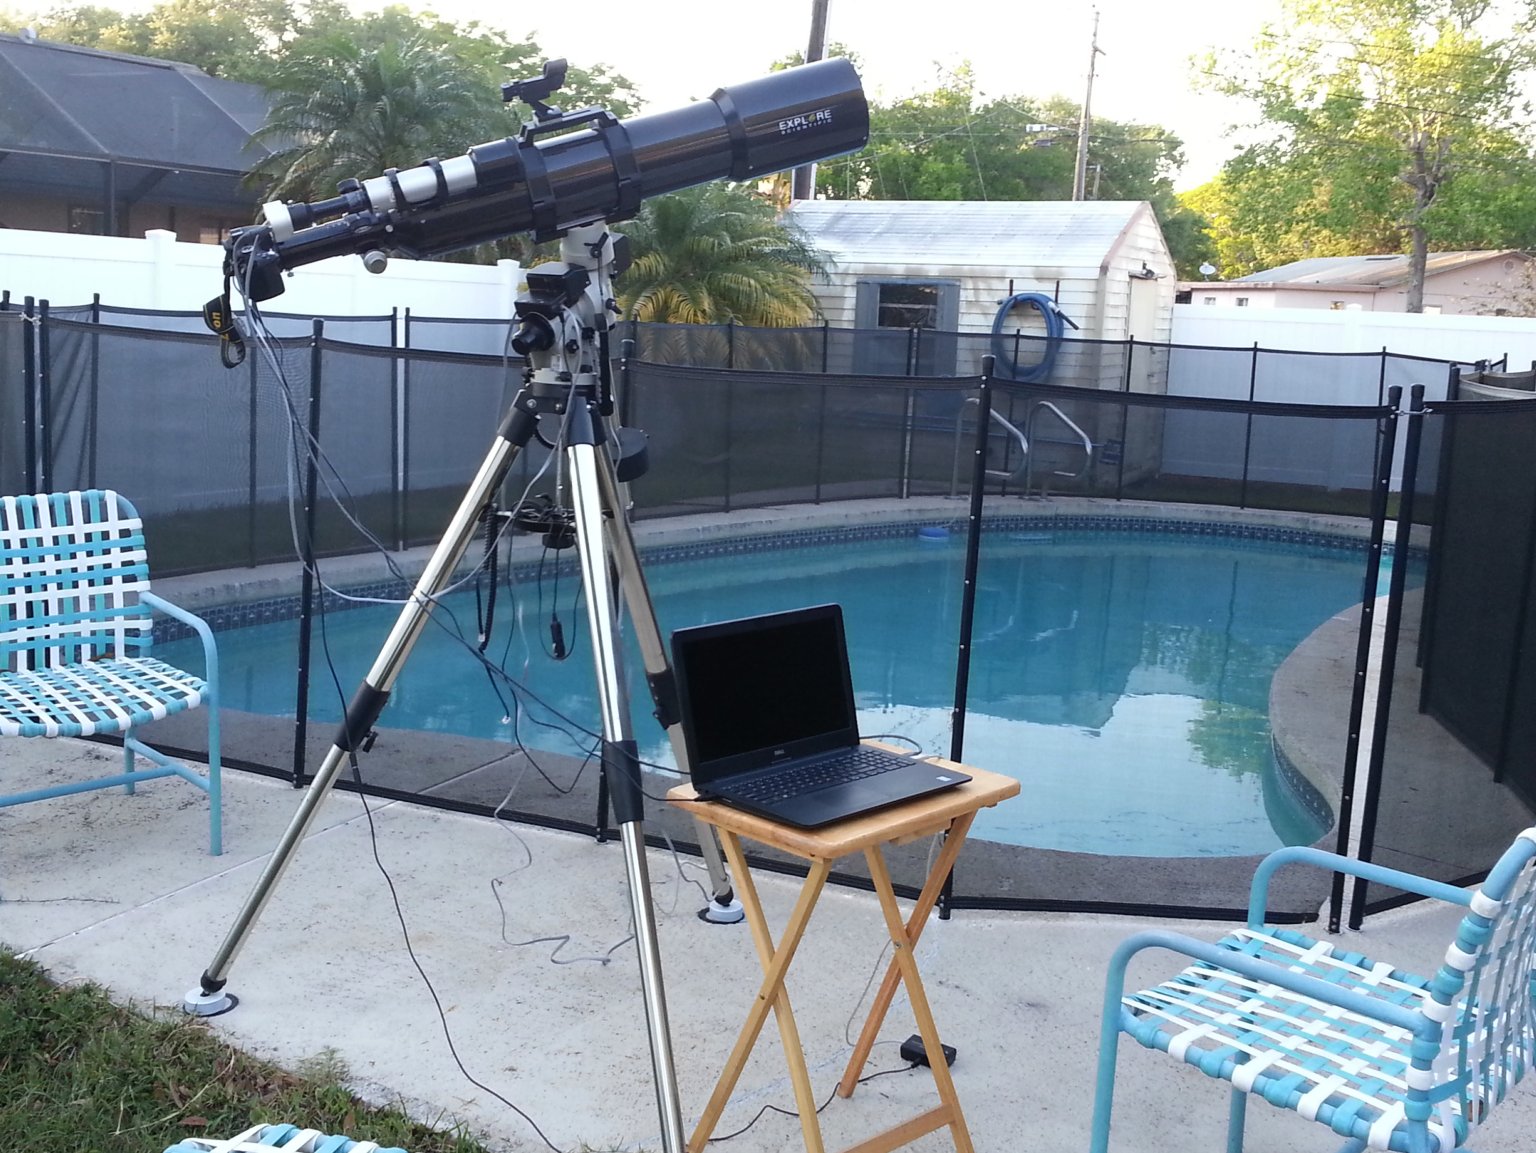
03/22/17 - Astrophotography From My Backyard.
Here is a photo of the Orion Nebula I took from my pool deck in the middle of town two nights ago. This is an amazing photo considering it was taken from a seriously
light-polluted area. This photo is a stack of 10 30 second exposures and 21 5 second exposures. That is a kind of odd mix of exposures, but it is hard to argue with the
result. Mixing long and short exposures may be a technique I try again on other objects, especially when light pollution interferes.
This is what I took the above photo with. It was a christmas present to myself that I haven't had much of a chance to use until now. It is my Explore Scientific 127mm (5 inch) diameter
triplet ed apo refractor with a carbon fiber tube. It is sitting on an iOptron EQ30 Pro German equatorial mounting. It is a great combination that works well. I also mounted my Nikon D5100
camera, a guide scope, an auto-guider and a red dot finder on the scope. All together it is an awesome astrophotography rig. It performs well in the city, but I can't wait to get it out under a
really dark sky and see what it can do.
03/21/17 - Melting Brass At Night With My DIY Foundry.
Last weekend I finally got around to running my home-made metal foundry at night. I figured it would be an impressive light show in the dark. It did not disappoint. It was quite impressive.
It also turned out some really nice ingots of brass. I filmed pretty much the whole process and it all turned out wonderfully.
Speaking of nice ingots, I have started using Morton Light Salt as a flux for melting aluminum. The ingots turn out smoother and shinier and just generally better. The dross is also a lot
easier to clean out of the crucible with the salt flux. Sometime I need to put all this foundry info in its own section on the web site. I'm also getting close to my first casting of real
objects, and not just ingots. I'm working on making molds. Stay tuned.
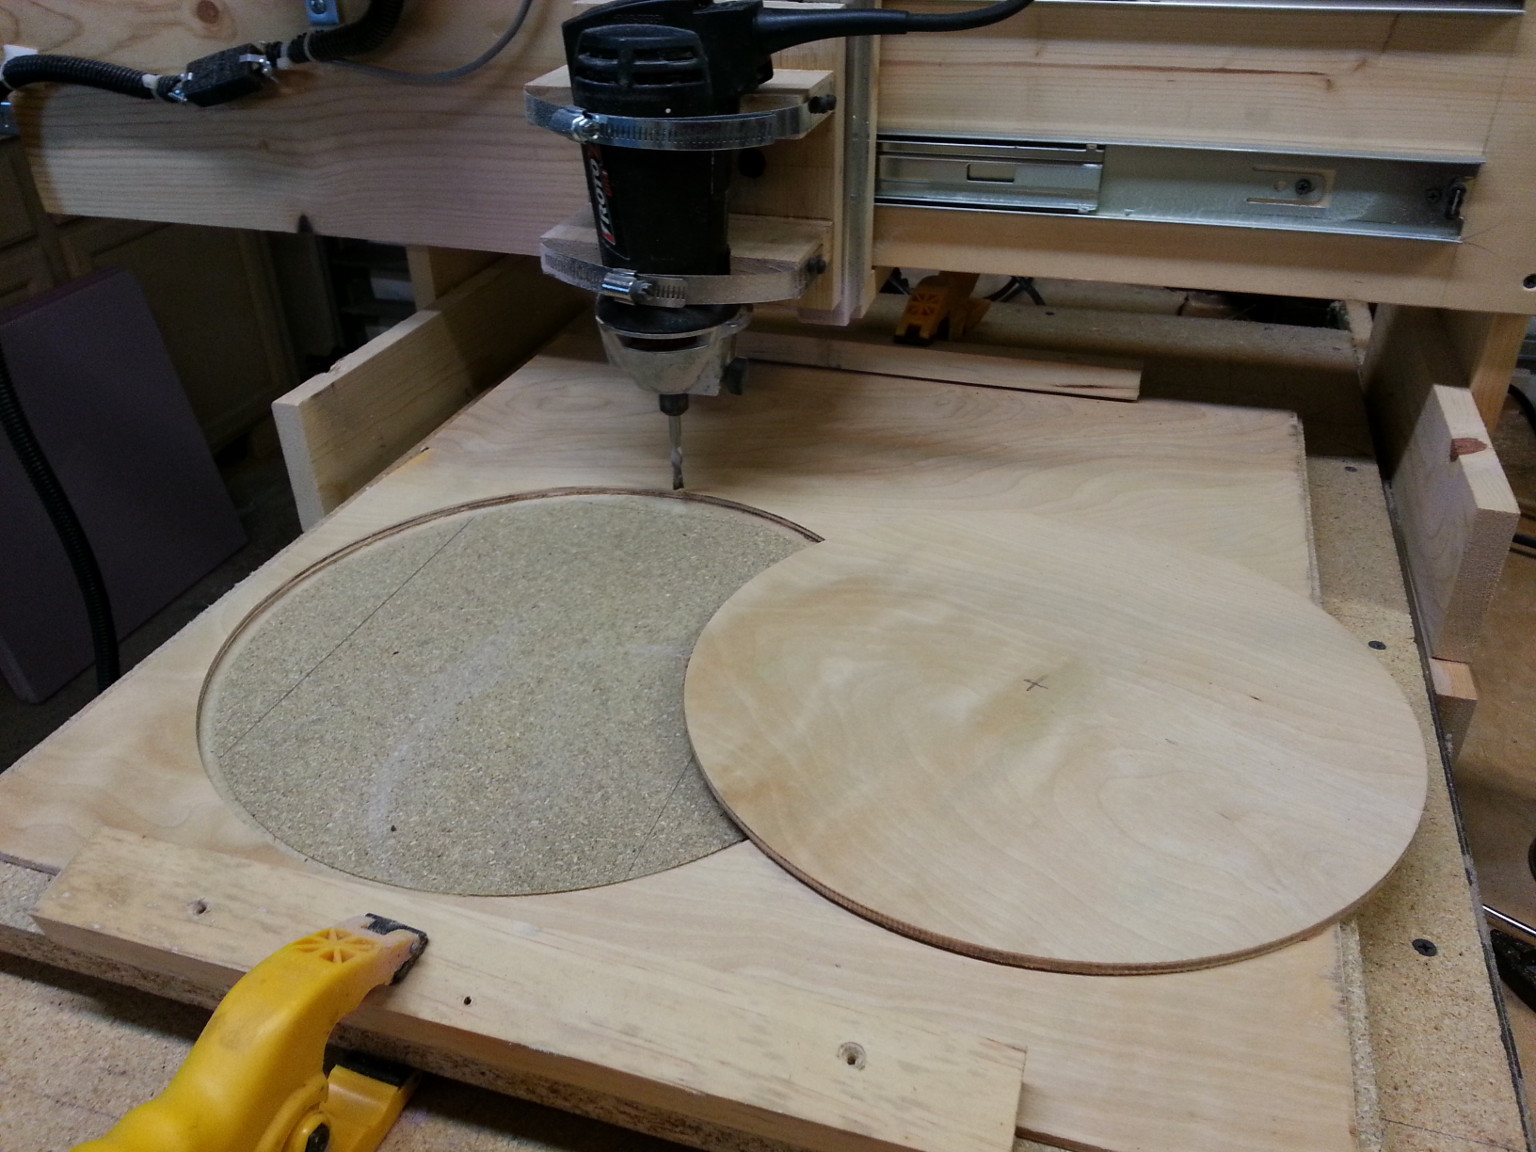
03/07/17 - Cutting circles with my DIY CNC Router
So I needed some 12 inch diameter circles cut out of 1/4 inch plywood for a project I am working on. How to go about it? Set up the circle cutting jig on the band saw? No, too much trouble.
Cut them out by hand with my jigsaw? No, I want them more accurate than I can probably do by hand. Oh wait, I have a CNC router! Problem solved. Just program up the circle code, put the sheet
of plywood in the machine, hit the button, and walk away. Easy peasy. Now some may think this is a trivial use of such a machine, but I built it to make my life easier. I was able to work on
other things while the machine cut perfect circles for me. I call that making things easier.
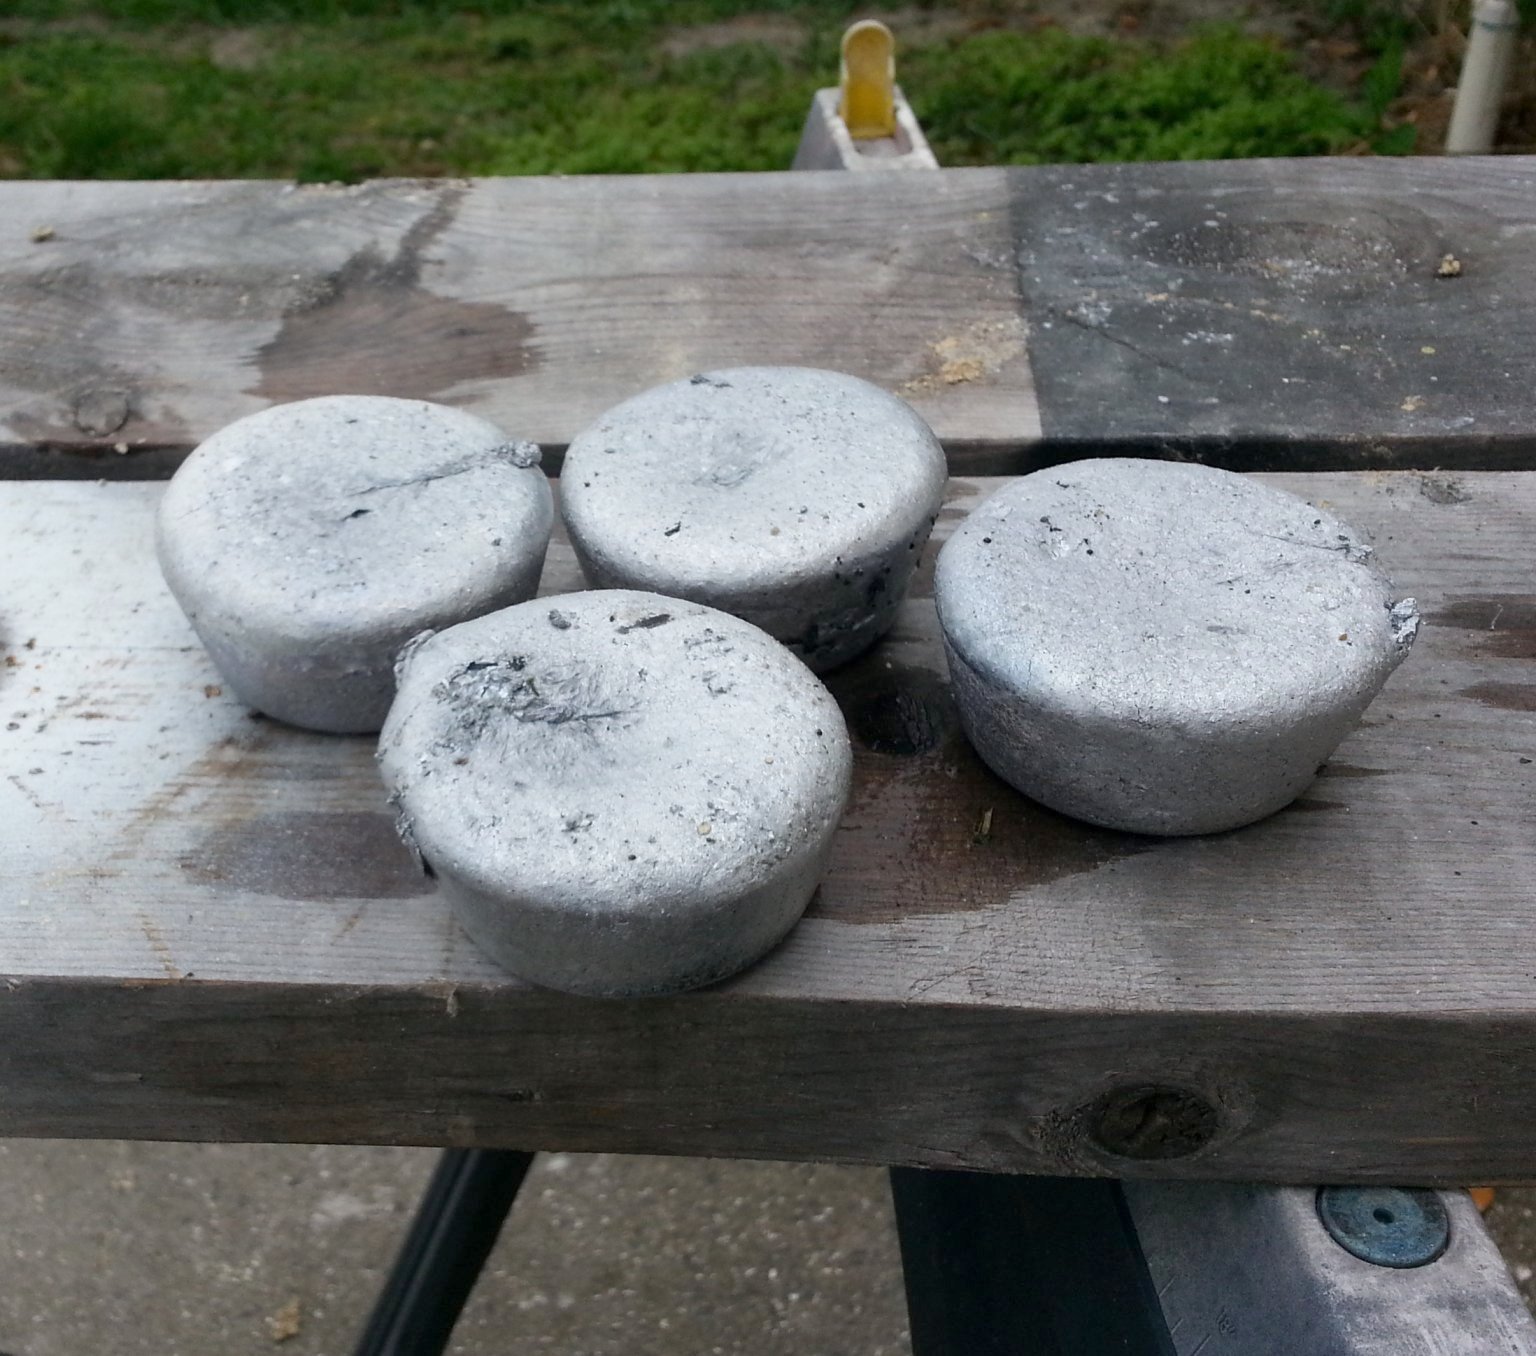
02/28/17 - Melting Aluminum in the Foundry
I built my little foundry (see below) to be able to melt brass and maybe bronze too eventually. So naturally melting aluminum in it should be a snap since it has a much lower melting point.
Up til now I have concentrated on making sure the foundry will actually melt brass without issues. That has been accomplished. So this morning, while it was still cool, I tried the first
melt of scrap aluminum. I had a bunch of scrap aluminum castings and rod stock (not cans). The aluminum melted down quickly and easily, and I poured four nice ingots. I don't know that it
was necessary, but I used a different crucible for melting the aluminum than I have been using for the brass. I had the second crucible on hand already, so I decided to use it rather than
try to clean all the brass residue out of the other one. Everything worked perfectly. I'm a happy camper right now.
02/27/17 - Melting Brass in the New and Improved Foundry
I finally found the perfect refractory lining for my foundry. I had totally forgotten that I had some ceramic fiber insulation. When I finally remembered, I used it to line the
inside of the foundry. What a difference it made. The foundry heats up much quicker, the metal melts quicker, less propane is needed to melt the metal, and the foundry doesn't
suffer any damage. It's an amazing transformation. This video follows all the steps in a typical session of melting down scrap brass (bullet casings) and pouring ingots, including
discussion of safety equipment and precautions, and flux usage. I'm still
fairly new at this, so there are a few awkward moments, but on the whole, it worked pretty well. I'm really happy with the way the foundry is working now. Anyone else interested
in melting aluminum or brass could build a foundry like this quickly and easily.
02/21/17 - First Brass Melt With My DIY Foundry.
The day before I went into the hospital for my surgery (see next entry) I managed to get in the first brass melt with my home-made foundry. I have finally managed to edit together and post
the video. I did manage to melt down a bunch of brass shell casings and pour some nice brass ingots. But things didn't go without some problems. The big issue was that my home-made refractory
can't stand up to brass melting temperatures for any length of time. The refractory lining of the foundry and the lid both began melting and sagging by the time the brass was ready to pour.
The plinth in the bottom of the foundry, made from the same refractory, completely melted. I replaced it part-way through the melt with a piece of broken kiln brick that withstood the heat
with no problem.
In the end I did manage to make 2 1/2 nice muffin sized ingots of brass, but at the cost of serious damage to the foundry. Belatedly I researched the melting point of perlite and found that
it softens at brass melting temps. Oops. That was a major engineering failure. I have a cunning plan to hopefully make the foundry usable for melting more brass without having to totally
rebuild it. I plan on chipping out part of the perlite refractory, and adding a lining an inch or so thick of a vermiculite based refractory mix that should stand up to brass melting
temps. Hopefully the vermiculite lining will protect the perlite behind it. If it doesn't work, I can chip out all the perlite and replace all the refractory with the vermiculite mix.
Time will tell how well it works. I am waiting until I heal up some more after my surgery before giving it another try. I am restricted under doctor's orders to lifting less than 15 lbs
for the time being. So no moving the foundry or propane tanks around for a while.
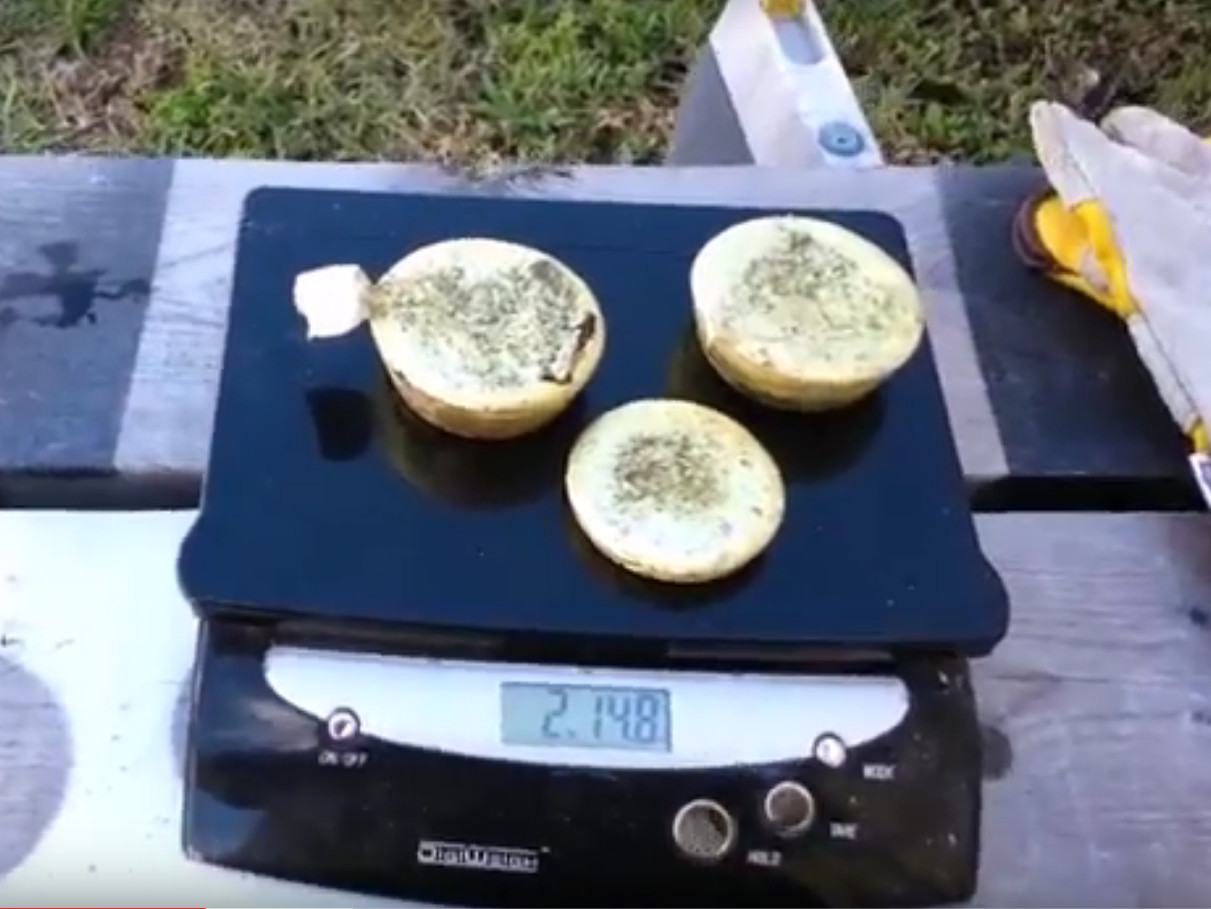
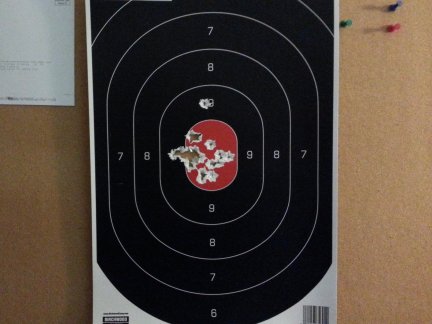
As I said above, I did manage to cast 2 1/2 good looking ingots of brass in my steel muffin tin mold. As you can see they add up to not quite 2 lbs 15 oz. It took a lot of shell casings
to make those ingots. Since shell casings are mostly empty space, I guess that shouldn't be surprising. Fortunately shell casings are free on the floor of the range
every time I go shooting. So I should have an unlimited supply to melt down and cast into ingots. Eventually I will have enough ingots of good, clean
brass to start casting useful items like gears and telescope parts. That is if my modifications to the foundry work out. Time will tell. Watch for more updates on my metal melting and
casting adventures.
02/08/17 - Just got out of the hospital after major surgery.
I found out just after Christmas that I was going to have to have major abdominal surgery. A routine colonoscopy found a large mass growing in and partly blocking my sigmoid colon. It was going to have to be
surgically removed via bowel resection. Fortunately it was a non emergency situation and I was able to schedule the surgery a month later so I could get some things sorted out before hand.
I went into the hospital for the surgery on Feb 2nd. I was discharged yesterday Feb 7th. Suffice it to say it has not been a pleasant experience. I will spare you any of the gruesome details
and there will be no photos of my newest epic abdominal scar that starts about 2 inches above my navel and curves around it down and to the right to my belt line. Probably a little over
6 inches long in total. Plus there are two large punctures from the laparoscopic assisted surgery. The scar will make a nice accompaniment to my gallbladder removal scar from a few years
ago. Though the surgeon says this new scar should be less prominent once fully healed because he used surgical glue to close me back up, rather than staples like last time. We'll see. One
big piece of good news is that the pathology report showed the growth to be totally benign. So no further treatment is necessary once I heal up.
This was the view from my hospital room. At least I had that while I was there. There was a recliner in my room in front of the big picture window. When I couldn't take being in the bed any more,
I'd sit in the recliner and look at the view. It's the only thing I miss about the hospital.
I'm doing OK. I can get around and take care of myself. The pain level is remarkably low, mainly just when I bend or sneeze. I stopped all narcotic pain medication 2 days before leaving the hospital because
the pain was so minimal and I wanted to get my newly re-plumbed bowels to wake up and start working. I'm certainly in less pain and more mobile than I was after the gall bladder surgery. But I
do tire very quickly. I have very little stamina. I am restricted to not lifting more than 15 lbs. I will probably be out of work for at least a month while I recover. I stocked up on
books and other reading material to make the enforced down-time less boring. I also staged some low-impact projects to work on once I begin getting some energy back. I also have video of my
first foundry melt taken before the surgery that I can edit and put on my Youtube channel. I'll get that done soon.
I wanted to say thanks to all my family and many friends who have helped me through this, and still are helping. Thanks for visiting me in the hospital and keeping me company. Thanks for all
the gifts and offers of assistance. I'd also like to say to everyone reading this - Go get that colonoscopy your doctor has been telling you to get! Don't keep putting it off.
It could save your life. It could also find and fix problems before they become bad enough to need surgery. And really, a colonoscopy isn't difficult at all. There is no pain, just a little
unpleasant prep, but that is nothing compared to how unpleasant skipping them can be.
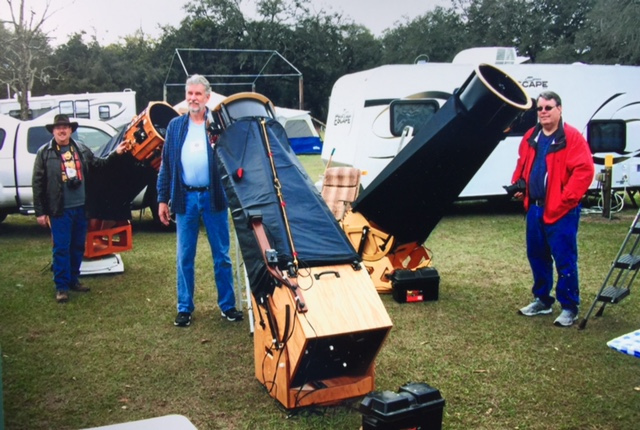
02/08/17 - The 2017 OBS Star Party.
Here is a photo taken at the 2017 Orange Blossom Star Party late last month. I am on the left with my 17.5 inch telescope. My buddy Ralph is in the middle with his 16 inch telescope, and
my buddy Allen is on the right with his 18 inch telescope. Every year we set up together and create our own little DOB Valley in the middle of the star party. We had a near record
attendance for the star party this year. Lots of activities were on the schedule. A good time was had by all, in spite of less than ideal weather.
This year was pretty much a bust as far as observing went, at least for the days and nights I could attend. It was cloudy and even rainy much of the time. I only got in a few decent hours
of observing Friday night into Saturday morning. The rest of the time it was hopeless. The OBS basically turned into a big communal camping trip, with a little bit of astronomy on the side.
We all packed up Saturday in anticipation of a storm front that was supposed to come through
Saturday night into Sunday morning. Nobody likes packing up wet equipment, or doing it in the rain. The field emptied out by Saturday night, though some of us stuck it out until
Sunday before leaving.
I'm getting soft in my old age. I rented a camper again this year. It is the one behind Allen in this photo. No more sleeping on the cold, hard ground in a tent for me. The camper also
made riding out the bad weather a lot easier. All in all, it was a good time for me. I got to relax and unwind a bit from the stresses of work and my upcoming surgery, and just hang with
my friends for four days.
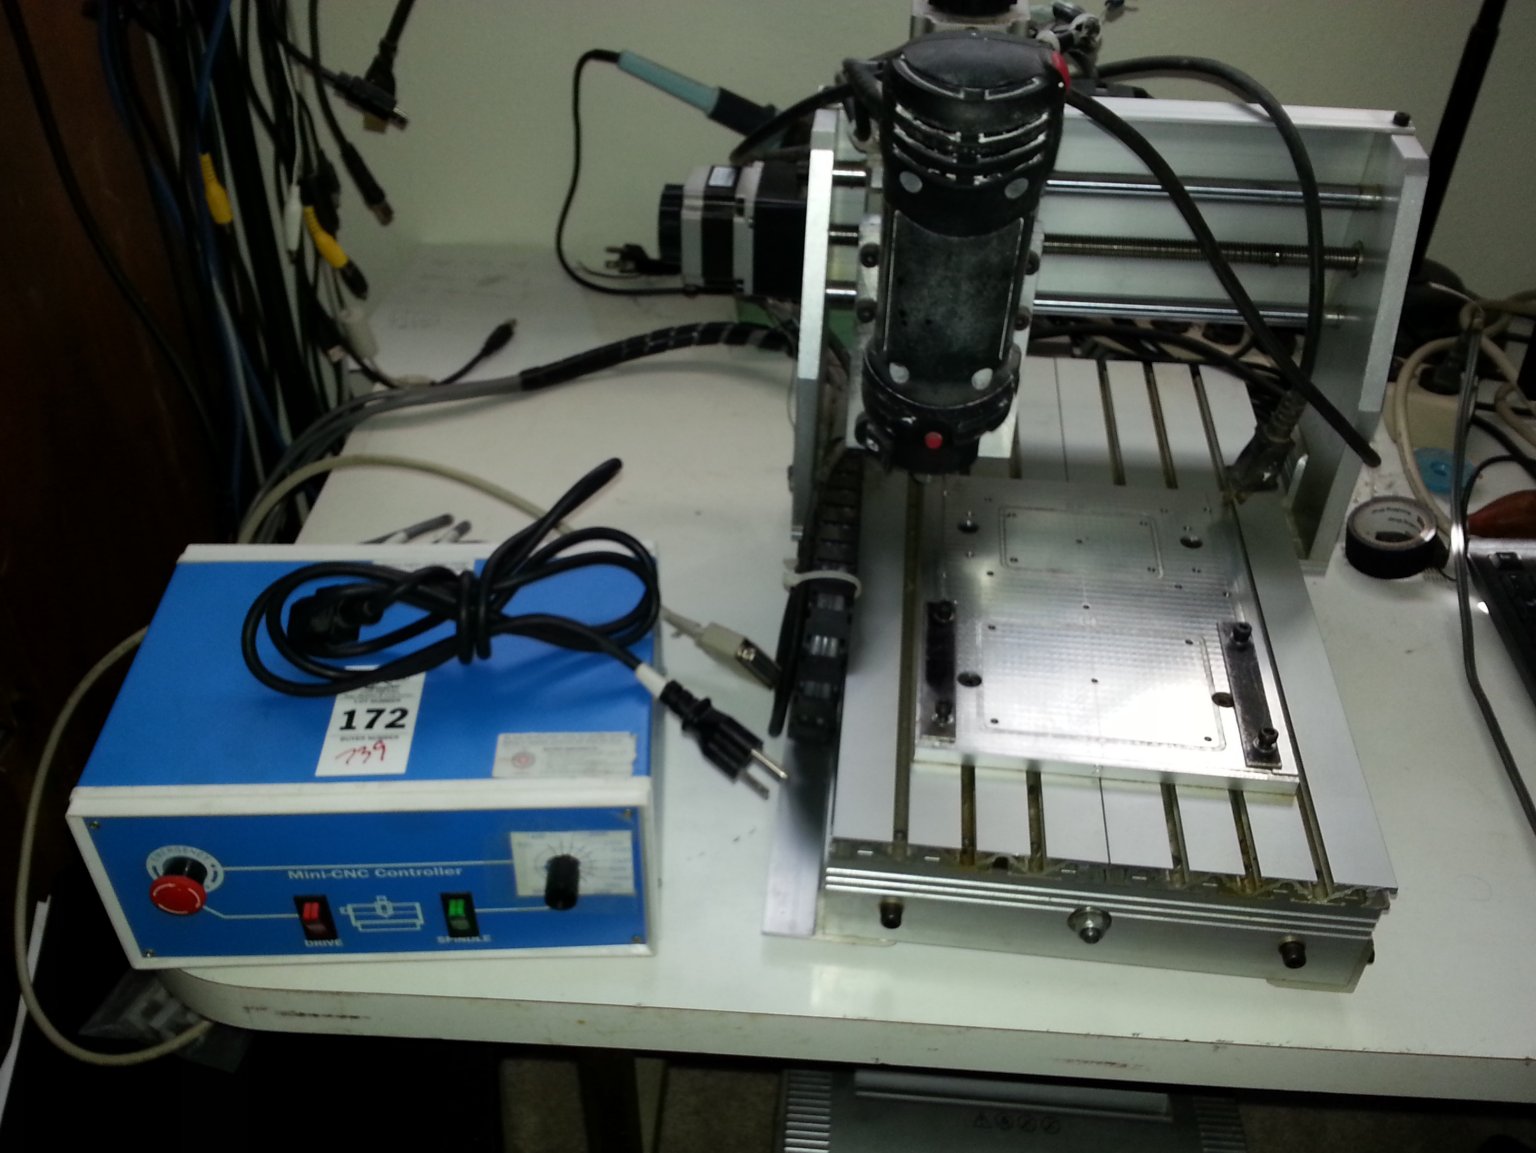
01/26/17 - A little CNC router/engraver.
Check out my new toy. It is a small CNC router/engraver I picked up dirt cheap at a machine shop bankruptcy auction. Isn't that the way it always goes? I spend over a year building my
own CNC router (scroll down the page for info on it), then find one for sale cheap. Still, the two machines will serve different purposes for me. My big home-made unit will carve large
foam molds for rough casting glass and metal. This little unit will be used to do precise detailed work in metal and wood, and maybe glass too.
The amazing thing is that everything works! The computer for controlling it is a huge dinosaur, the control box is old and labeled in Chinese, and the XYZ platform has no maker's mark
that I can find. The wiring is a bit iffy, and no documentation was included with the unit. Plus of course I couldn't test it before bidding on it. I was worried that it was going to take
a lot of work to get it running. So I set my bidding limit pretty low for it at the auction. I figured the computer and control box would need to be replaced and lots of experimenting
and reverse engineering would need to be done to get the platform moving. The unit was also absolutely filthy. It was caked with layers of grime that I was worried might be hiding other
issues. But no. I hooked all the cables up, plugged it in, booted up the computer (no password required thankfully), and it all worked. There is a fully licensed installation of Mach 3
on the computer. All three axes move smoothly and easily. The router motor runs. It all just works. No muss, no fuss. Cool! About 30 minutes of applied elbow grease got the machine
all cleaned up and shiny again, and ready for duty. Sweet!
That being said, I will certainly replace the computer with a newer, more compact and capable unit and get rid of the old dinosaur. I'll port the Mach 3 configuration over to the new computer
and be up and running my own projects on it in no time. I absolutely love auctions. I get the best stuff dirt cheap at auctions.
01/23/17 - My DIY Metal Melting Foundry is Done!
Here is a project I have been dropping hints about for a while. I have been building a foundry for melting and casting aluminum and brass. It may also get used for melting and casting glass projects.
It was a really simple and inexpensive build. The foundry is built in a heavy-duty, 5 gallon, steel, ash can I picked up at an estate sale really cheap. This project also didn't take too long. The
hardest part was getting the home-made refractory mix recipe right. I tried several different mixes recommended online, but none really
worked for me, especially the ones that used plaster. Eventually I came up with my own simple recipe that seems to work really well. The recipe is in the video.
This was the first firing for the foundry. I wanted to get it good and dry and burn out any organics in it. I also wanted to see how well the refractory would hold up to the extreme heat. No cracking!
It all worked great. I'll be melting and casting metal soon. I plan on creating a page devoted to the foundry build with a write-up and lots of photos and video of the build and eventual operation.
Stay tuned for updates. In the mean time, check out this video.
01/02/17 - A busy long New Year's weekend at the ranch
I had some time off between Christmas and New Years. So I spent the time working on a variety of projects. Some of them will eventually become entire new sections on my web site. I spent a lot of time
working on a foundry I am building to melt and cast aluminum and brass. Lots of info on that project will eventually get posted here. I also spent some time playing around with my new CNC mill (see
video below). I also of course spent some time at the SPAC Mirror Lab working on my latest 4th gen honeycomb telescope mirror. I have completed fine grinding and
moved on to polishing. This photo shows the mirror after only a couple of hours of polishing with the pitch lap on the left. The mirror is sure looking nice and shiny already, but there is a lot of
polishing left to go before figuring can begin. This is the fastest I have ever gone from starting rough grinding to starting polishing. Hopefully polishing and figuring will go quickly too.
While I was at the SPAC Mirror Lab working on my latest mirror, we had yet another new student join up to learn how to make his own telescope mirror. He bought
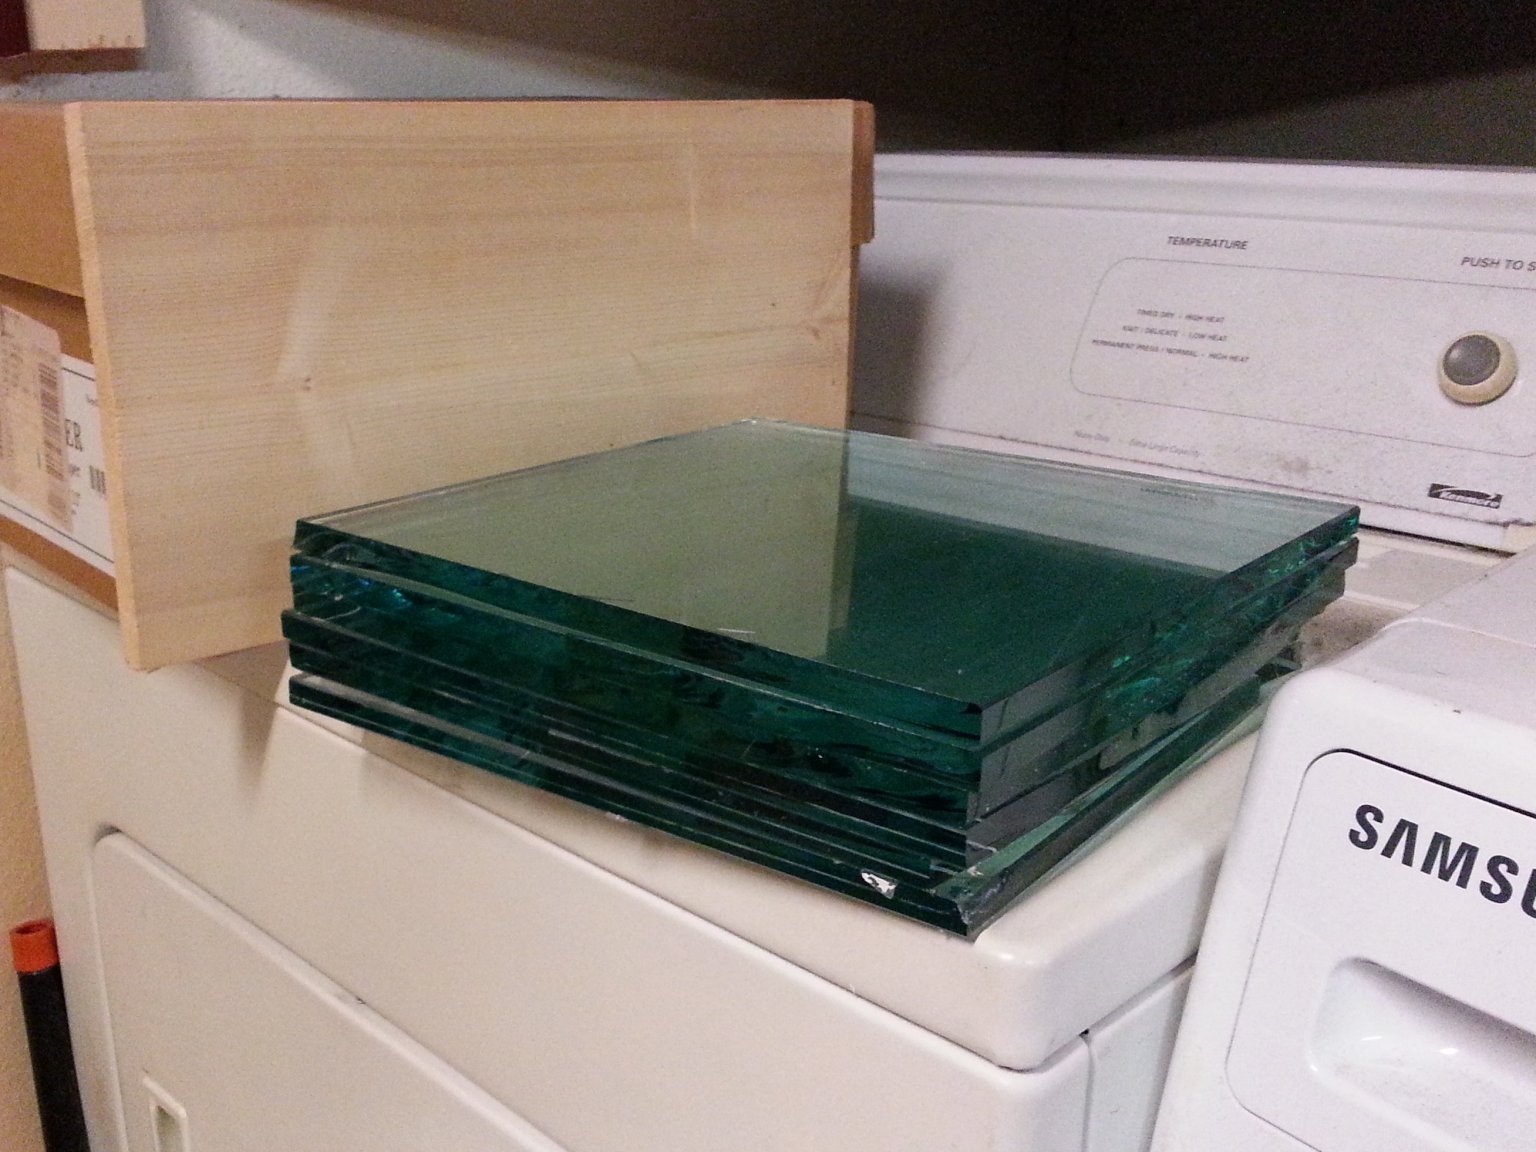
one of my 10 inch solid glass blanks that I had made for the lab. It was the next to last of the last group of 10 inch blanks I had made for the lab. So it was time to make some new blanks. I have a
large stock of 1/2 inch glass on hand. So I cut up some of it into 12 X 12 pieces to fuse into thick slabs I can cut 10 inch mirror blanks from. This photo shows a 3 inch thick stack of glass. It's
amazing how deep green the glass gets in such a thickness.
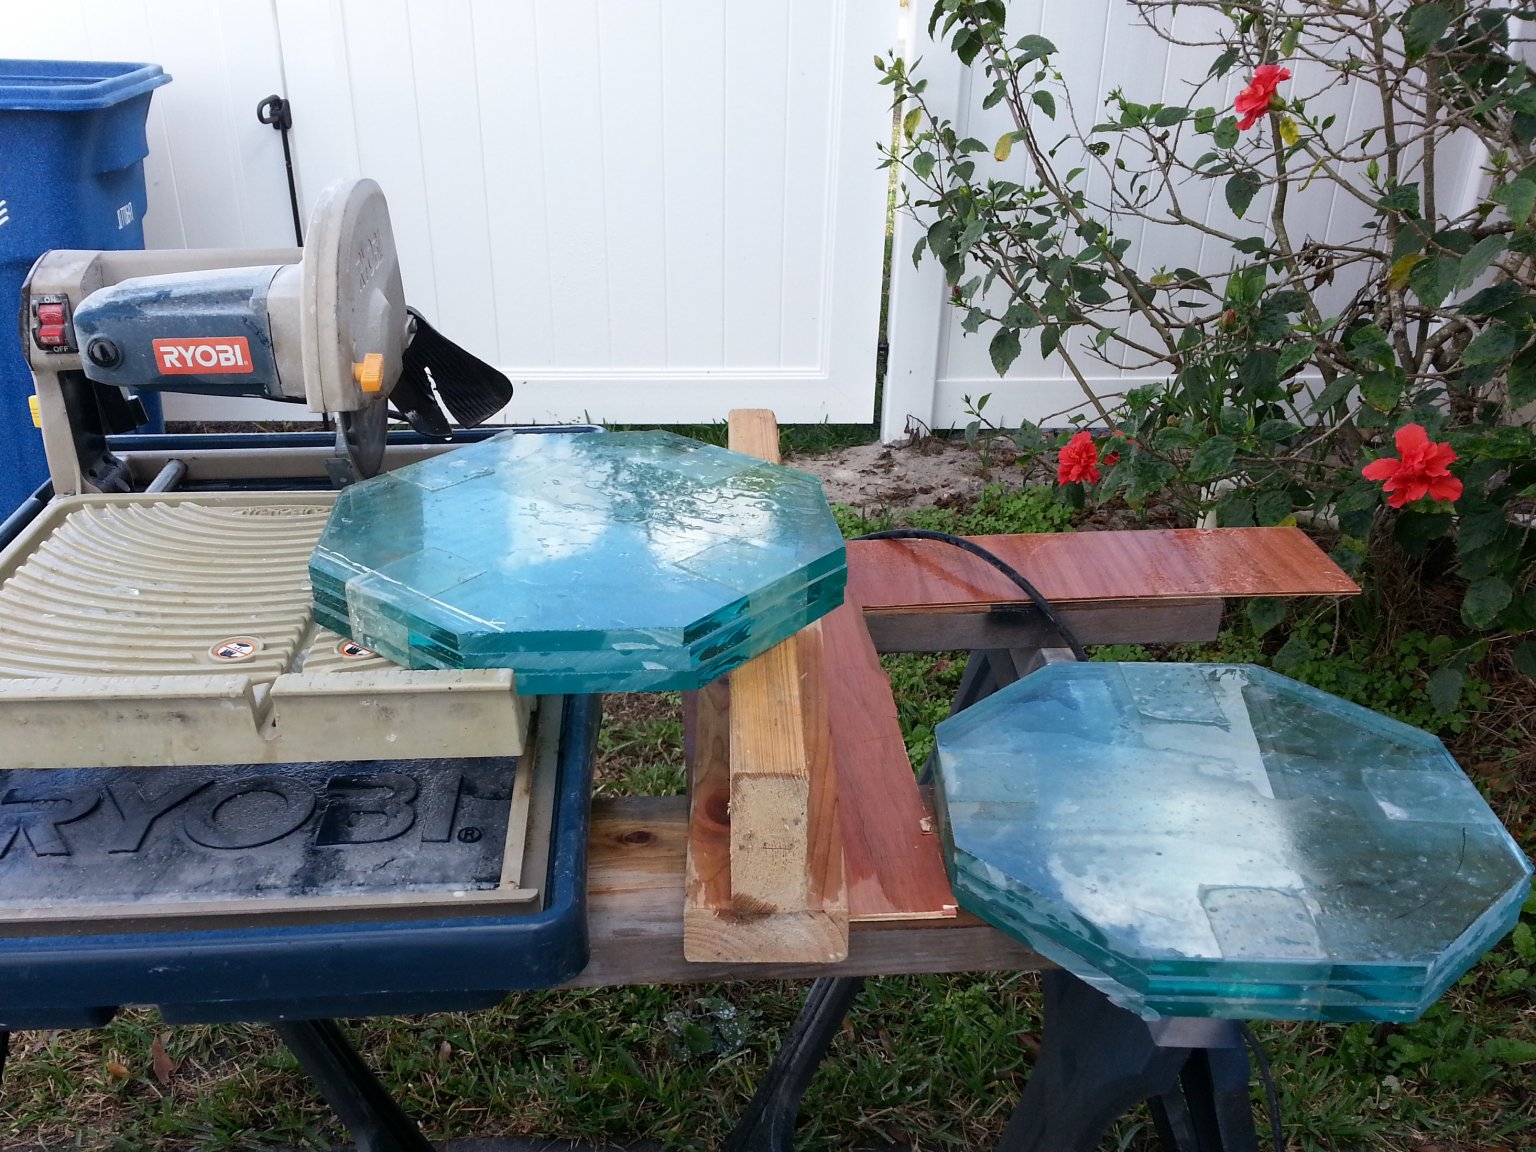
The next step in making mirror blanks is to tape together a stack of three 1/2 inch pieces of glass and cut the corners off using my wet tile saw to make octagons. These
1 1/2 inch thick octagonal stacks of glass will now be
thoroughly cleaned, and then fused in my kilns into single, solid slabs of glass 1 1/2 inches thick. From each slab I will cut a round 10 inch diameter mirror blank.
It was a good, productive start to the new year. I have a tone of projects planned for 2017. It is going to be a fun year. Check back in from time to time to see what I am doing.
12/26/16 - My DIY CNC Mill is finally complete!
Well, is anything ever really complete? I have other modifications and additions I want to make to it in the future, and experiments to
try out. Maybe a laser cutter head attachment. Or possibly a 3D print head attachment. The possibilities are endless. So it will probably
never be truly complete, but it is complete enough to start making stuff with it. This video shows the last few stages in the construction of the machine, and the first simple project to be
made with it.
Someday I will need to pull together all the photos and videos I took during the build and put it together on one page to document the build. As busy as I am with work these days, documentation
has been a little scarce, sorry. But this build is a good example of what can be done with inexpensive and readily available materials and a few surplus stepper motors. It is going to be
great to have my own CNC machine in my garage, only steps away, whenever inspiration to make something strikes. It is a nice Christmas present to myself.
12/13/16 - A new blog about recreational shooting.
I have created a new section on my web site. It is a blog documenting my experiences as a recreational target shooter. Here I will talk about different guns, ammunition,
shooting ranges, review products, share how-tos, etc.
I have gotten back into target shooting after a long hiatus. My grandfather used to take me shooting with him when I was a young child. I handled guns from a very early age. I have always enjoyed shooting.
I kind of drifted away from it for a while in my 20s and 30s. After going to the range with friends and co-workers several times lately, I have rediscovered how much fun it is, and dived back into it
big time. Check it out.
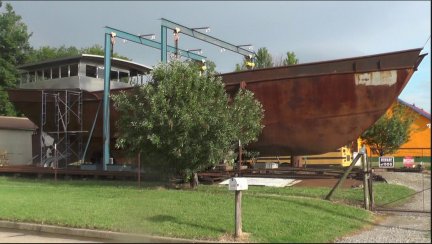
11/30/16 - This is amazing.
I found something amazing on Youtube. I thought I had a pretty good little DIY site going here, full of interesting projects. Well the SV Seeker
channel on Youtube puts me, and just about everyone else,
to shame. These guys (mainly Doug Jackson and an ever rotating crew of volunteers) are building a 72 foot, steel hull, ocean-going, ship in their backyard, in the middle of Oklahoma, with all volunteer
labor, and they are doing it completely from scratch. And by
from scratch I mean they started with a stack of � inch steel plates and fabricated everything themselves. They even cast the bronze propeller blades themselves. And best of all, they have documented
every step of the way (even their mistakes) on video and posted it to Youtube. They've been at it for more than five years now, and there must be hundreds of hours of video. I am totally addicted to it.
It's the most amazing thing I have ever watched.
These guys are utterly fearless. Nothing scares them, and no job, no matter how massive, intimidates them. They are absolute masters of improvisation on an epic scale. They have to be among the greatest
DIYers on Earth. Watching their videos I have learned a ton about steel fabrication, bronze and aluminum casting, rigging, just general can-do improvisational techniques, and some new curse words too.
I've also been massively inspired by their videos to get off my ass and tackle some of my own projects. Watching these guys do a dozen seemingly impossible things a day leaves me with damn few valid
excuses for not finishing my orders of magnitude less difficult projects. So I have been inspired tear myself away from watching their Youtube videos and get out in my workshop and finish wiring my CNC
mill project, and completing the rebuild of my 17.5 inch Dobsonian telescope. I also learned some better video documentation techniques from them. So watch for some new build videos on
my own Youtube channel soon.
The next time I am in Oklahoma, I am going to arrange to visit them, and volunteer to work on the project, for a few hours, or a few days, whatever I can spare. Working with them in person would likely
be an amazing learning experience, and I'd love to contribute to the project any way I can.
11/23/16 - A winter trip to Colorado.
I just got back from a great trip out to Colorado. The primary reason for this trip was to search for Fenn's treasure and meetup with good friends for a long weekend. I used some of my massive accumulation
of airline points to fly for free. I also got a great deal on a hotel room, and the rental car was inexpensive as well. So the whole trip cost me very little. It was a lot of value in fun for the money.
A good time was had by all. Fenn's treasure wasn't found, at least not this time, but maybe we found other treasure along the way. You can read more about this trip on my
Treasure Hunting Page.
11/07/16 - I've started grinding one of my new 12.5 inch diameter, 4th generation, honeycomb mirror blanks. My 4th generation design is almost the same as the earlier 3rd generation design, but the method
for making the plaster mold for casting the glass is different. This mirror blank was made using a replica silicone rubber positive mold to cast a plaster negative mold. I used a
dimensionally perfect, but cosmetically ugly 3rd gen blank to make a negative silicone rubber mold. Then I cast a positive silicone rubber mold off of the negative. Now I can make a new plaster
negative mold in almost no time using the positive silicone rubber mold, and each mold is exactly the same. No more having to CNC mill a foam mold for each new blank. No more having to
burn out the foam. It's just so quick and easy. I also figured out a new method for perfectly centering the rough castings on my edge grinding machine. So this blank
is the best looking and most dimensionally perfect one yet.
I tried out a new method of roughing out this blank too. In this photo I am using a couple of stacked barbell weights as the roughing tool. I watched a friend at the
SPAC Mirror Lab using the barbell method on his mirror, and decided to try it myself. It works great. In only a few short sessions of grinding, I got more than half
the final depth of the curve into the glass. I couldn't believe how quick and easy it was versus starting with a tile tool.
In this photo I have moved on to a tile tool. I found a used tile tool at The Mirror Lab. Since it was used, it already had a convex shape to the top surface. I rough ground the blank with
the barbell weights until the mirror matched the curve of the tile tool. Then I switched to using the tile tool to complete rough grinding. Only one afternoon with the tile tool
got me to within 11/1000 of my final depth of 0.157 in or 4 mm. I'm targeting f/5 with this blank. This is the quickest and easiest I have ever rough ground a mirror blank. The barbell method
really speeds things up. I will probably switch from 60 to 120 grit for the next grinding session to take the blank to final depth and begin cleaning up the surface.
This blank is blissfully bubble free, so there was no need to fuse a sheet of glass onto the top surface for grinding. The blank weighed only 7 lbs 7.6 oz before grinding began. I'll let you
know what the final weight is when I am done removing glass. This should be a very light finished mirror.
Click the photos for a larger view.
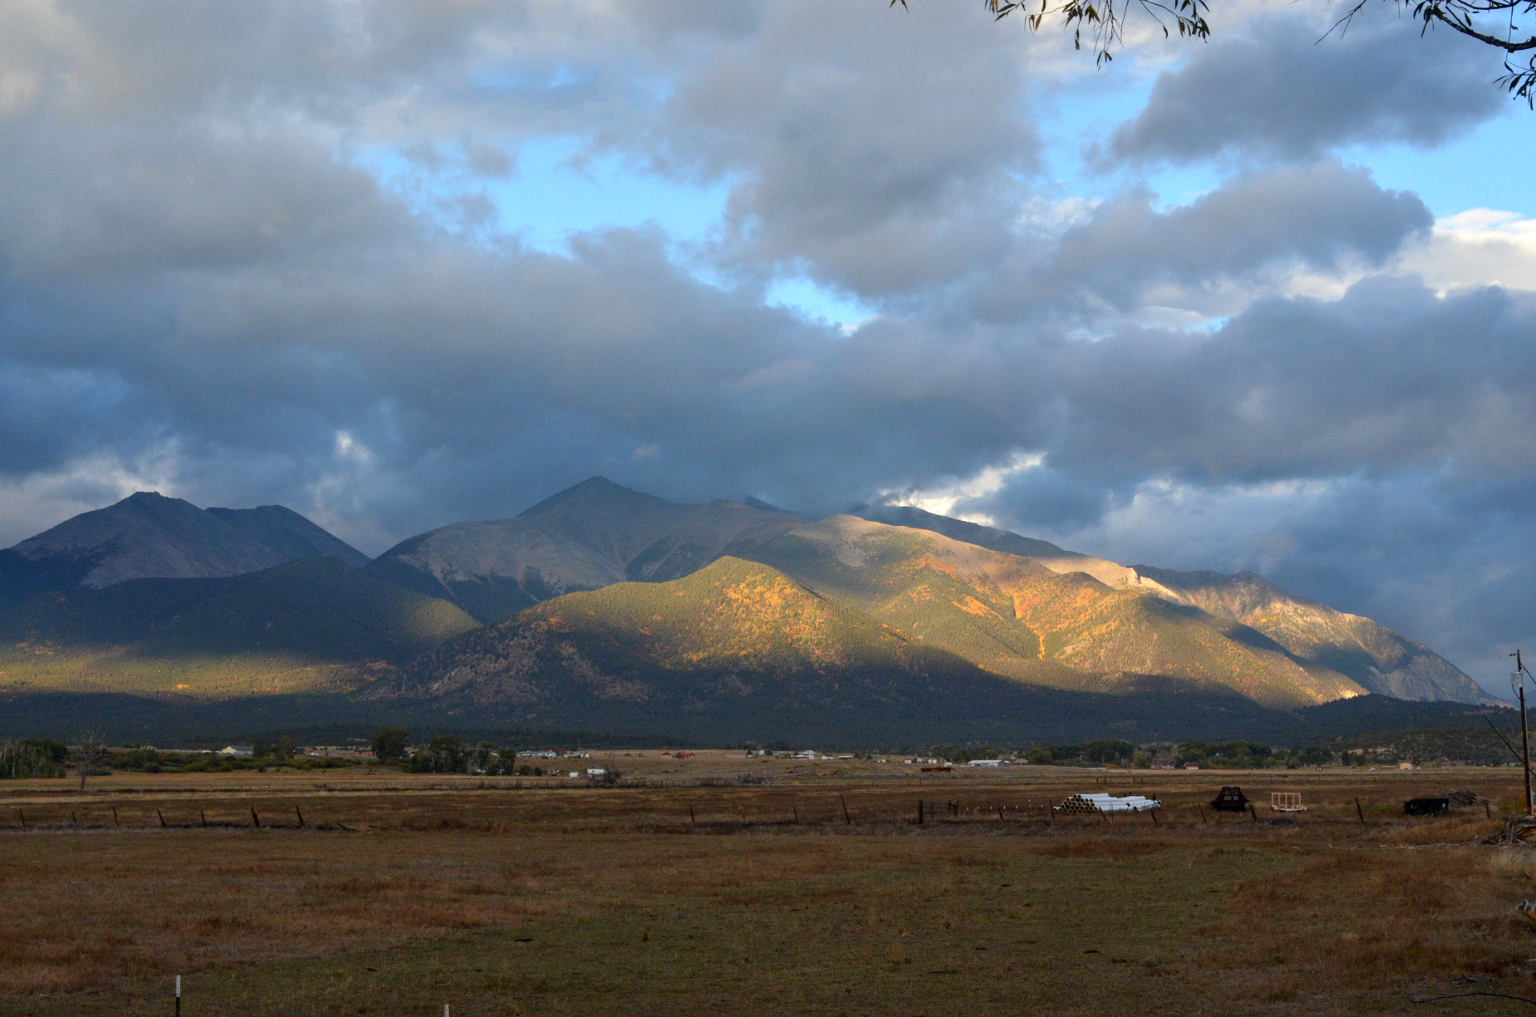
10/16/16 - I just recently got back from a fantastic two week long vacation to Colorado, New Mexico, and Arizona. It was fantastic! I flew into Denver and spent a week in Colorado.
I visited with friends out there, and hit the absolute peak of the aspens changing. It was beautiful. Then after about a week, and a lot of great adventures in Colorado, I drove down into
New Mexico, and on to my property in Arizona. I had a lot of fun, and got some much needed relaxation. I also got some really great photos, like this one. It was taken just after
sunrise in central Colorado. When I get some time I will post more photos and a writeup of the trip to my Travel and Vacation Photos Page.
Click the photo for a larger view.
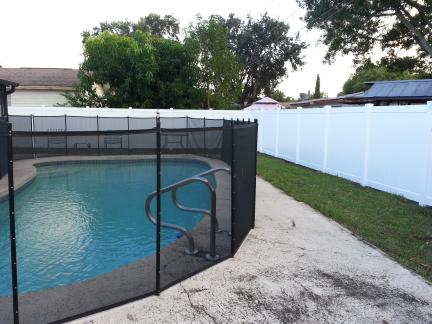
10/16/16 - I Finally got a new fence installed around the house and yard. It took a long time, but it is finally done. The nasty old wooden fence is finally gone, and the new
PVC fence is up. It really looks great.
Click the photo to go to my house blog to read more.
08/22/16 - Behold my latest creation: The Walking Desk. It is my one up on the concept of the standing desk. If standing is good, walking must be better, right? I spend a lot
of time on the computer. So this should help get me off my butt and hopefully even help me lose some more weight. I have a more extensive write-up on my Misc.
Projects Page. Check it out, and watch the video.
08/11/16 - A very sad video of a house down my street burning early Sunday morning in the pouring rain. The Fire Department arrived very quickly and in massive force, but the house
was already fully involved by the time they got there. They had the fire out quickly, but the place is pretty much gutted. As far as I know, there were no injuries.
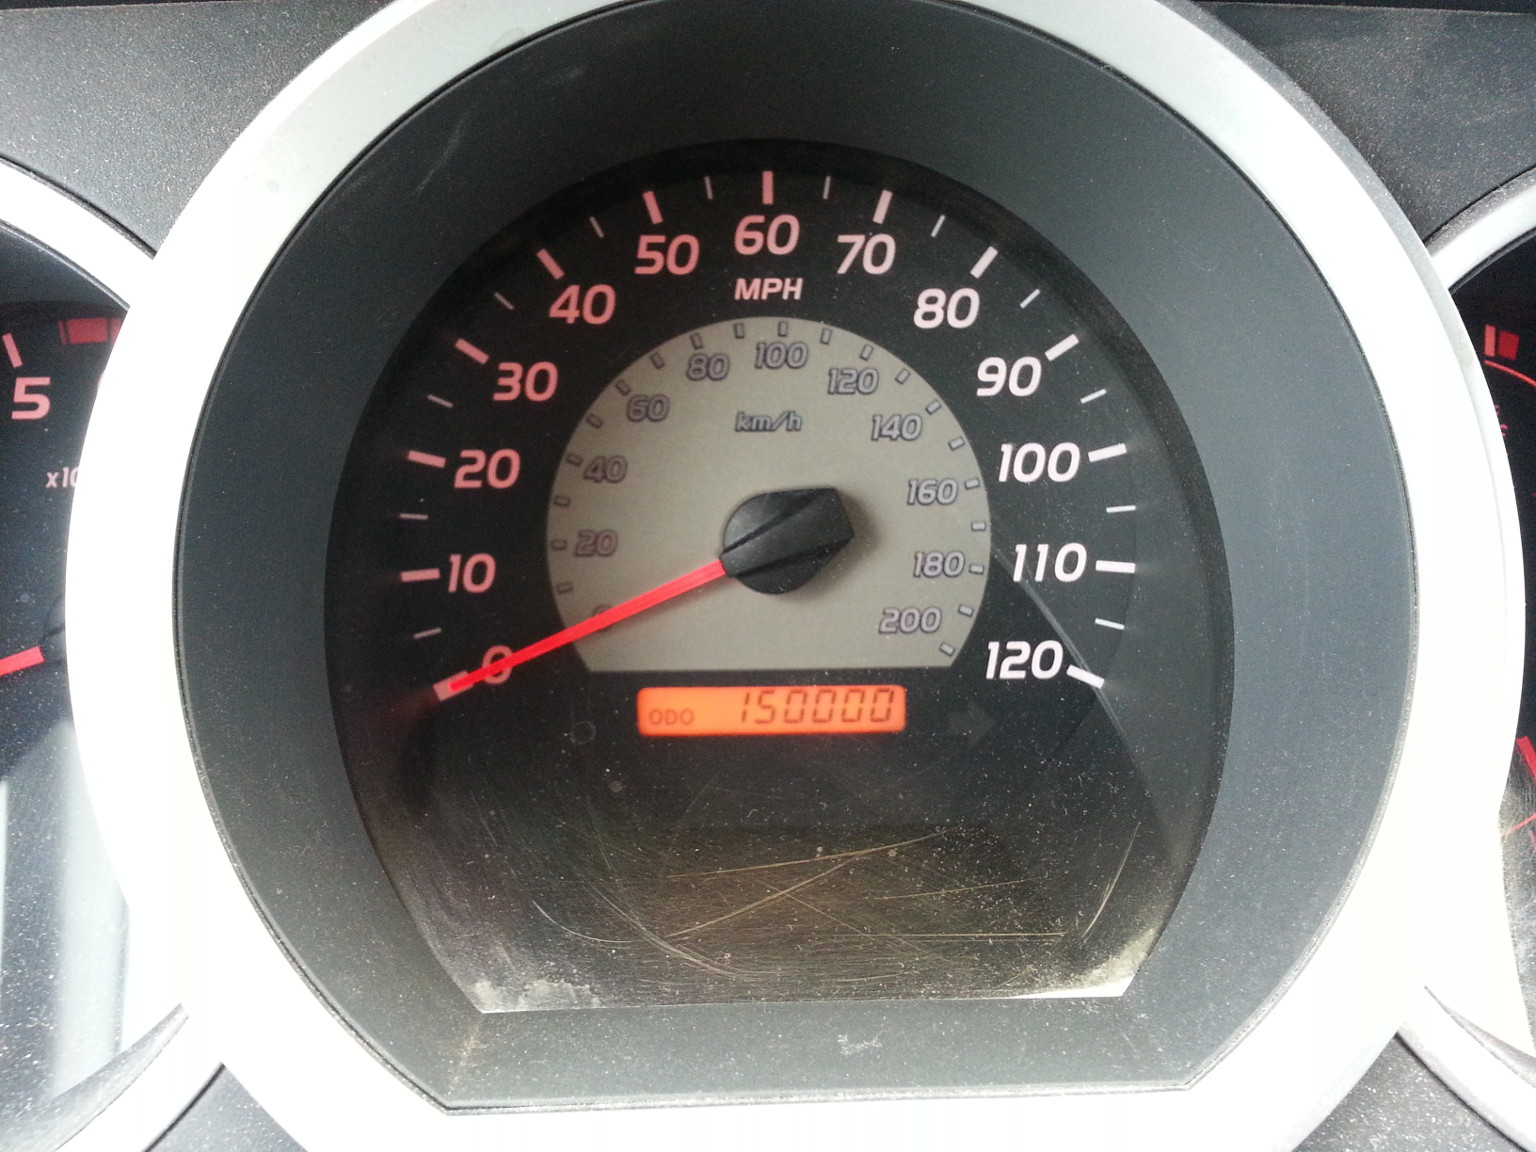
07/02/16
Just turned over 150,000 miles on my 2006 4X4 Toyota Tacoma today. Would have happened a while ago, but a couple of years ago I started flying out to my Arizona property instead
of driving out twice a year. That's over 10,000 less miles each year not going on the truck now.
The truck still runs and drives like new. The body has a few dings in the paint, and there are a few chips in the windshield. The driver's seat is getting a little worn.
Otherwise it is in great condition. No rust, and it still looks almost brand new under the hood. Not bad for a 10 year old truck. Gotta love the indestructibility of Toyotas.
Especially considering all the crazy off-road places I've taken it, and all the towing I've done with it. It's never let me down. Best vehicle I have ever owned, hands down.
Next stop the quarter million mile club.
Click the photo to see a larger view.
06/27/16
I have posted a bunch of photos and a write-up about my recent vacation to New Mexico and Arizona on my Travel and Vacation Photos page.
It was a great trip. There are lots of nature photos and astrophotography. Check it out.
Click the photo to see more.
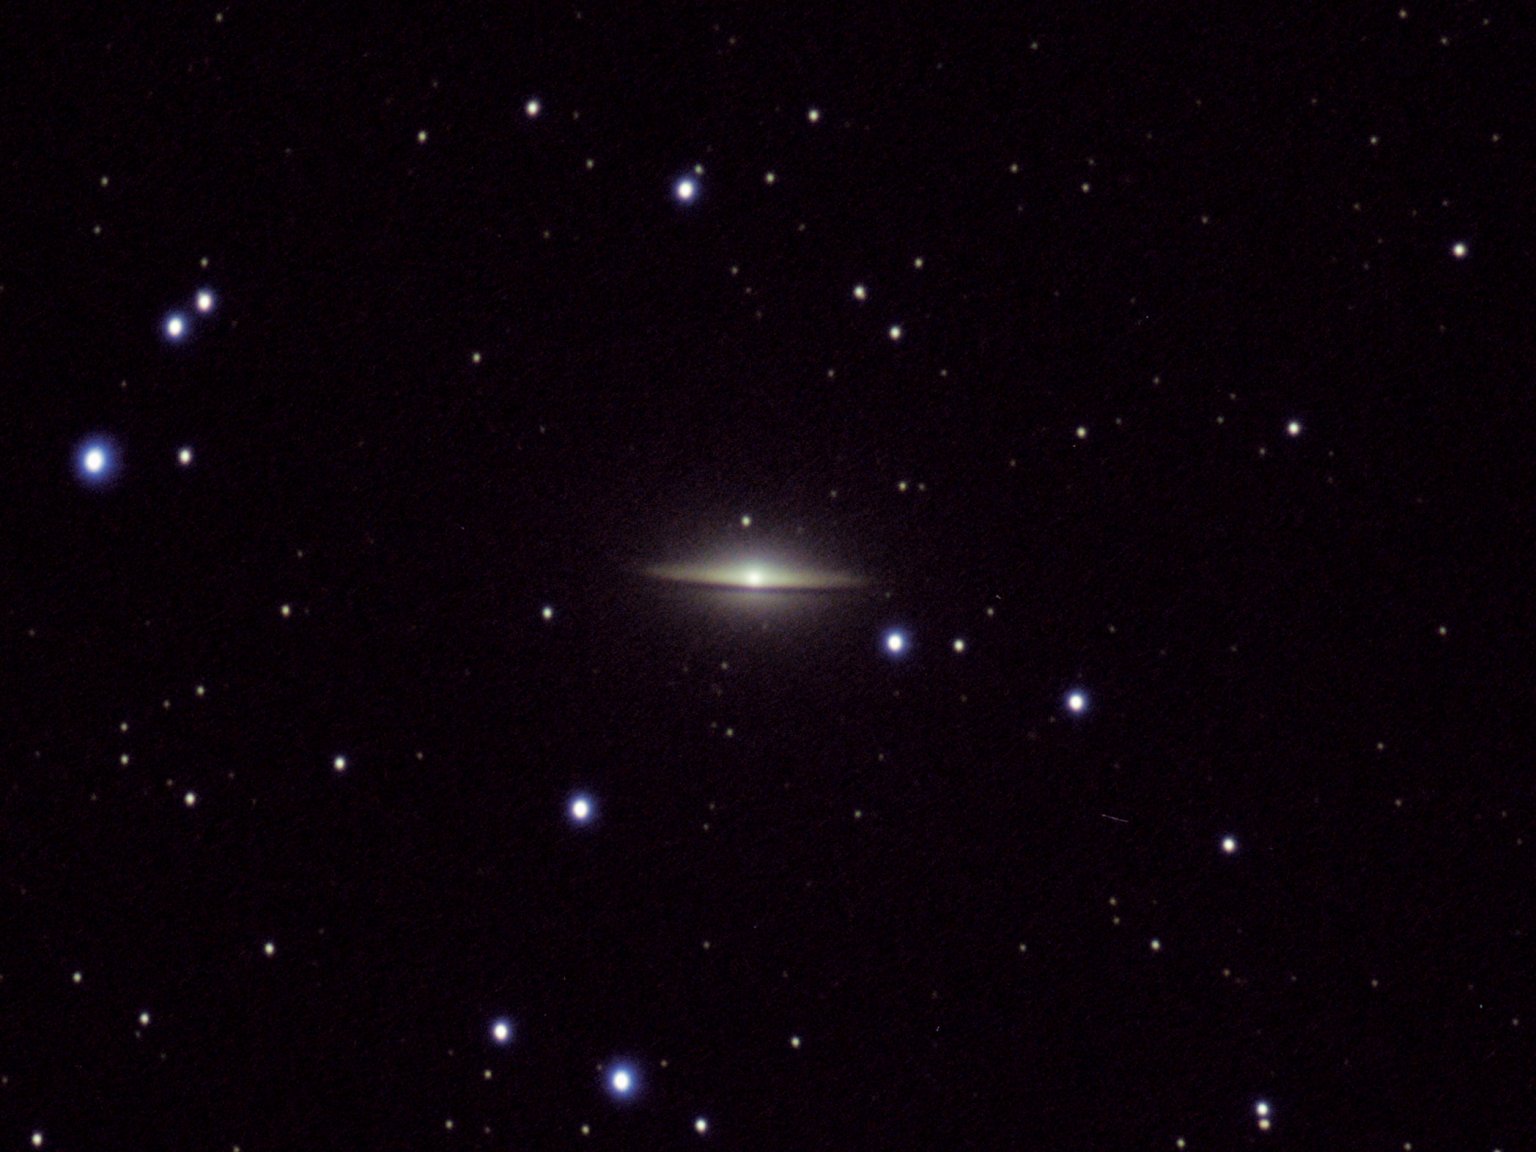
06/17/16
Just got back from a wonderful, and much needed, vacation out west to Arizona and New Mexico. Had a great time. The weather was fantastic. I got to spend a week in my cabin on my remote Arizona
property, and spend some time at my favorite spa in New Mexico. There was also the usual exploration of the mountains. And of course much astrophotography was also done. This is a photo of the
Sombrero Galaxy. Many more photos will be posted when I get the time.
Click the photo for a larger view.
06/16/16
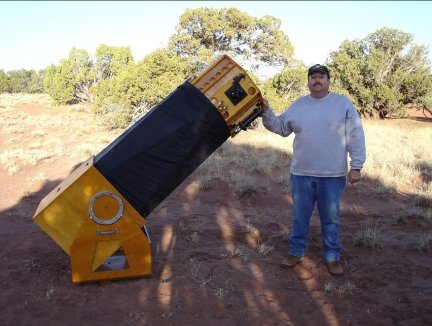
While I was away traveling so much the last month, the Board of Directors of the St. Petersburg Astronomy Club voted to give me this wonderful 17.5 inch Dobsonian telescope I built for them
20 years ago. What a nice surprise. This is an old photo of me with the scope set up on my remote Arizona property. Now that it is my scope, I have some big plans for it.
Click the photo to read more.
05/21/16
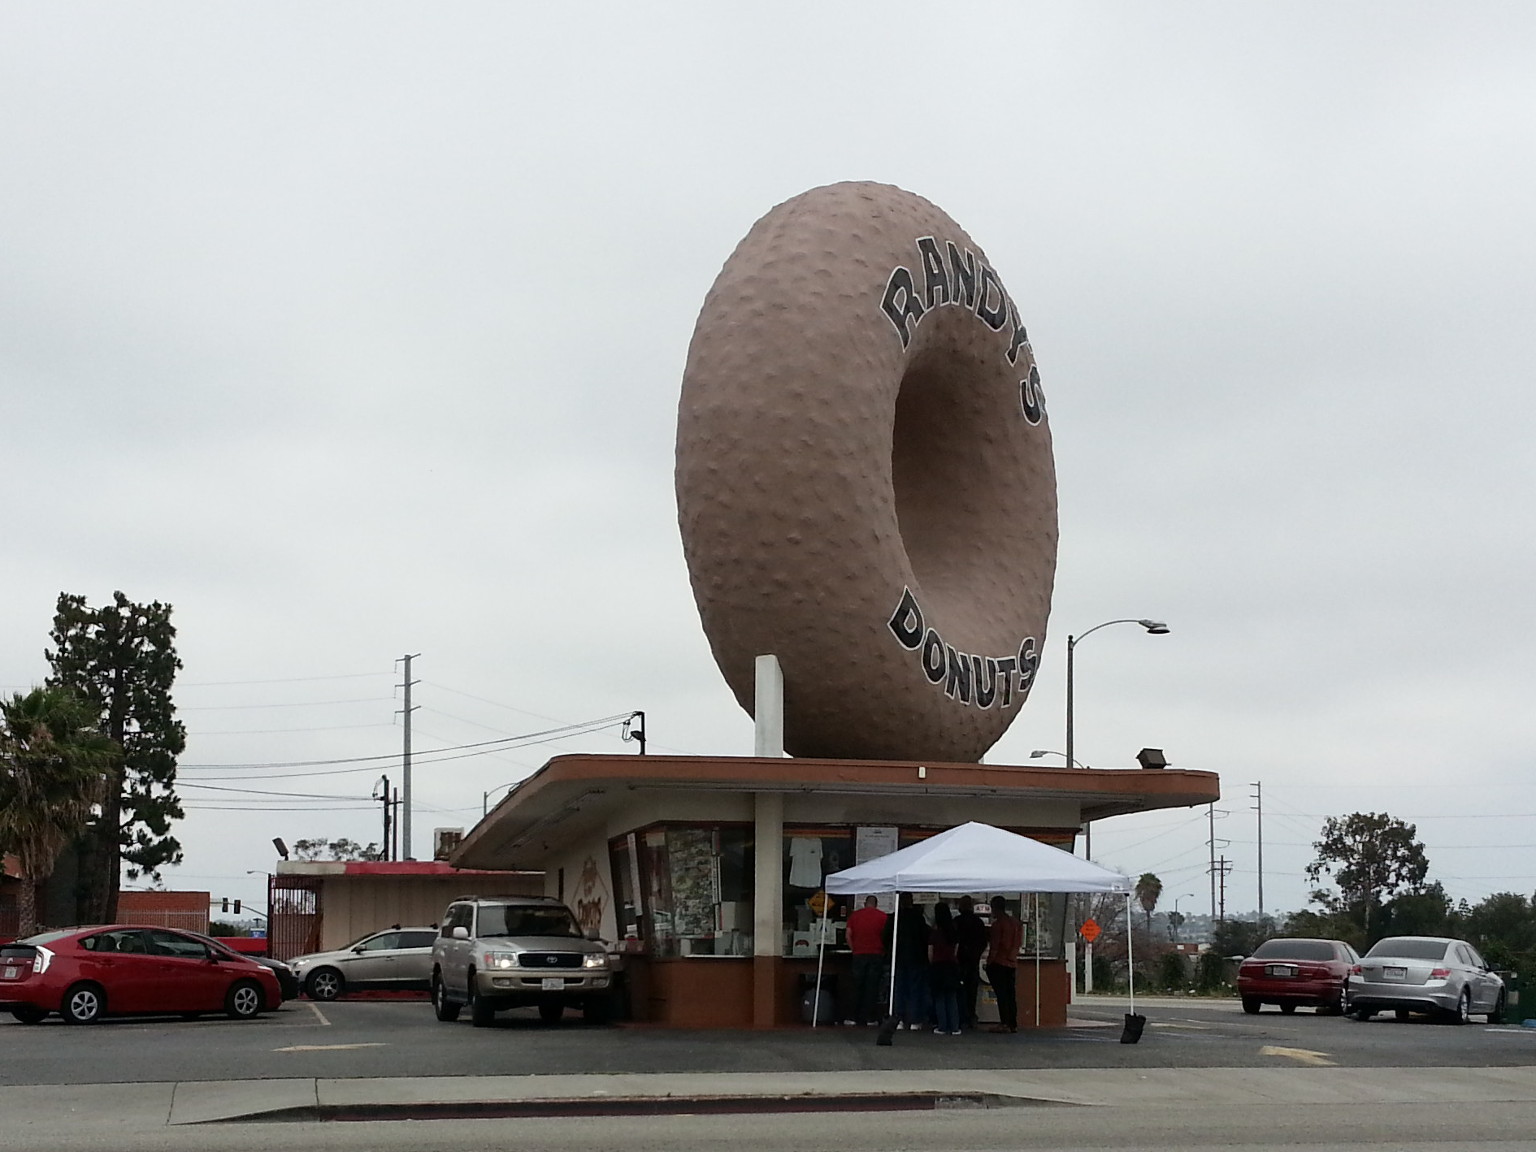
Just got back from yet another business trip. This time to the opposite side of the country from my last few business trips to New York. This time I flew out to Los Angeles
California. I landed in LA and saw a couple of the iconic LA area sights on my way to my appointment. How many times have I seen Randy's Donuts on TV and in movies? And there
is was, as I was driving away from the airport. So I had to get a picture.
Click on the photo to see a larger view.
My route was going to take me near another iconic Landmark, so I made a little detour to get a look at it. So here is a photo of the famous Hollywood Sign. I also drove around in the Hollywood
Hills a little bit and checked out the mansions of the rich and famous. It was an interesting drive. Worth the detour.
Click on the photo to see a larger view.
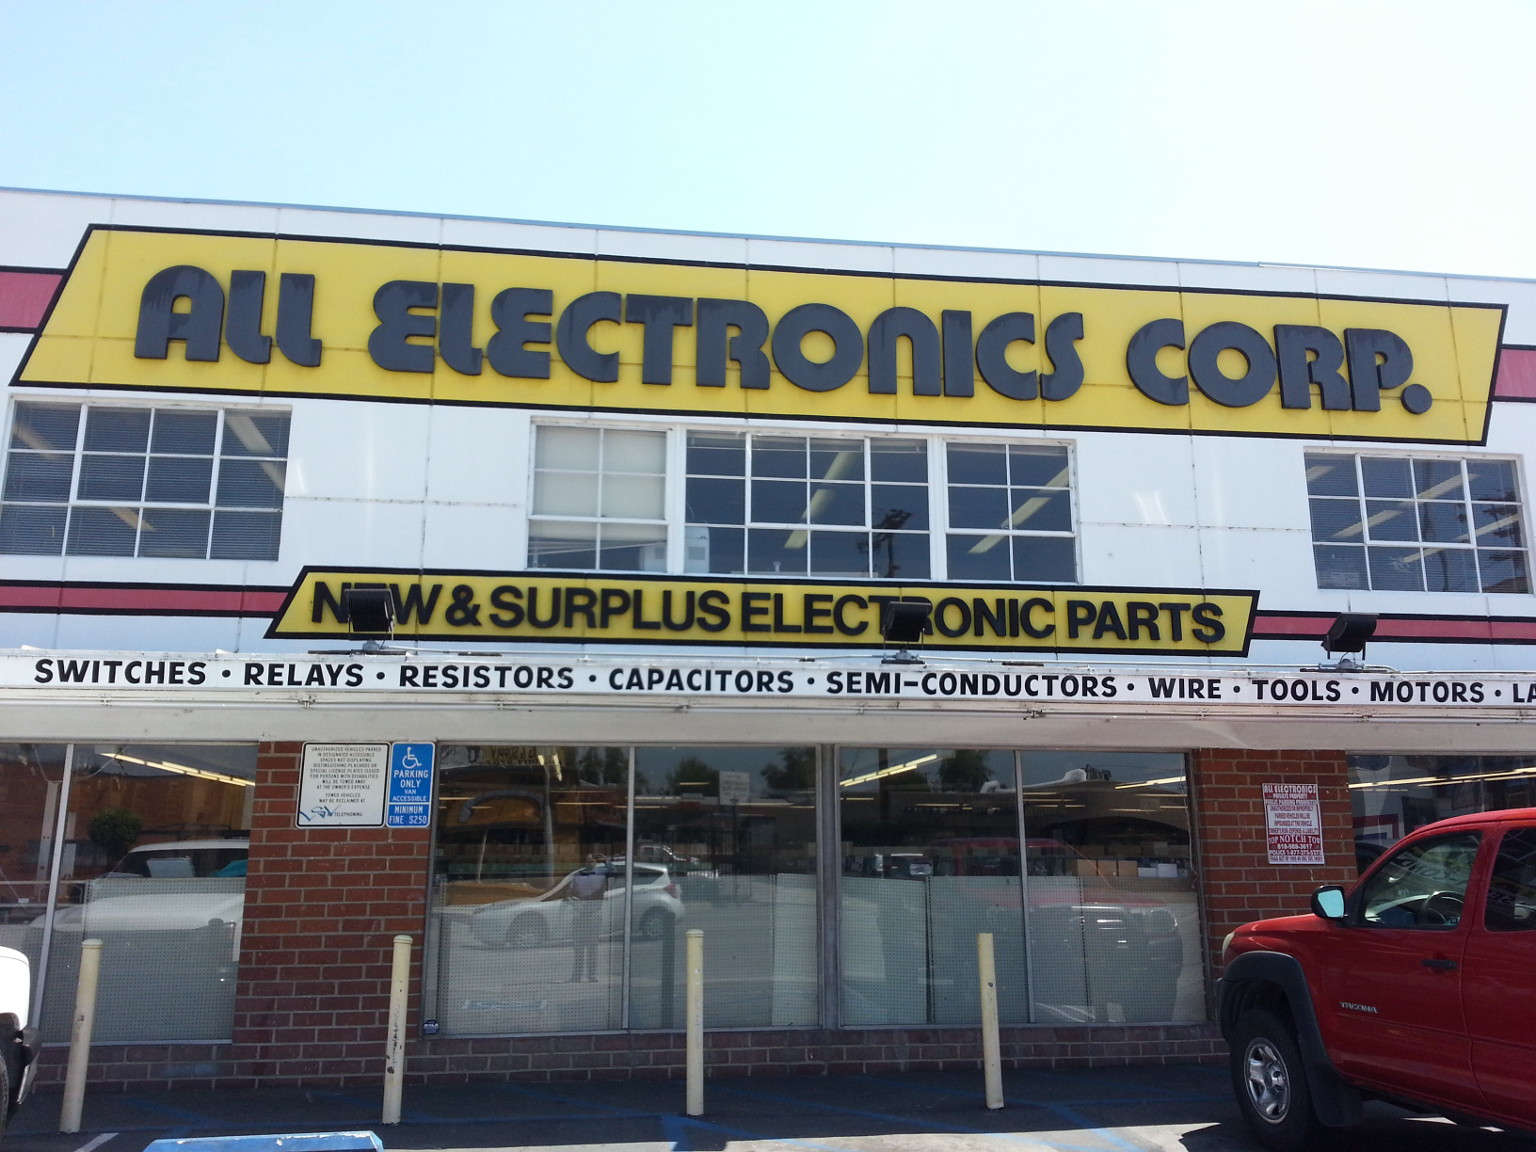
I couldn't very well pass near this place without stopping in for at least a few minutes and looking around. I also bought a few things for future projects. I love electronic surplus stores.
I've always wanted to visit All Electronics. I also wanted to go to Apex Electronics, but that place is insane. It would be an all day thing, and I only had a few minutes.
So I'll save the trip to Apex for another time.
Click on the photo to see a larger view.
Here is a video I shot at the Carpinteria Seal Sanctuary. I've been here before, several times. It's a great place to hike out to and unwind after a long day of meetings. The
park is great and the seals are always fascinating to watch as they jockey for position on the narrow beach. There was also a lot coming and going of ships transferring crews
from the offshore oil platforms via the pier next to the sanctuary.
In spite of the interesting side trips,
it was a grueling trip, especially the trip home. I left my hotel in Carpinteria before dawn, and rolled into my own driveway around 9:30 pm. In between, I drove down the CA coast to LA,
fought terrible traffic to get to the rental car return. The shuttle bus took forever to get me to the airport termainal. After the Egypt Air crash, the police had security checkpoints set up
around LAX, further snarling already impossible traffic. The TSA security line was beyond ridiculous. I was expecting it. Glad I left as early as I did. My flight got delayed. Then I spent
about 8 hours on an airplane which stopped in Atlanta on the way home, and got caught in a runway traffic jam in Atlanta. We were on the ground for a long time there. Glad to be home again. No
more business trips for a while (I hope). The next time I fly I want it to be for my vacation.
05/14/16
Just got back from a business trip to Buffalo, NY. New York is beautiful in the spring. Everything is greening up, the trees and shrubs are all in bloom, there are birds everywhere.
After a day in meetings, I had a little time before sunset to do a little sight-seeing. So I headed for Niagara Falls. Haven't seen it since I was a kid.
05/09/16
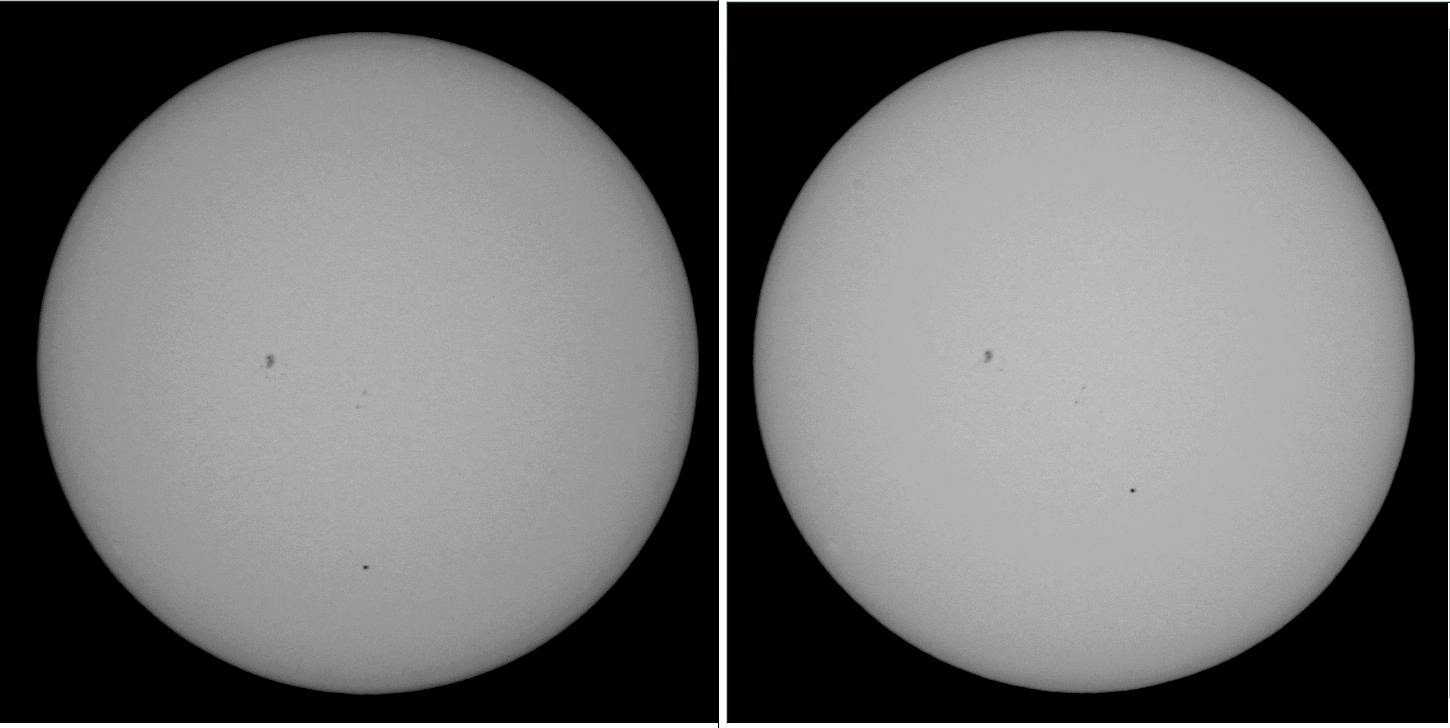
I ducked out of work for a little while today to check out the transit of Mercury. These two photos show how far Mercury moved across the sun in the space of a little over an hour.
I got a lot of photos from in between those two points.
I setup, polar aligned, and star aligned the mount last night in my back yard in anticipation, and left it set up until this morning. It went straight to the sun with no issues and
tracked really well. Unfortunately I couldn't watch and photograph the whole transit. Had to go back to work. This was good practice for the total solar eclipse next year.
Click on the photo to see a larger view.
05/09/16
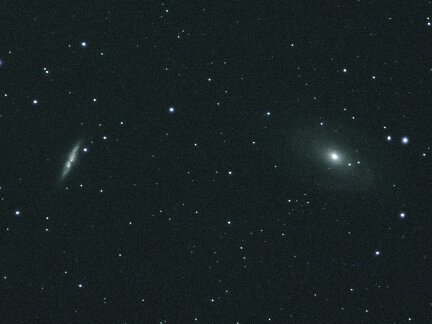
A photo of galaxy M101 taken last Saturday night at the SPAC Spring Picnic at our Withlacoochee dark sky site. It is a stack of 7, 5min exposures. Note the small gravitationally distorted galaxy
at the lower right. At least two other small galaxies are visible in the full size image. This is by far the best photo of M101 I have ever got. It has been my nemesis over
the years.
Click on the photo to see a larger view.
05/09/16
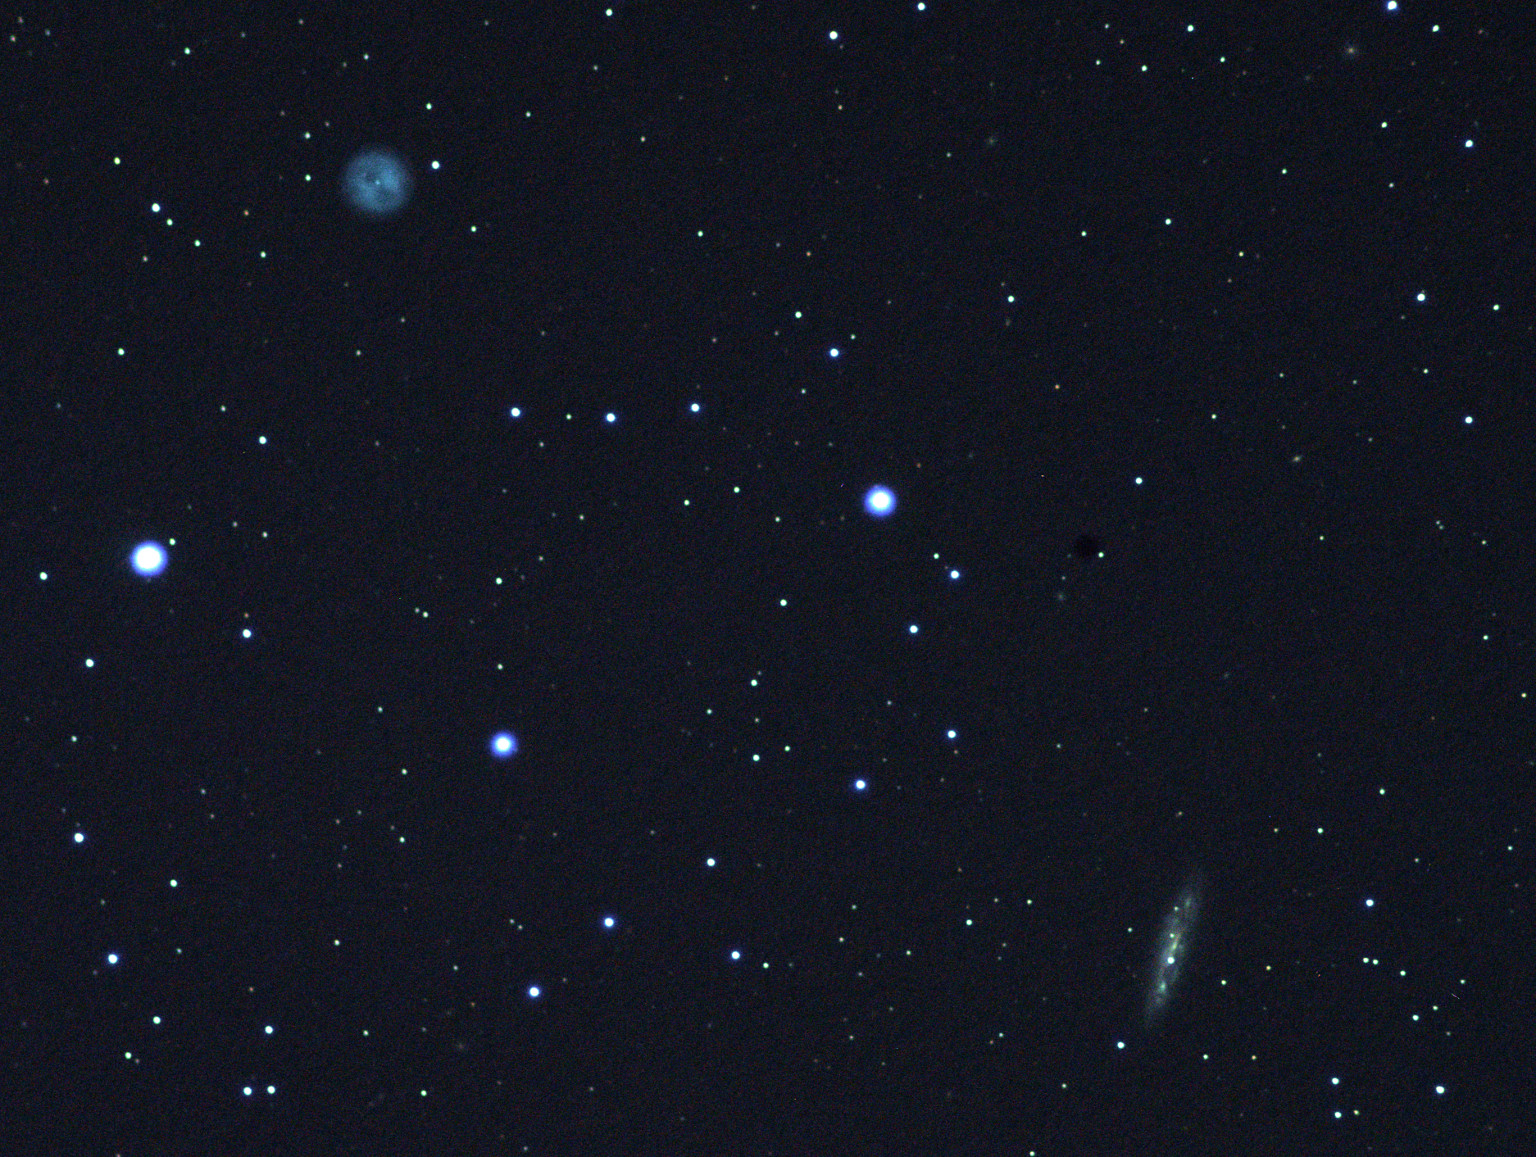
A photo of M97 (Owl Nebula) and M108 taken last Saturday night at the SPAC Spring Picnic at our Withlacoochee observing site. It is a stack of 5, 5min exposures.
Not bad, but I probably should have grabbed a couple more 5 min exposures to add to the stack.
I also got some shots of M81 & M82, and M51, Saturday night, but they were only marginally better than the ones I got at the OBS a couple of months ago.
Can't wait to get this imaging setup away from the humid and light-polluted Florida skies and under the dark sky at my remote Arizona property. Coming soon!
Click on the photo to see a larger view.
04/02/16
I have added some photos and a writeup of the 2016 Orange Blossom Special Star Party on the vacation and travel photos section of the web site.
It was another great star party this year. A great time was had by all, and I thoroughly enjoyed myself.
This is a photo of galaxies M81 and M82 that I took during the star party. Click on the photo to see more.
02/17/16
I just added a new section to the web site about my current process for fusing layers of thin glass to make thick telescope mirror blanks. My current process of fusing is (relatively) quick and easy,
and produces great blanks. Here is a photo of three 10 inch diameter blanks I made using this process. I am gearing up to make larger diameter blanks too.
Click on the photo for more information.
02/17/16
I just got back a few days ago from another business trip to Rochester, NY. Not many touristy photos this time. It was downright cold. We didn't spend too much time outside. The first day the temp was
only in the low 30s, and there wasn't much snow left on the ground, so we got out and did a little sight-seeing along the Genesee River and the Lake Ontario lake front. This photo was taken at Ontario
Beach. But then the cold and snow
really started in. It became too rough for us Floridians. There wasn't any more sight-seeing. By the morning of our last day it was 14 degrees and blowing snow. We hoped our flight would be
able to leave, fortunately it did. But then after we were in th air a while, a passenger got sick, and the flight got diverted to NC to get the passenger medical help. So that made for an
extra long trip home. Just another wonderful business trip.
Looks like these trips to Rochester may become a regular thing. I'm hoping I won't have to make too many more before Spring.
01/31/16
It has been a long, hard slog, but I have finally finished figuring this 12.5 inch diameter f/4.9 honeycomb mirror. It has taken me two years on and off working on it at the
SPAC Mirror Lab to get it done. There was a long
hiatus while I had health issues. Then I had problems with digging deep holes in the center and badly turning down the edge, multiple times, and having to basically start over from a sphere each time.
The combination of plate glass and the shape of the back were giving me fits. The blank did not behave at all like a solid blank.
I eventually gave up on using a full size lap and learned how to figure all over again using sub-diameter laps. Finally it is done. The best axis is just short of 1/14th wave. I never expected to get
this mirror so perfect. It was just a proof of concept for my 2nd generation honeycomb mirror design. I'd have been happy to just get it to 1/4 wave, as much trouble as I was having with it. Now it
is on to the 3rd generation design.
Click on the photo for more a larger version.
Here is a Focogram of the finished mirror. Ain't it purty? That is one smooth surface. That's what two years of figuring will do.
Here is the Surface Error Analysis for the best axis of the mirror. Never thought I could get a surface that close to perfect.
Click on the photo for more a larger version.
01/29/16
Again, it took a while, but I finally have some images and a writeup in my travel section of my October business trip to The Contact Lens Manufacturers
Association Conference in Miami back in late October. I have been traveling so much for work, and so busy with work that I can't keep up with getting it all into the blog.
Click on the photo for more information.
01/14/16
Well it took a while, but I finally got the images and writeup of my October business trip to New York put up on the travel and vacation section of the web site. I've just been so darn busy the
last few months that it seems to take me forever to get any updates to the web site done.
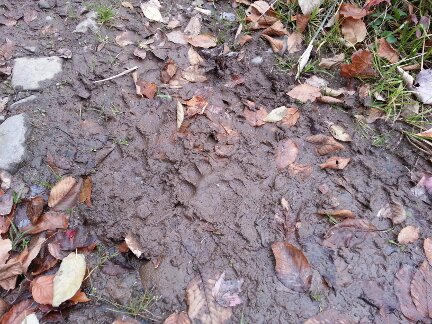
This photo shows bear paw prints in the mud near where we were staying in the Adirondack Mountains. We think we missed encountering the bear by possibly only mere seconds. Click on the photo for
more information.
11/19/15
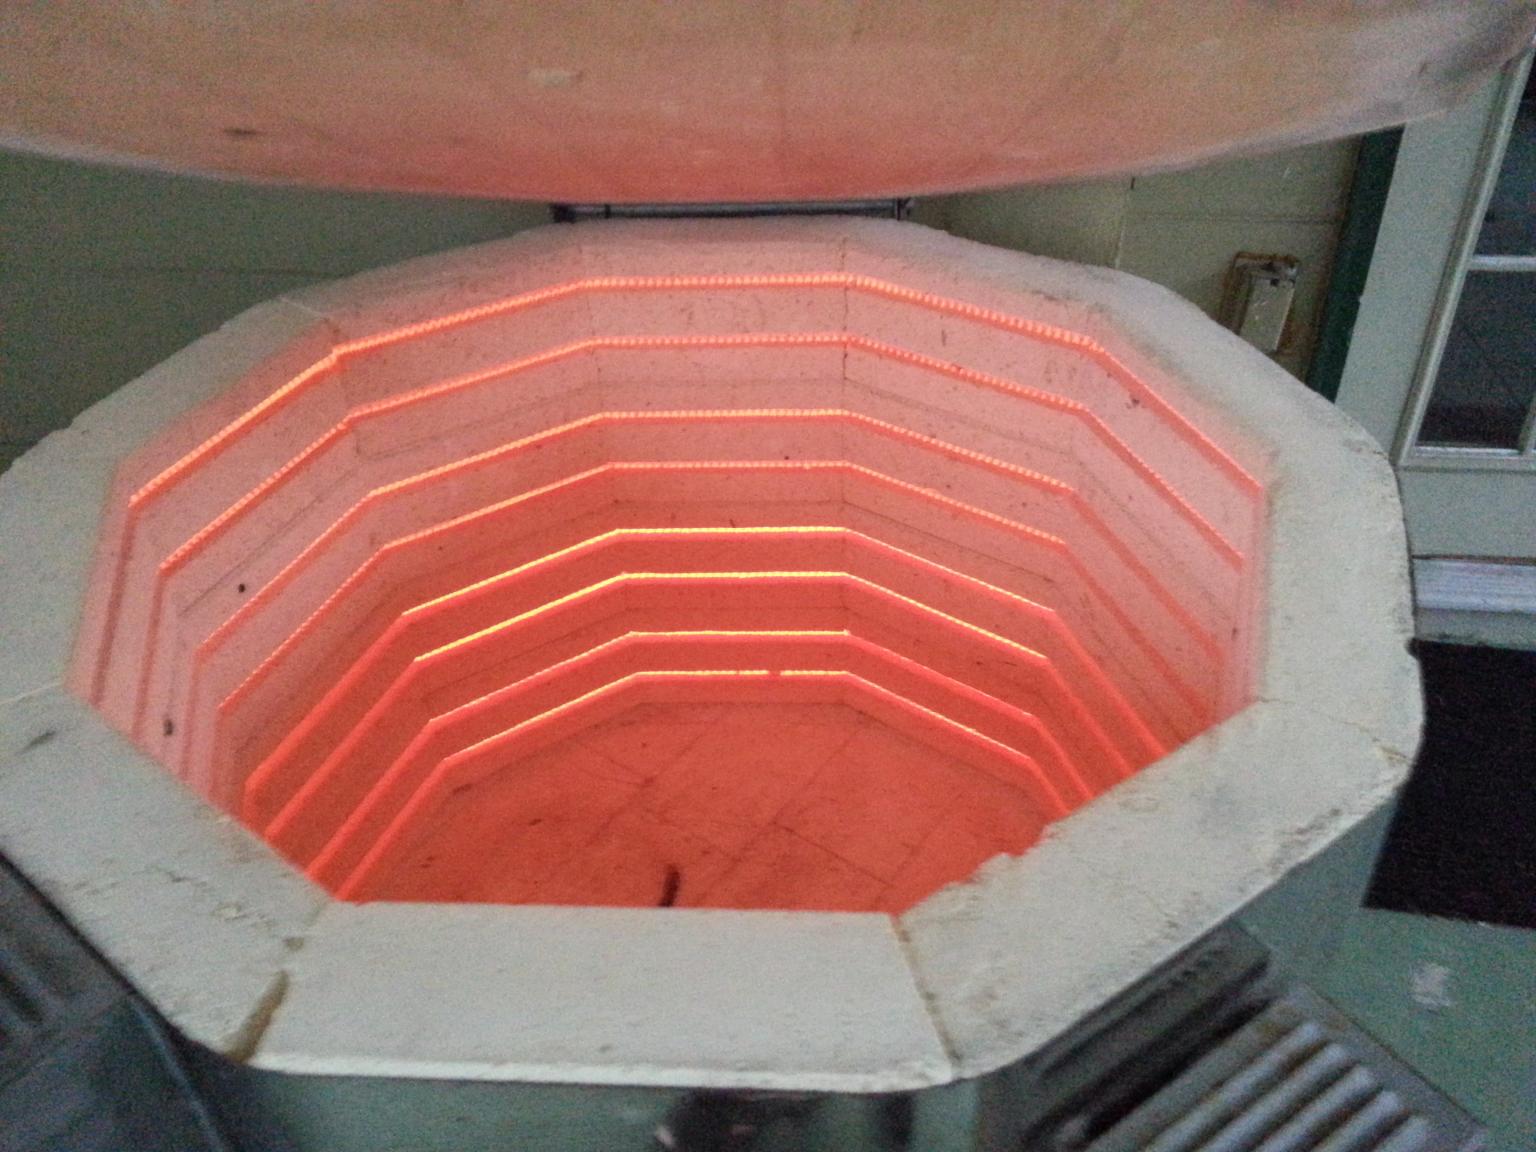
This is an image of the first test firing of my large Paragon kiln. It's been a long time coming. I bought this kiln in a thrift store about two years ago. It was a wreck.
I rebuilt it, but had no way to test it, and nowhere to use it. It went into storage. Today I got it up and running. You can read the whole story on my
House Blog page. I'll be casting large telescope mirrors in it soon.
11/19/15
Photos and a write-up from my most recent vacation have finally been posted to the travel and vacations section of the web site. Check it out.
10/31/15
It's been a while since my last post here. I have been on the run all around the country in the last month. First I want on another vacation out west. It was a great trip.
I will post photos from that trip soon to the travel and vacations section of the web site. It seemed like no sooner was I back from my
vacation than I was off on a work-related
trip to Rochester, NY. Big changes at the company where I work have meant new responsibilities for me, and a lot of travel. This first trip to Rochester was a very interesting,
and took me to an area of the country I hadn't been to since I was a kid. Plus it was during the height of the Autumn colors. And as a bonus I managed to do a little exploring
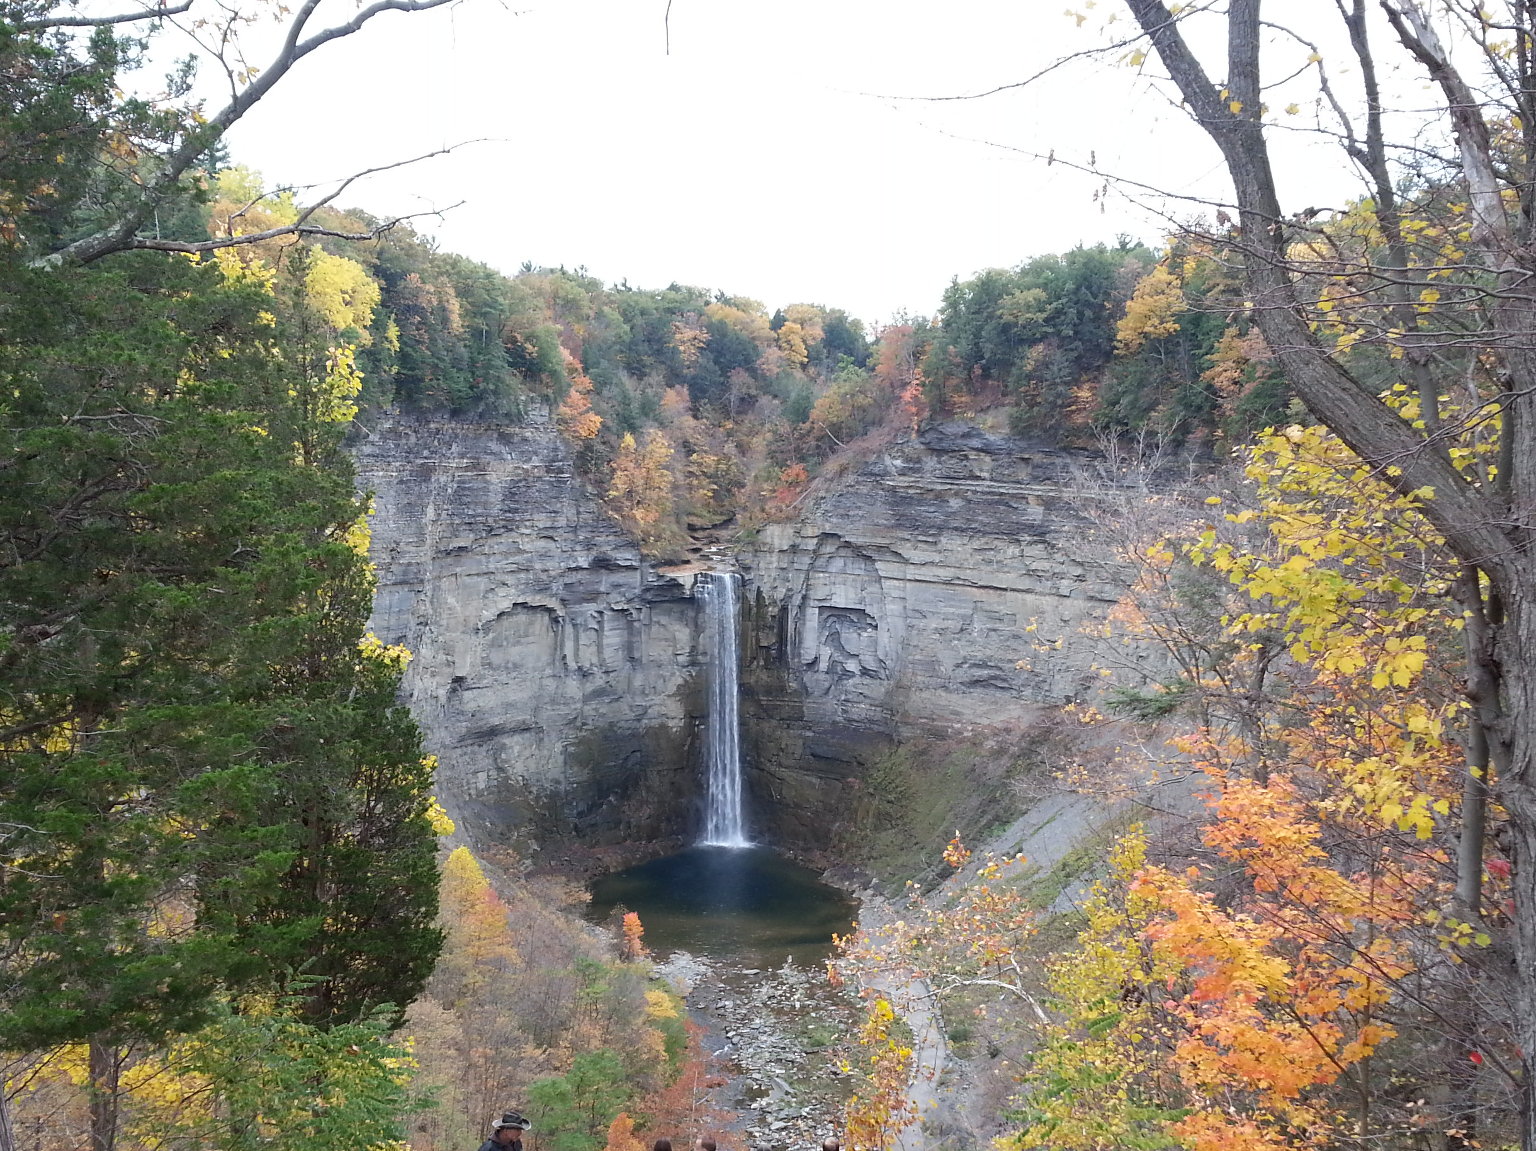
of the Finger Lakes region, and spend some time at the hunting cabin a work colleague owns in the Adirondack Mountains. This particular photo was taken at Taughannock Falls State Park.
More photos from this trip will eventually also be added to the travel and vacations section of the web site.
Three days after returning from Rochester, I was off to a trade show in Miami, and spent a few days there. I have some photos from that trip too. Whew! Seems like I have been
away from home more than at home in the last month. I've gone as far west as Arizona, as far north as Lake Ontario, and as far southeast as Miami. I've spent a lot of time
on airplanes, in airports, in hotels, and in rental cars. It's going to be good to hang around my own house for a while.


 01/30/18 - Goodbye boot.
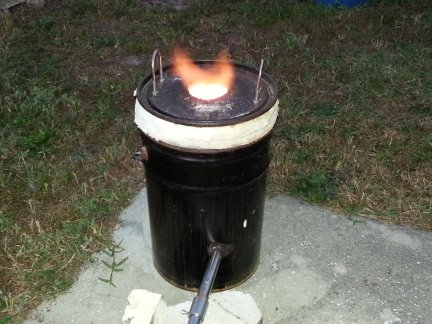


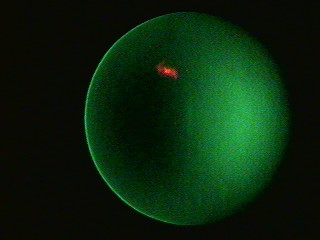 Here is a Focogram of the finished mirror. Ain't it purty? That is one smooth surface. That's what two years of figuring will do.