 I'd been experimenting with some wide-field astrophotography using camera lenses on my trips out to my remote and dark Arizona Property. I found that without guiding I was limited to fairly short exposures before tracking
errors became noticeable. I wanted to do longer exposures like I do with my prime focus photography on a telescope. For those long exposures I piggyback a guidescope with an autoguider on the main telescope. I got to thinking
that there ought to be a way to do the same with my wide-field photography. So I knocked out a quick mounting rig for the camera and a guide scope using spare bits and pieces in my workshop. This site shows how I did it for
anyone interested in doing long-exposure, wide-field photography using standard camera lenses.
I'd been experimenting with some wide-field astrophotography using camera lenses on my trips out to my remote and dark Arizona Property. I found that without guiding I was limited to fairly short exposures before tracking
errors became noticeable. I wanted to do longer exposures like I do with my prime focus photography on a telescope. For those long exposures I piggyback a guidescope with an autoguider on the main telescope. I got to thinking
that there ought to be a way to do the same with my wide-field photography. So I knocked out a quick mounting rig for the camera and a guide scope using spare bits and pieces in my workshop. This site shows how I did it for
anyone interested in doing long-exposure, wide-field photography using standard camera lenses.
Click on any photo for a larger view.
 I have a pretty well equipped workshop set up in my garage, and a box just full of misc. astromomy and telescope related parts, plus a bunch of scrap metal of all shapes and sizes. So putting together this camera rig was super easy.
It should be relatively easy for anyone else too. The hardest part was drilling and tapping a couple of holes in the edge of an aluminum plate. More on that below.
I have a pretty well equipped workshop set up in my garage, and a box just full of misc. astromomy and telescope related parts, plus a bunch of scrap metal of all shapes and sizes. So putting together this camera rig was super easy.
It should be relatively easy for anyone else too. The hardest part was drilling and tapping a couple of holes in the edge of an aluminum plate. More on that below.
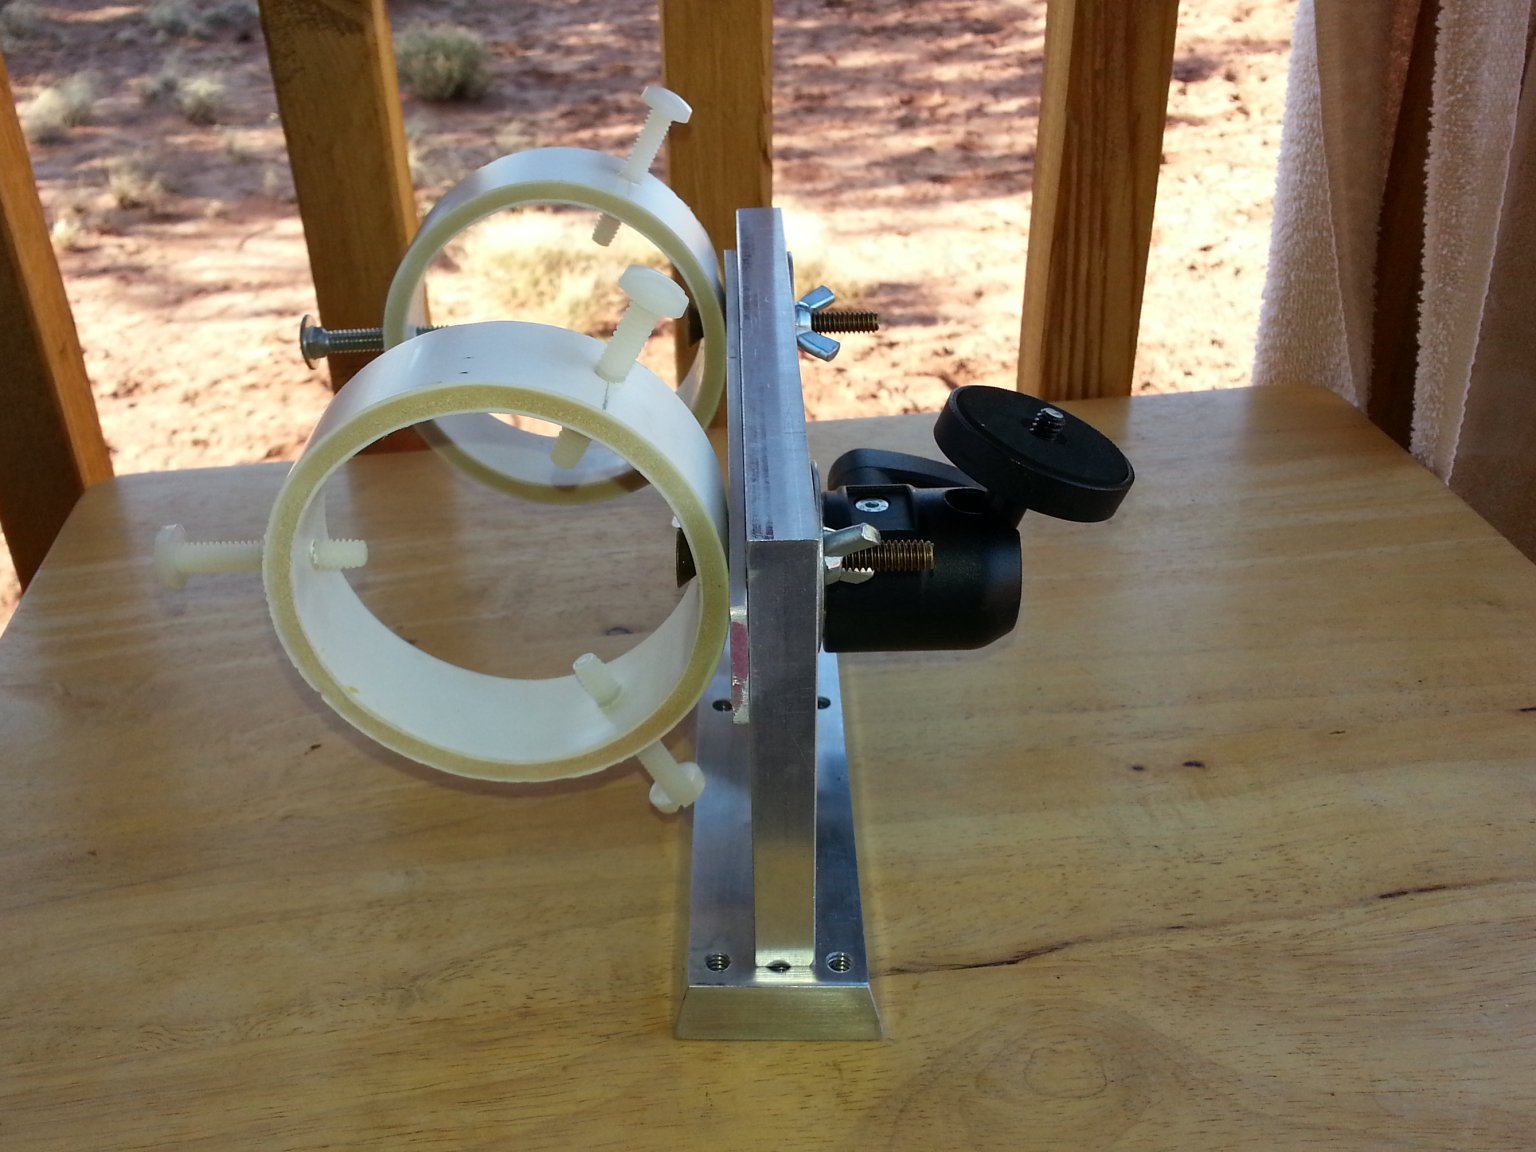
I started with a Vixen-style dovetail plate to fit into my iOptron go-to telescope mount. I mounted a piece of 1/2 inch thick aluminum plate vertically on top of the dovetail plate. I had to drill and tap two 1/4-20 holes in the
edge of the aluminum plate to mount it to the dovetail plate with two 1/4-20 socket head cap screws. The dimensions of the plate are not critical. I used a piece of scrap plate from my aluminum scrap pile that is roughly 9 X 7
inches in size. I suppose you could use wood or plastic for the vertical member. Those materials would be easier to work with if your shop is not well equipped for metal working.
On one side of the vertical member I mounted rings for holding the guidescope. On the other side I mounted a heavy-duty camera ball mount.
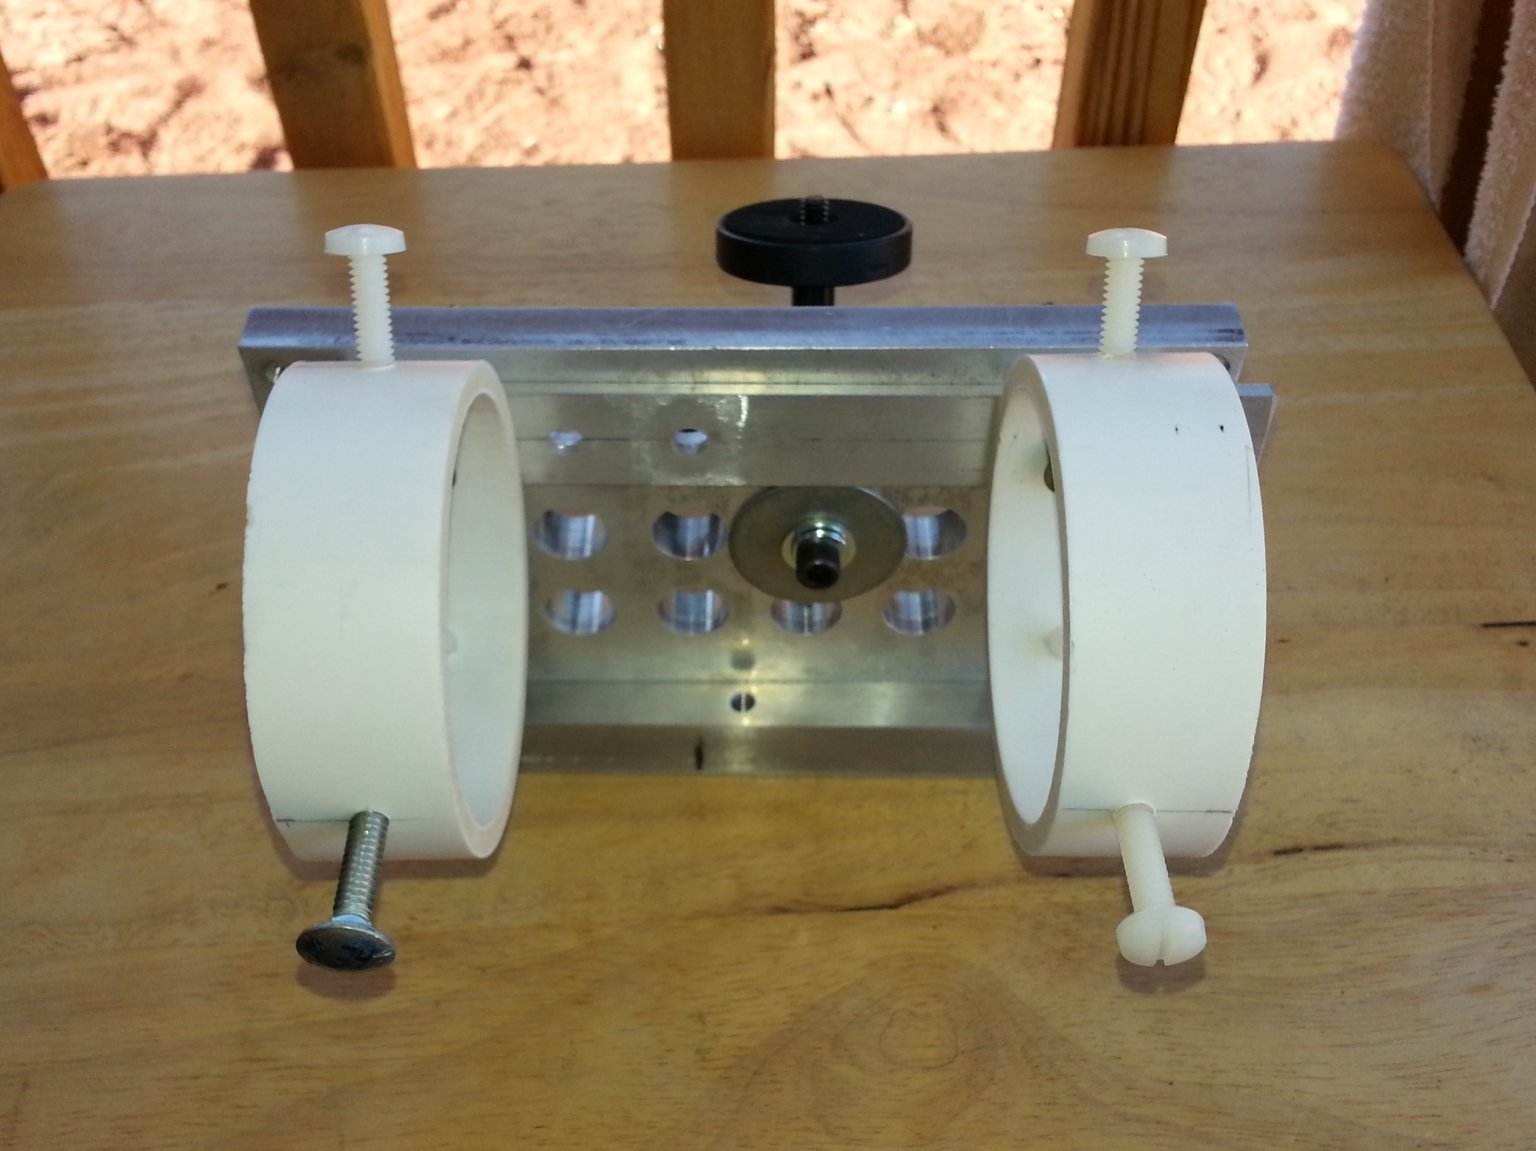 This photo shows the side of the unit with the rings for mounting the guidescope. I made my own rings, but a commercially made mounting could also be used if you have one. My rings are made from pieces cut from a PVC pipe. Three
holes were drilled and tapped in each ring for 1/4-20 nylon alignment screws. A fourth hole was drilled for mounting the ring. One of my nylon screws broke and I found an emergency replacement in a 14-20 carriage bolt.
This photo shows the side of the unit with the rings for mounting the guidescope. I made my own rings, but a commercially made mounting could also be used if you have one. My rings are made from pieces cut from a PVC pipe. Three
holes were drilled and tapped in each ring for 1/4-20 nylon alignment screws. A fourth hole was drilled for mounting the ring. One of my nylon screws broke and I found an emergency replacement in a 14-20 carriage bolt.
This view also shows that the scrap aluminum plate I used has numerous holes in it. That's the way I found it. I re-purposed the existing holes for mounting everything. Here you can see that the camera ball mount is attached
using a fender washer and a socket-head cap screw. The rings are attached with fender washers and wing nuts (see below). If you are using a blank plate with no
holes you really only need to drill three passage holes to mount everything. I just lucked out in finding this plate with lots of holes in it It let me experiment with placement of the parts.
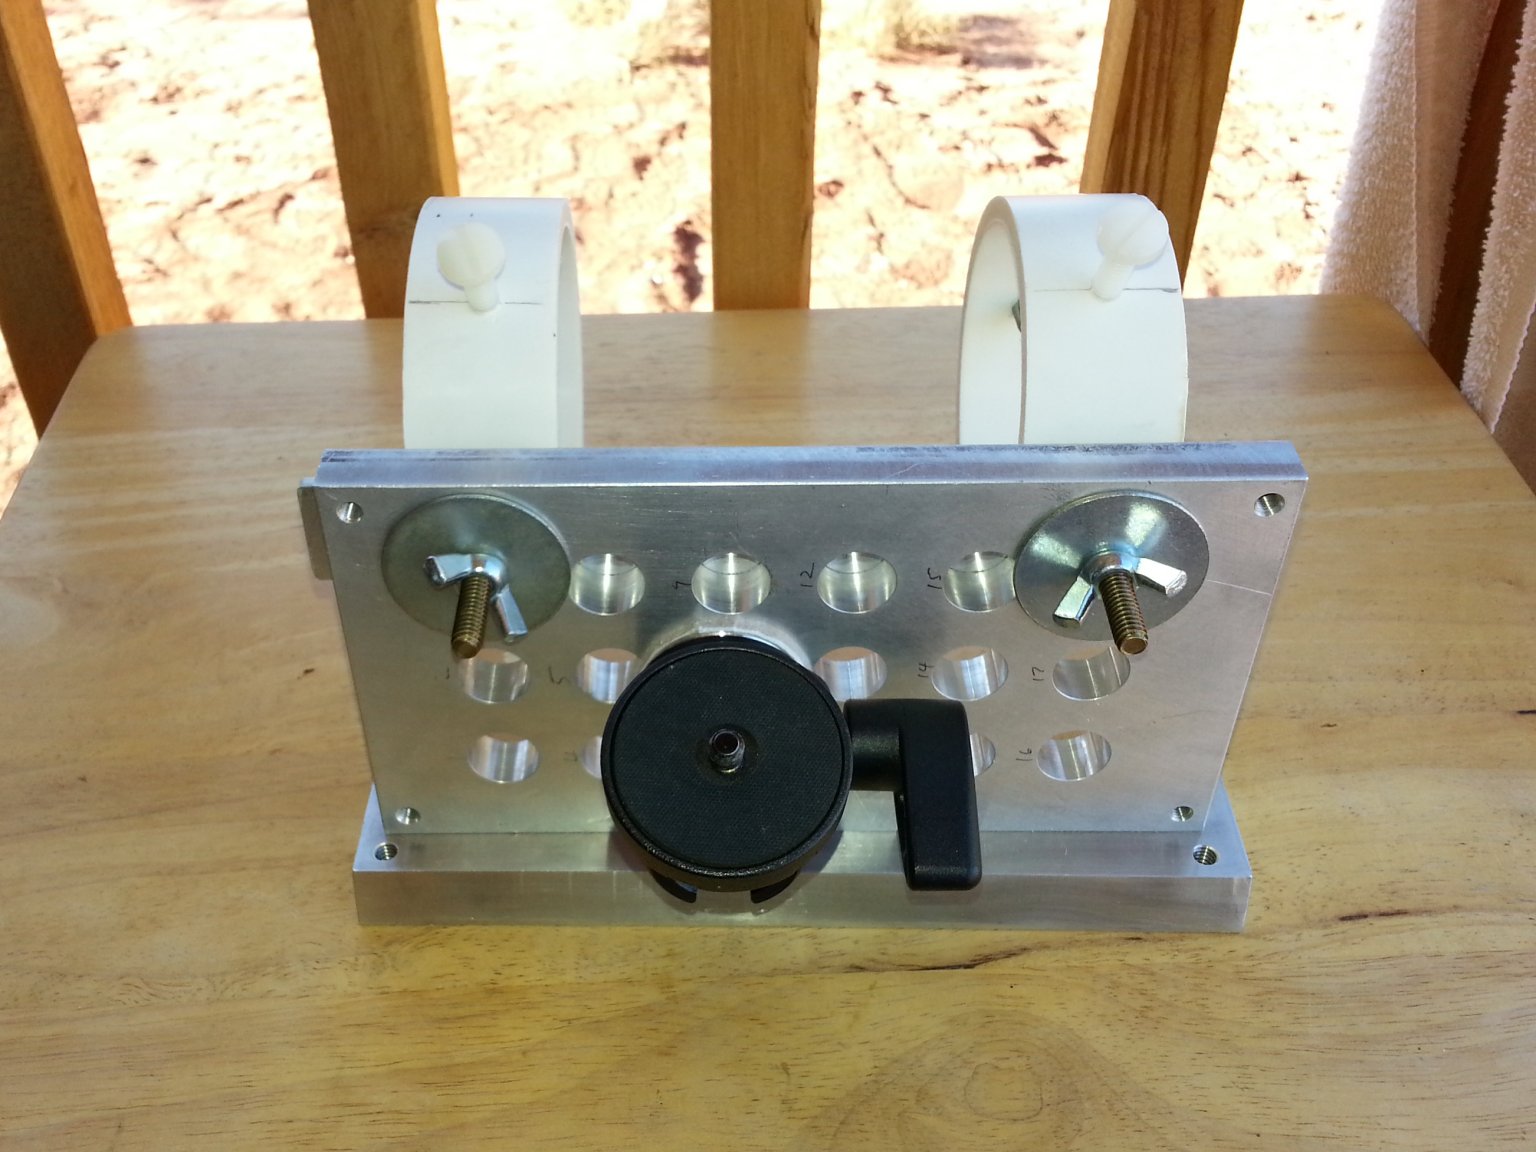 This view shows the camera ball mount attached to the other side of the unit. I used a large, heavy-duty, camera ball mount capable of holding a full size DSLR camera with a large and heavy lens attached without coming lose, not matter
how the unit is tilted or rotated. Rigidity is vital. The unit can't sag or droop under the weight of the camera and lens. So cheap and wimpy mounts won't work.
This view shows the camera ball mount attached to the other side of the unit. I used a large, heavy-duty, camera ball mount capable of holding a full size DSLR camera with a large and heavy lens attached without coming lose, not matter
how the unit is tilted or rotated. Rigidity is vital. The unit can't sag or droop under the weight of the camera and lens. So cheap and wimpy mounts won't work.
In this photo you can also see the fender washers and wing nuts holding the rings in place.
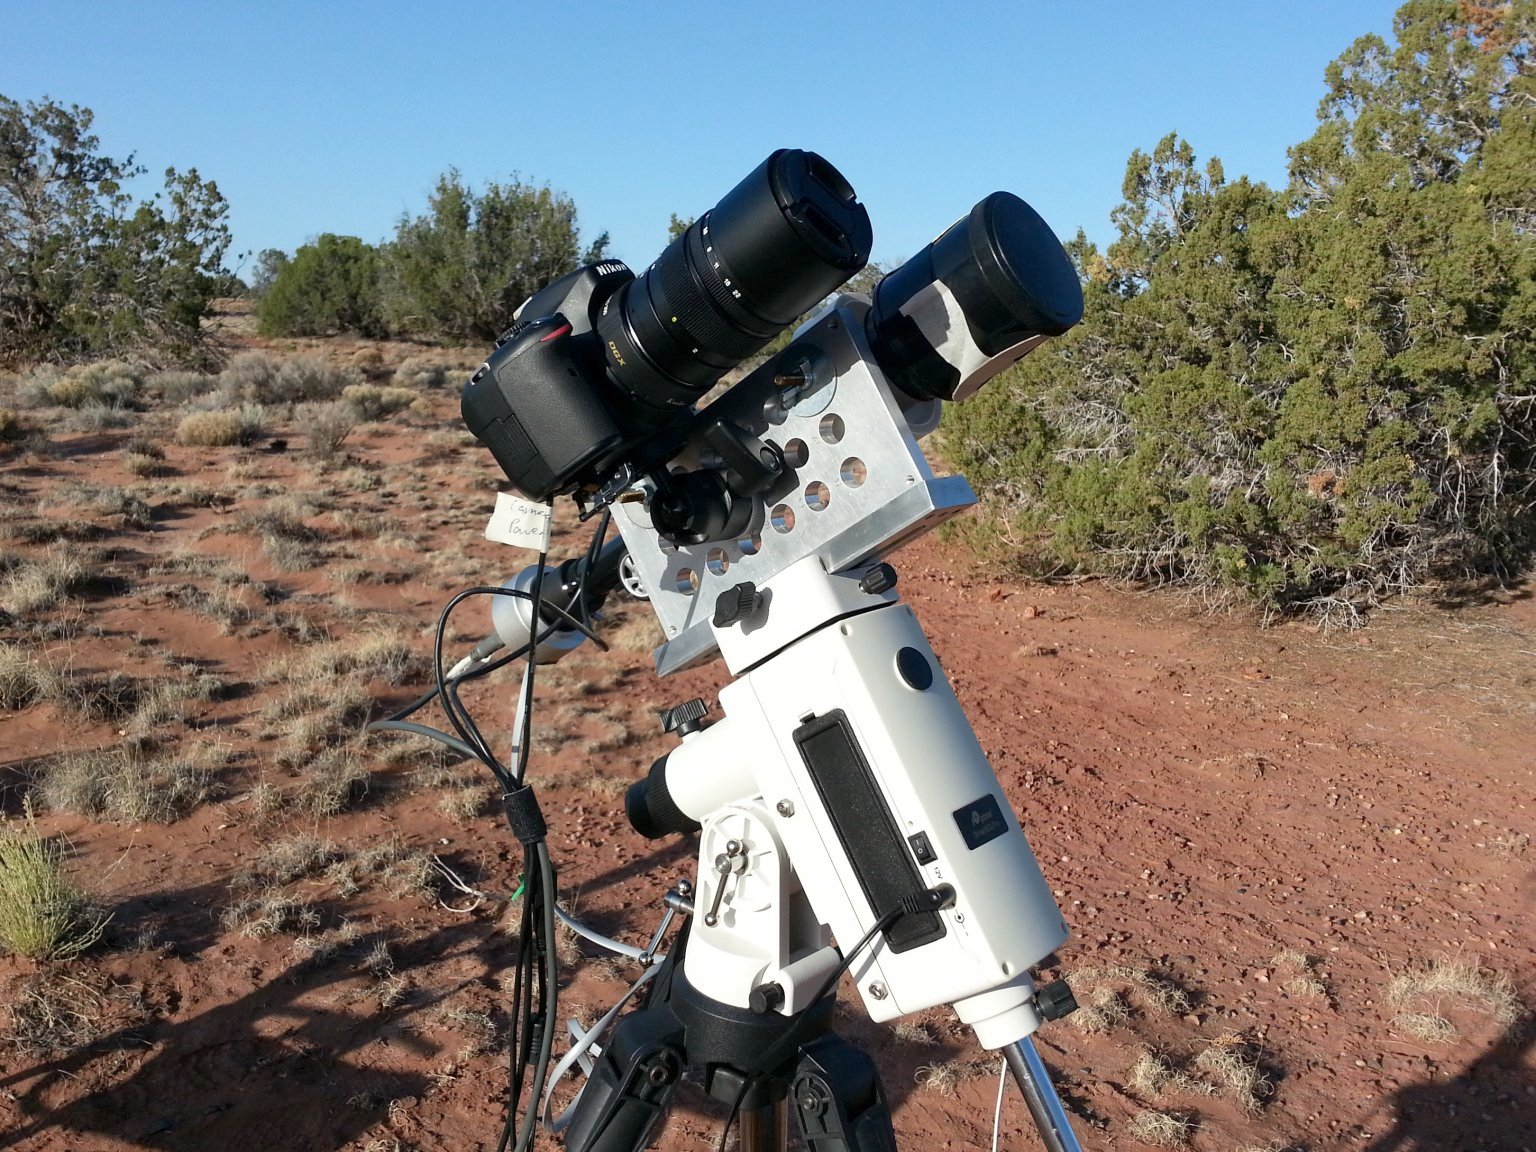
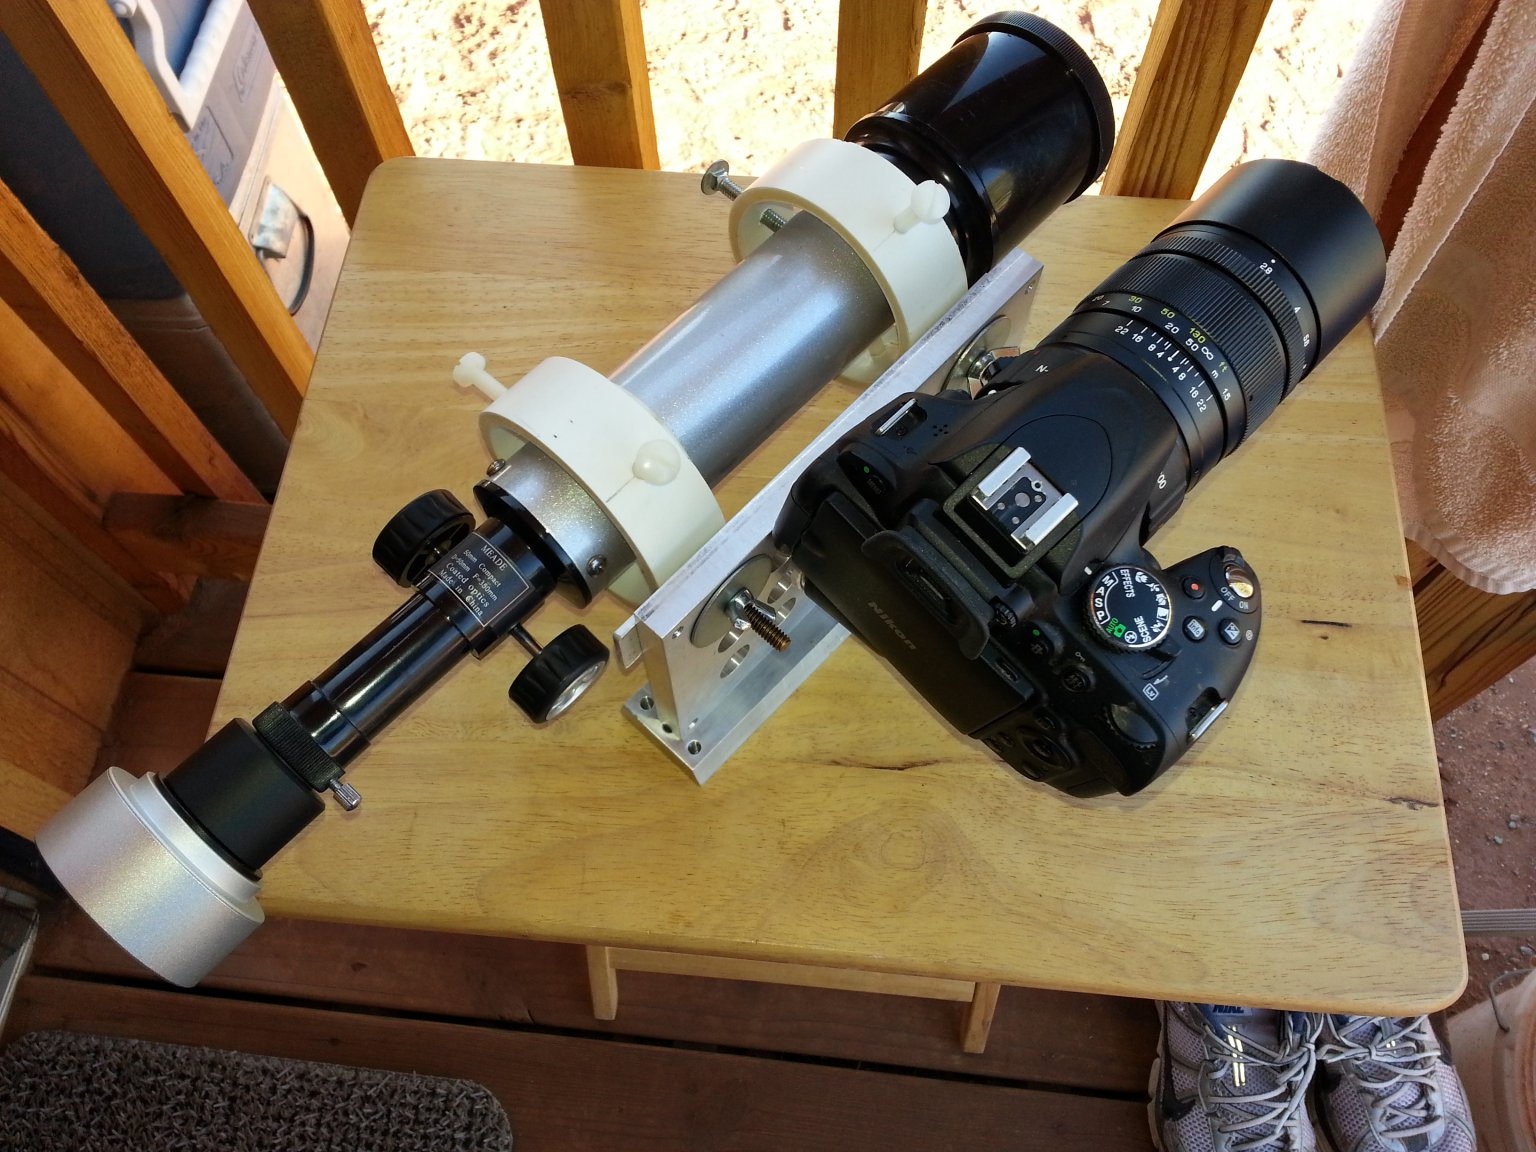 This photo shows camera, lens, guide scope and auto-guider camera mounted on the rig. My camera is a Nikon D5100. The lens is a large and heavy 135mm f/2.8 portrait lens. The guide scope is a cheap 50mm finder telescope. The
auto-guider camera is an Orion Starshoot. This guide scope and autoguider are the same ones I use piggybacked on my 4-inch telescope when I am doing prime focus astrophotography with it.
Click here to see some prime focus shots.
This photo shows camera, lens, guide scope and auto-guider camera mounted on the rig. My camera is a Nikon D5100. The lens is a large and heavy 135mm f/2.8 portrait lens. The guide scope is a cheap 50mm finder telescope. The
auto-guider camera is an Orion Starshoot. This guide scope and autoguider are the same ones I use piggybacked on my 4-inch telescope when I am doing prime focus astrophotography with it.
Click here to see some prime focus shots.
So here is the complete setup attached to the telescope mount. It is nice and light compared to my telescope with camera and guidescope attached. It is only lightly loading the mount, and the
balance point is low with nothing cantilevered out far, which is great for pointing accuracy and stability in light winds.
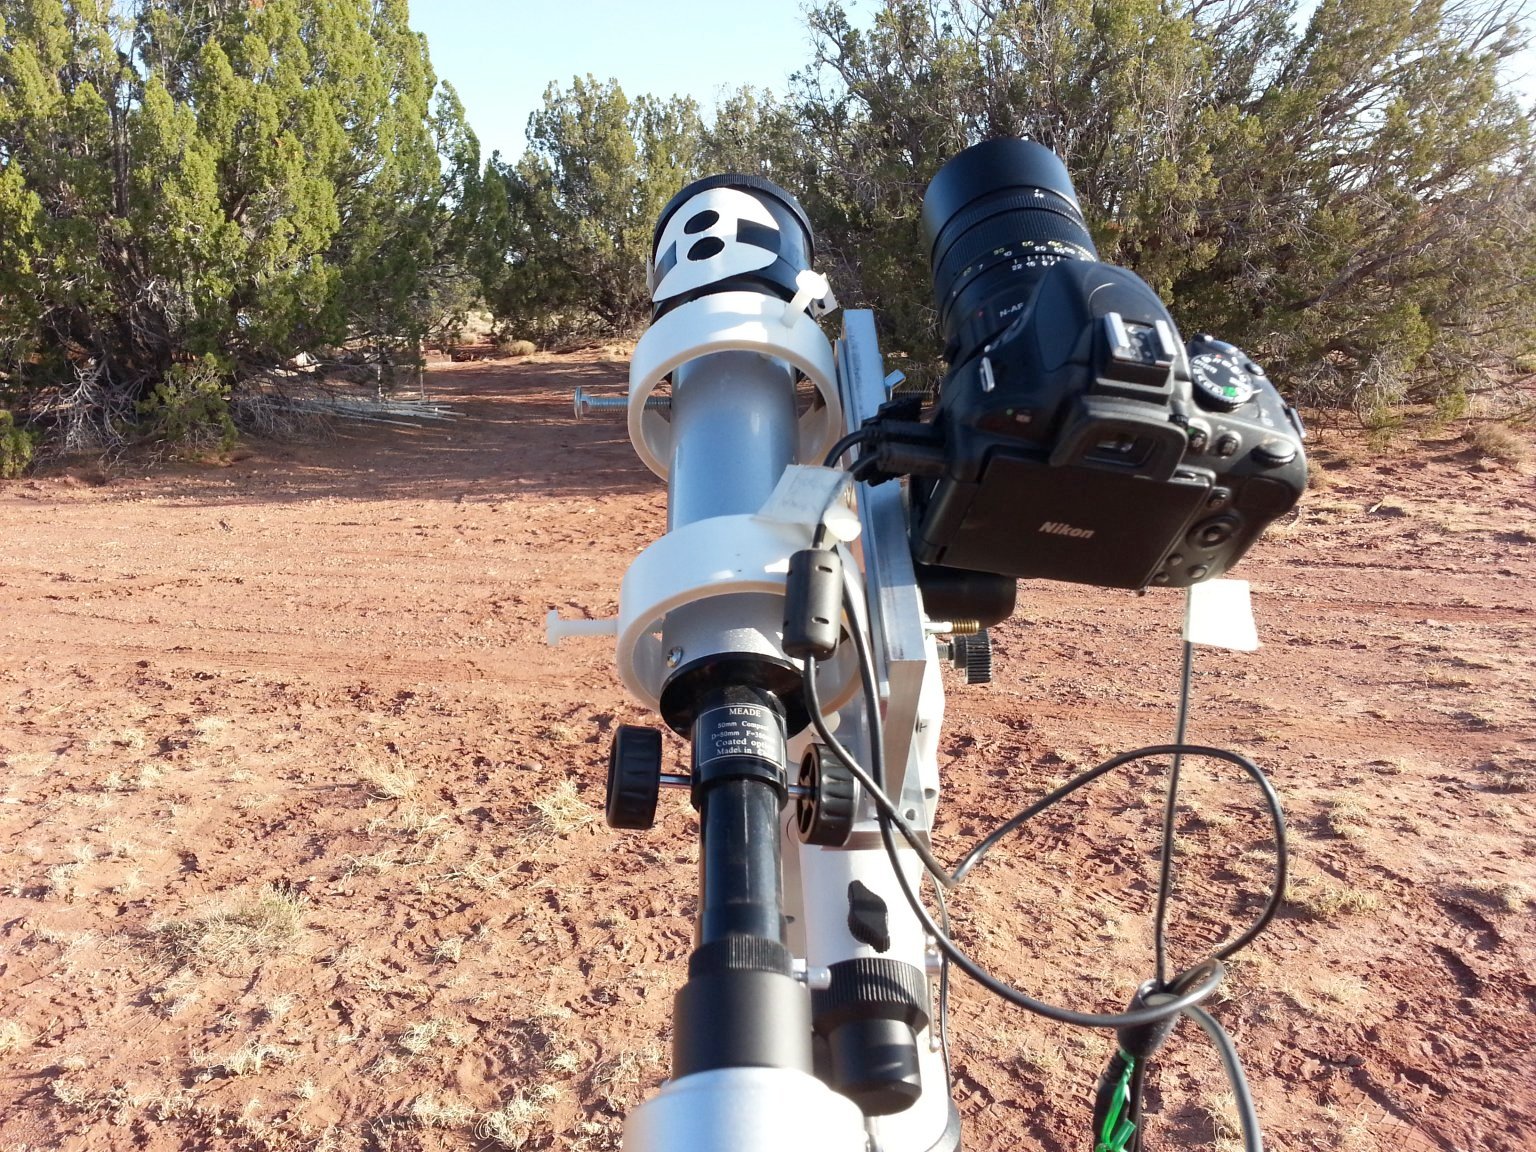 Here is a view from the south side of the mount. The cables coming from the camera are for power, data, and shutter release. The shutter release is connected to a DSUSB shutter controller
which plugs into a USB hub mounted lower on the tripod. The camera data cable also plugs into the USB hub. I have a power supply for my camera that I built myself, also mounted lower
down on the tripod. I wanted an external power supply for the camera for the dual reasons of not having to worry about the battery dying while imaging, and keeping the heat from the
discharging battery from warming the camera internals and contributing to image noise.
Here is a view from the south side of the mount. The cables coming from the camera are for power, data, and shutter release. The shutter release is connected to a DSUSB shutter controller
which plugs into a USB hub mounted lower on the tripod. The camera data cable also plugs into the USB hub. I have a power supply for my camera that I built myself, also mounted lower
down on the tripod. I wanted an external power supply for the camera for the dual reasons of not having to worry about the battery dying while imaging, and keeping the heat from the
discharging battery from warming the camera internals and contributing to image noise.
In this and the blow photo you can also see the focus mask I use to get the guidescope into focus. The idea behind the two hole mask is simple. When the scope is out of focus there are
two images of every star. When it is close to in focus the two stars merge into one elongated star. I can then tweak the focus while looking at the image and data in the autoguider
software on my laptop computer. I use the same two-hole method for rough focusing my telescopes when doing prime focus astrophotography.
 This view from the north shows the guiding cable going from the autoguider to the mount, and the USB data cable from the autoguider going down out of view. I have a USB hub mounted lower
down on the tripod where the all The USB cables go. A single USB cable goes from the hub back to the table where my laptop computer normally sits. I also have a power supply for my camera
and a DSUSB shutter controller mounted on the tripod. Everything is powered by a large, deep-cycle, 12V battery that can last through several nights of imaging.
This view from the north shows the guiding cable going from the autoguider to the mount, and the USB data cable from the autoguider going down out of view. I have a USB hub mounted lower
down on the tripod where the all The USB cables go. A single USB cable goes from the hub back to the table where my laptop computer normally sits. I also have a power supply for my camera
and a DSUSB shutter controller mounted on the tripod. Everything is powered by a large, deep-cycle, 12V battery that can last through several nights of imaging.
In this view you can see the wide-open expanse I have to the south from where I set up the telescope mount. I have an unobstructed southern view almost to the horizon. East is nearly as good
with a relatively large juniper tree partly obstructing the NE horizon. West is not so good with several large juniper trees obstructing the view below about 30 degrees above the horizon.
Still I can track most objects from the time they rise in the east until they are about 30 degrees above the western horizon.
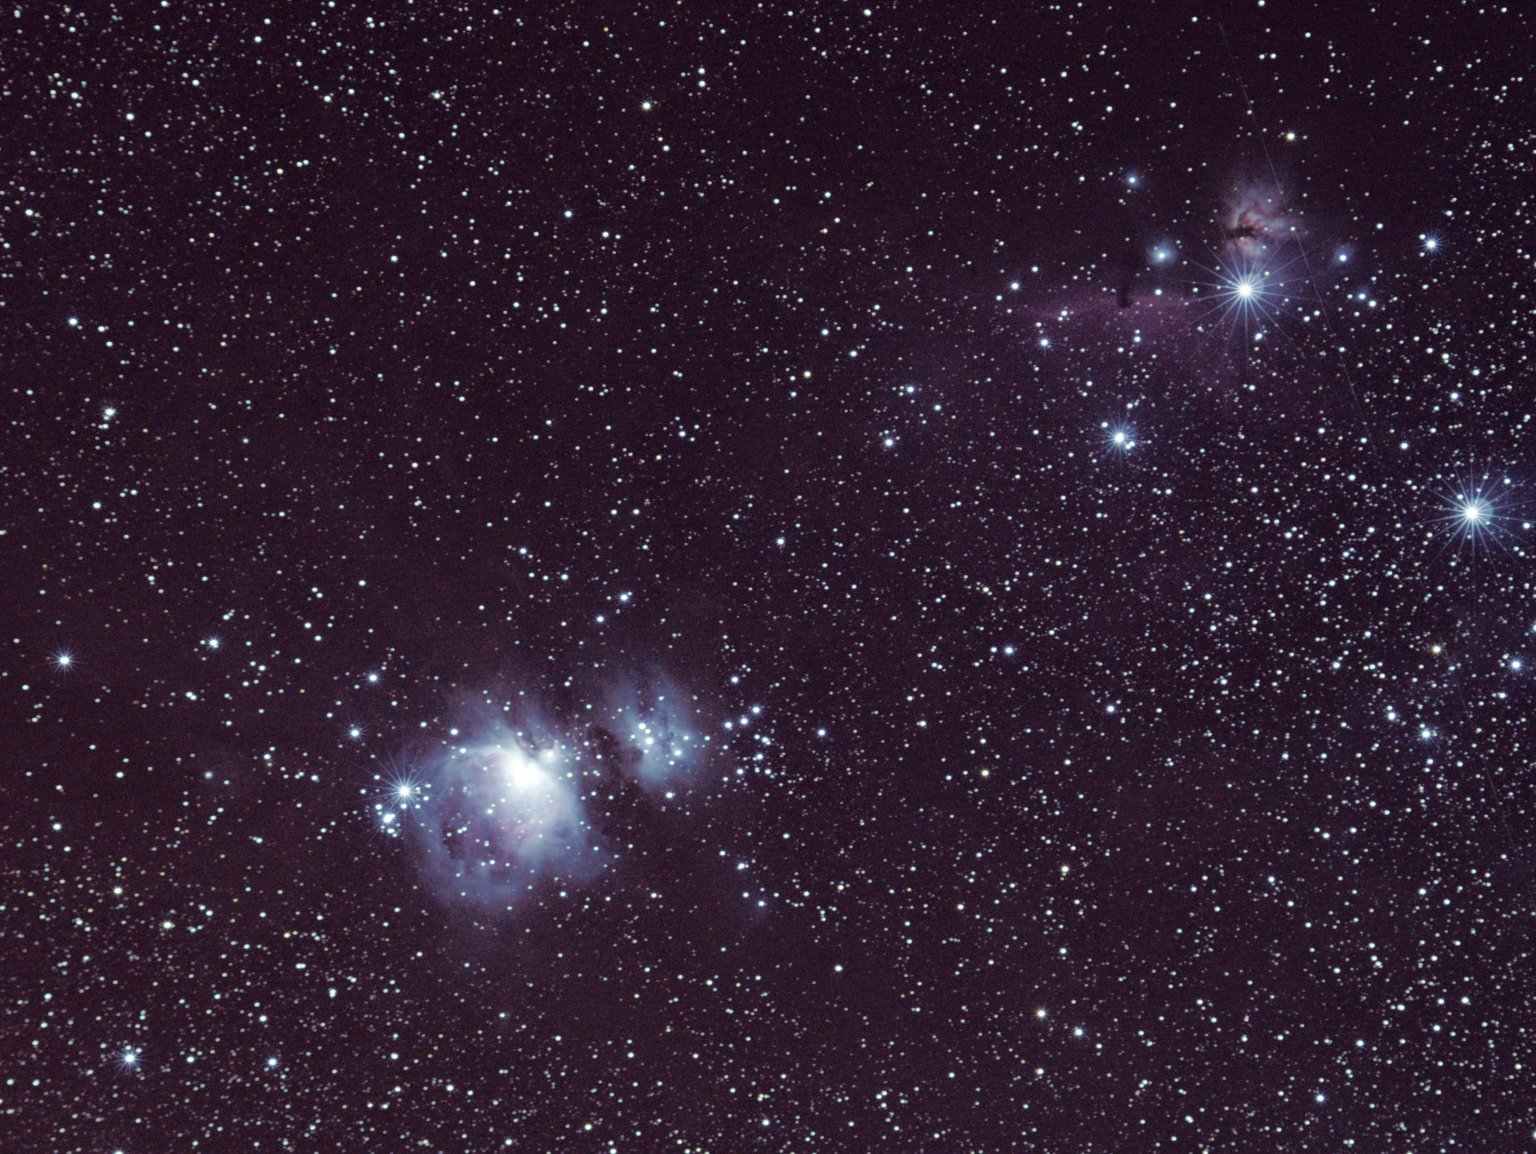 So what kind of images can I take with this rig? Well here is one of the constellation Orion taken with the 135mm lens. It is a stack of individual one minute exposures. From lower left to
upper right are The Orion Nebula, The Running Man Nebula, The Horsehead Nebula and The Flame Nebula. Not too shabby, if I do say so myself.
So what kind of images can I take with this rig? Well here is one of the constellation Orion taken with the 135mm lens. It is a stack of individual one minute exposures. From lower left to
upper right are The Orion Nebula, The Running Man Nebula, The Horsehead Nebula and The Flame Nebula. Not too shabby, if I do say so myself.
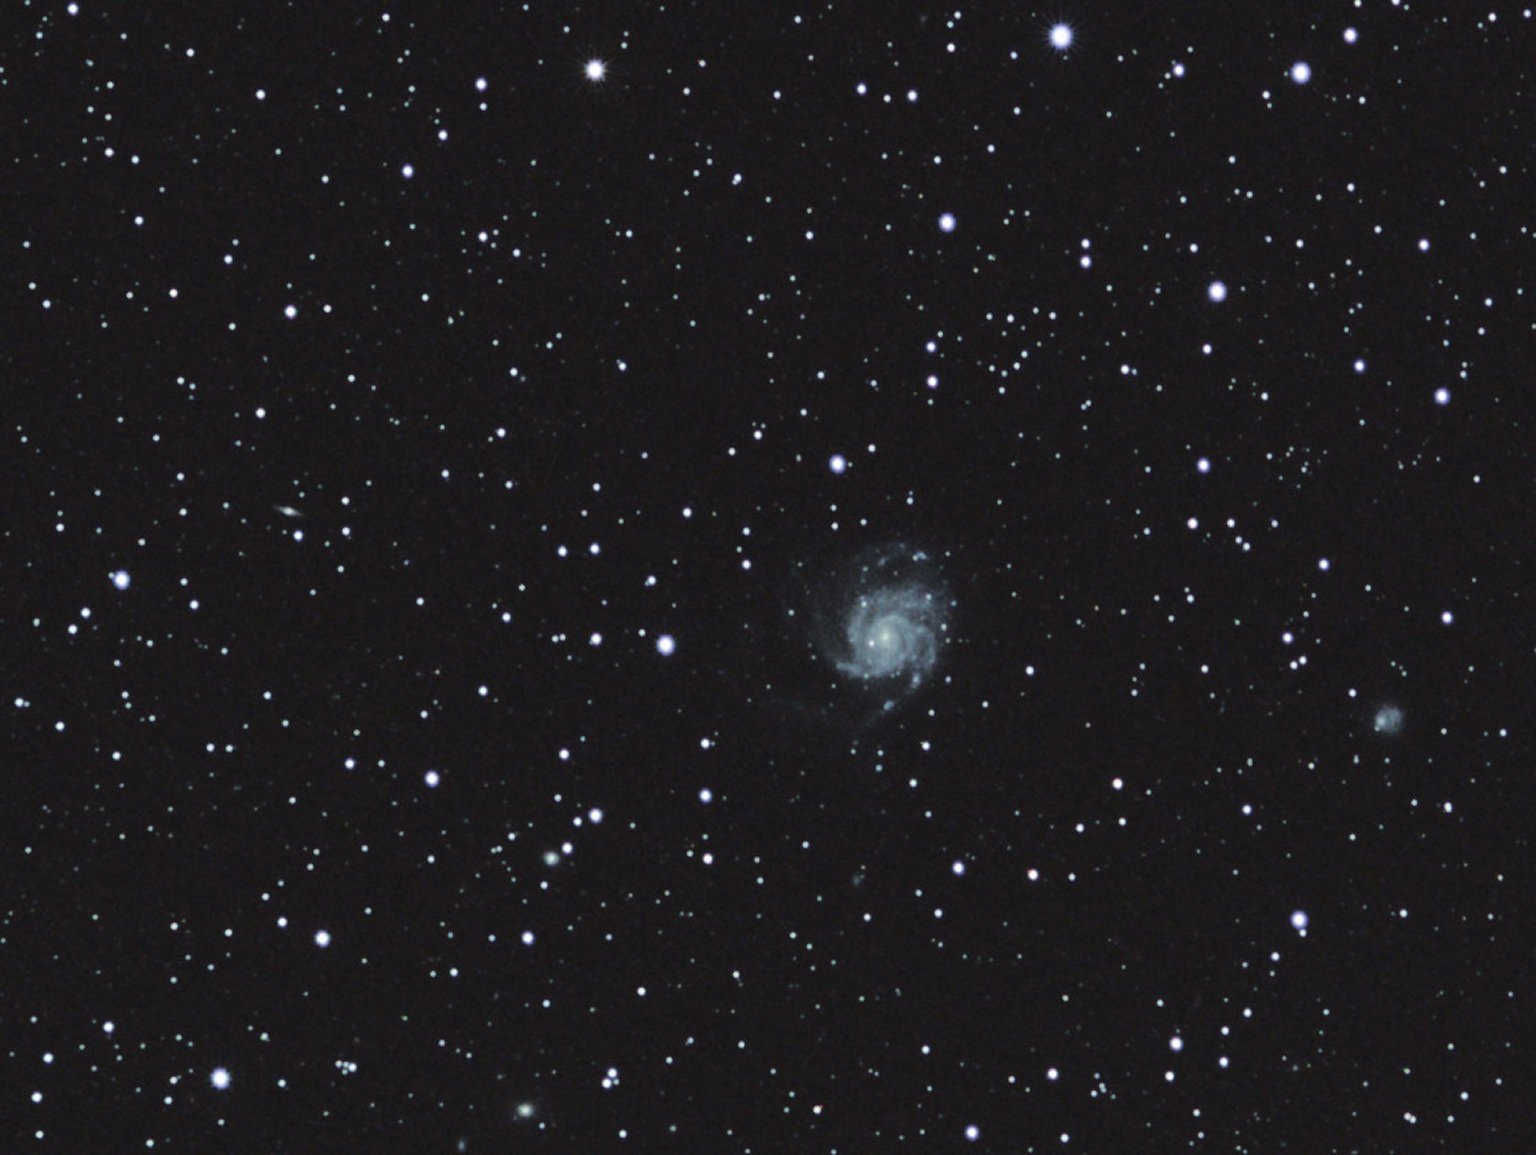 Here is an image of the galaxy M101 and several of it's companions and background galaxies. This is a stack of three minute exposures. The focus is a bit soft in this photo. I was still figuring
out how to get to perfect focus with the camera lens.
Here is an image of the galaxy M101 and several of it's companions and background galaxies. This is a stack of three minute exposures. The focus is a bit soft in this photo. I was still figuring
out how to get to perfect focus with the camera lens.
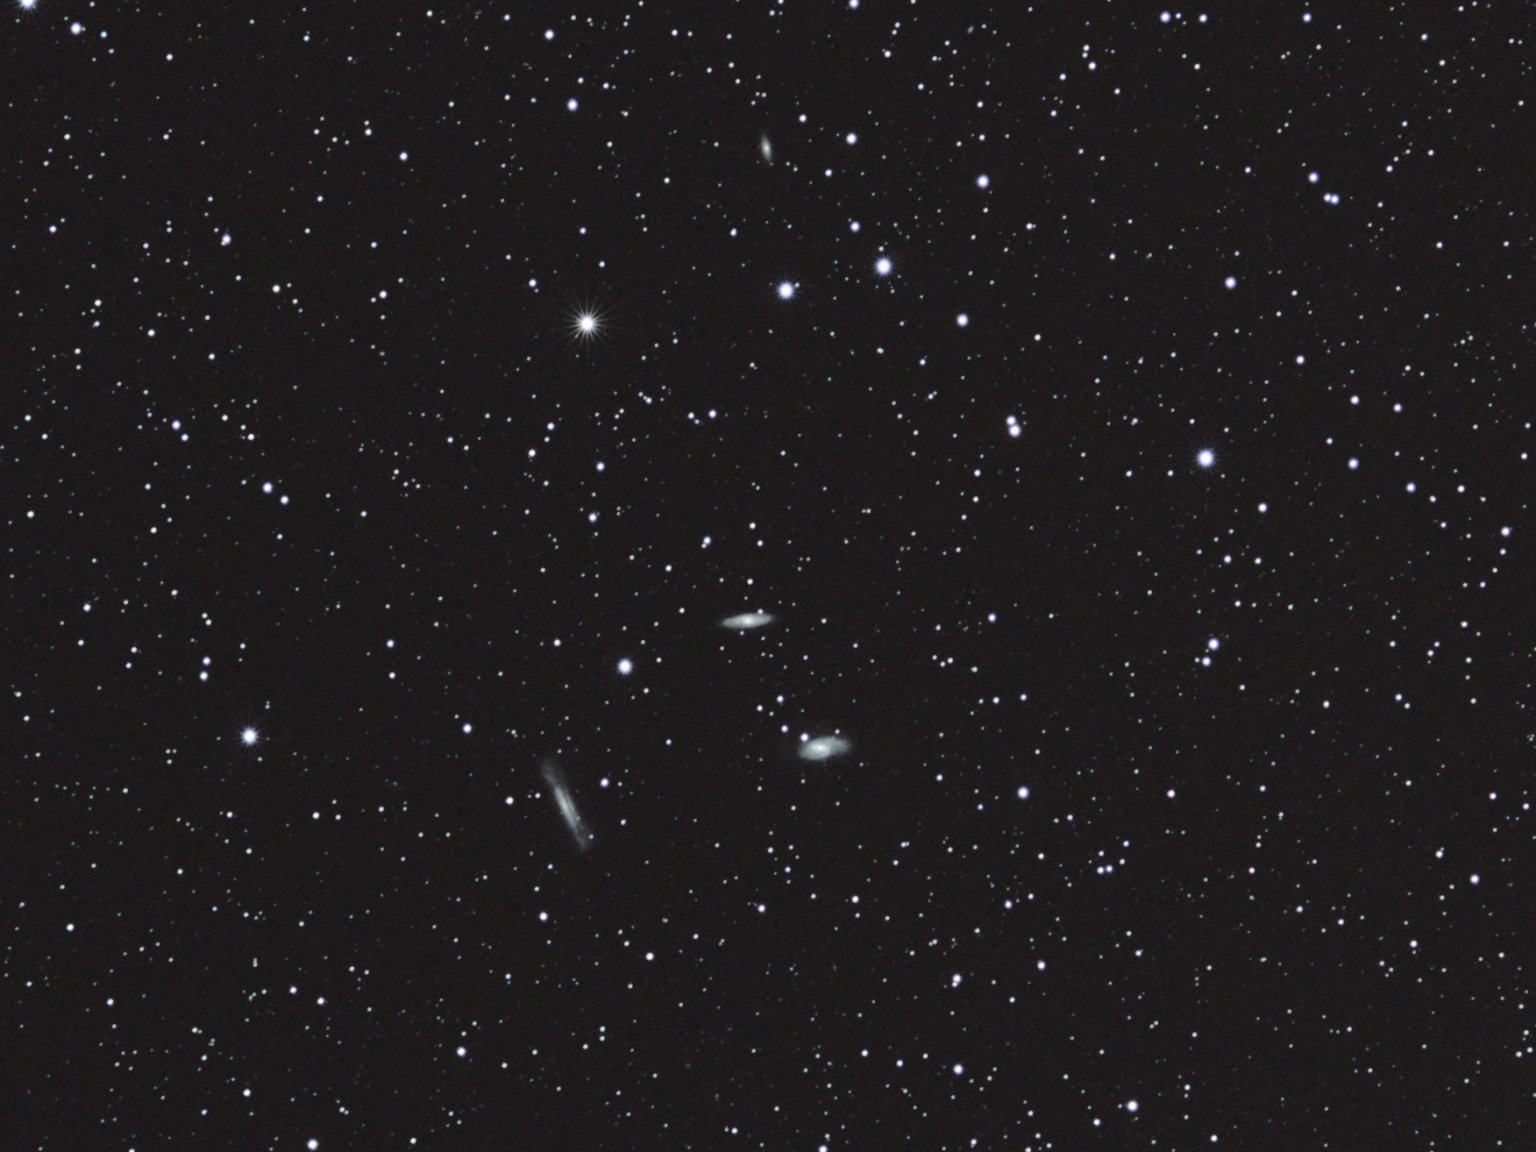 Here is an image of the Trio in Leo with another nearby galaxy in the field. Again the focus is a bit soft.
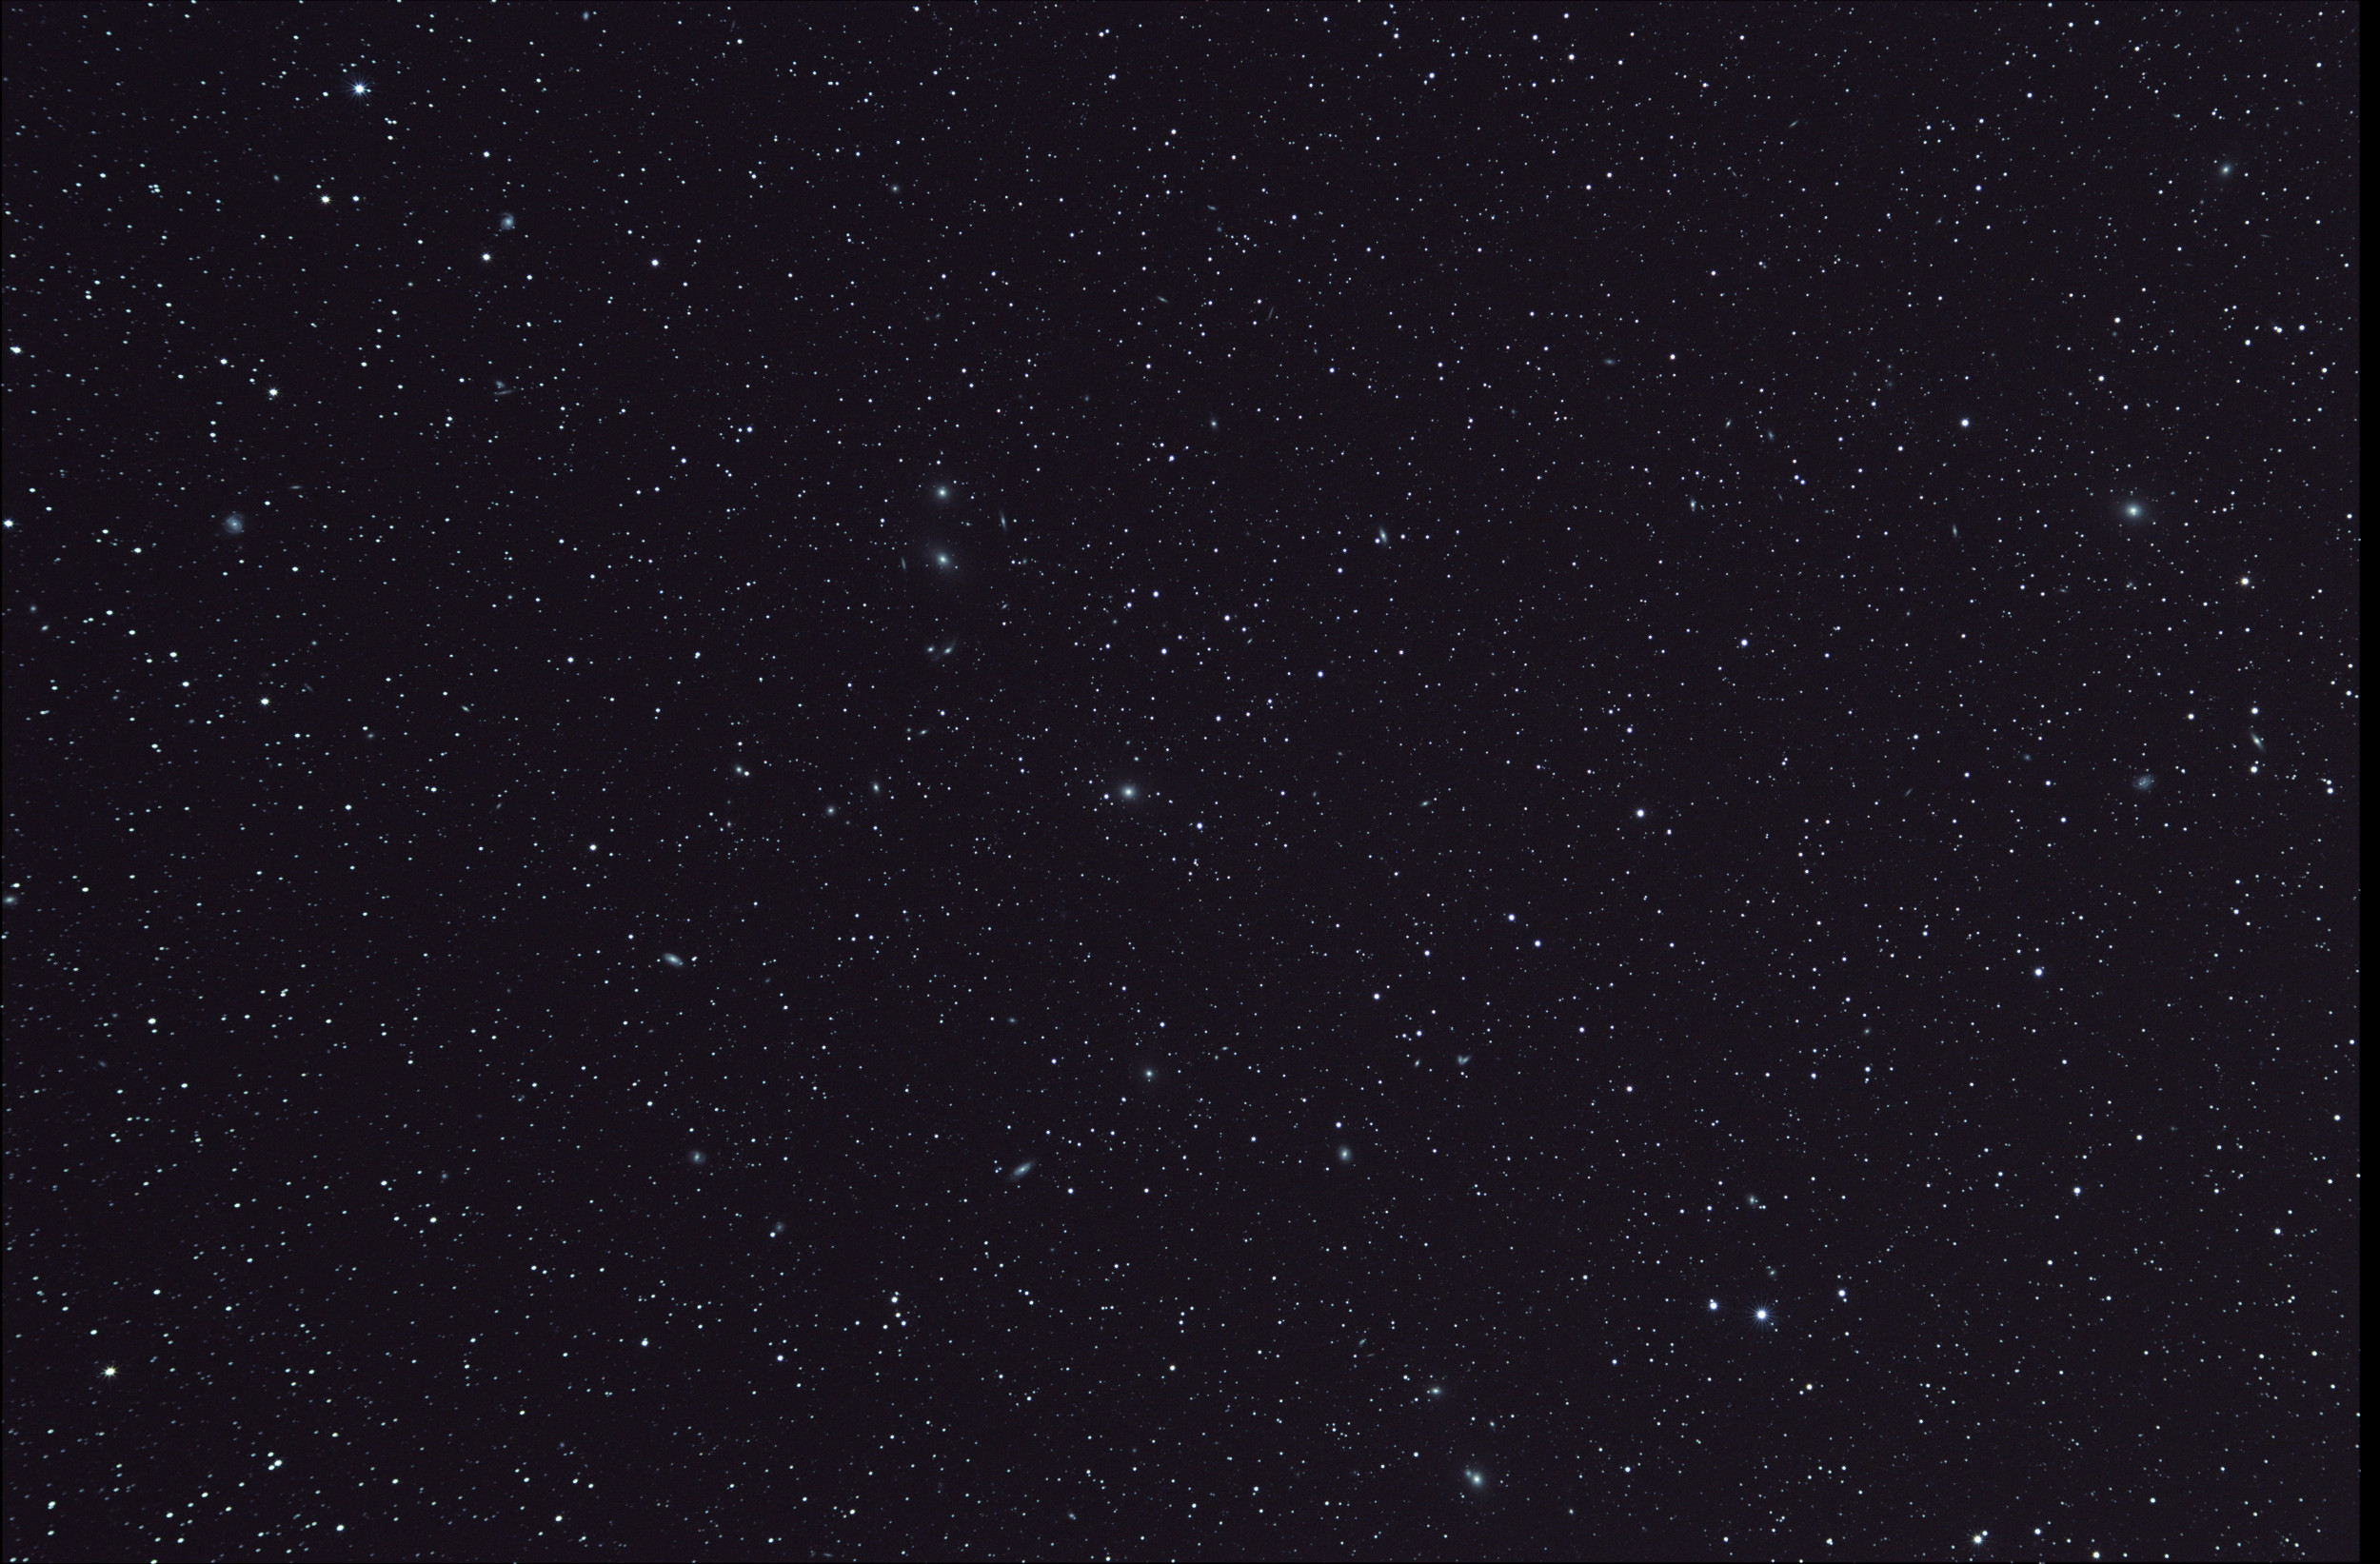 This is a very large photo and may take a while to download. I did not resize it this image like I have the others. It is a wide-field view of the Virgo Galaxy Cluster centered on M86. This image
contains hundreds of galaxies. Zoom into it and scroll around. The number and variety of galaxies visible in this one image is amazing. It really blew me away. I plan on doing an even deeper
wide-field image of of the Virgo Cluster again in the future.
This is a very large photo and may take a while to download. I did not resize it this image like I have the others. It is a wide-field view of the Virgo Galaxy Cluster centered on M86. This image
contains hundreds of galaxies. Zoom into it and scroll around. The number and variety of galaxies visible in this one image is amazing. It really blew me away. I plan on doing an even deeper
wide-field image of of the Virgo Cluster again in the future.